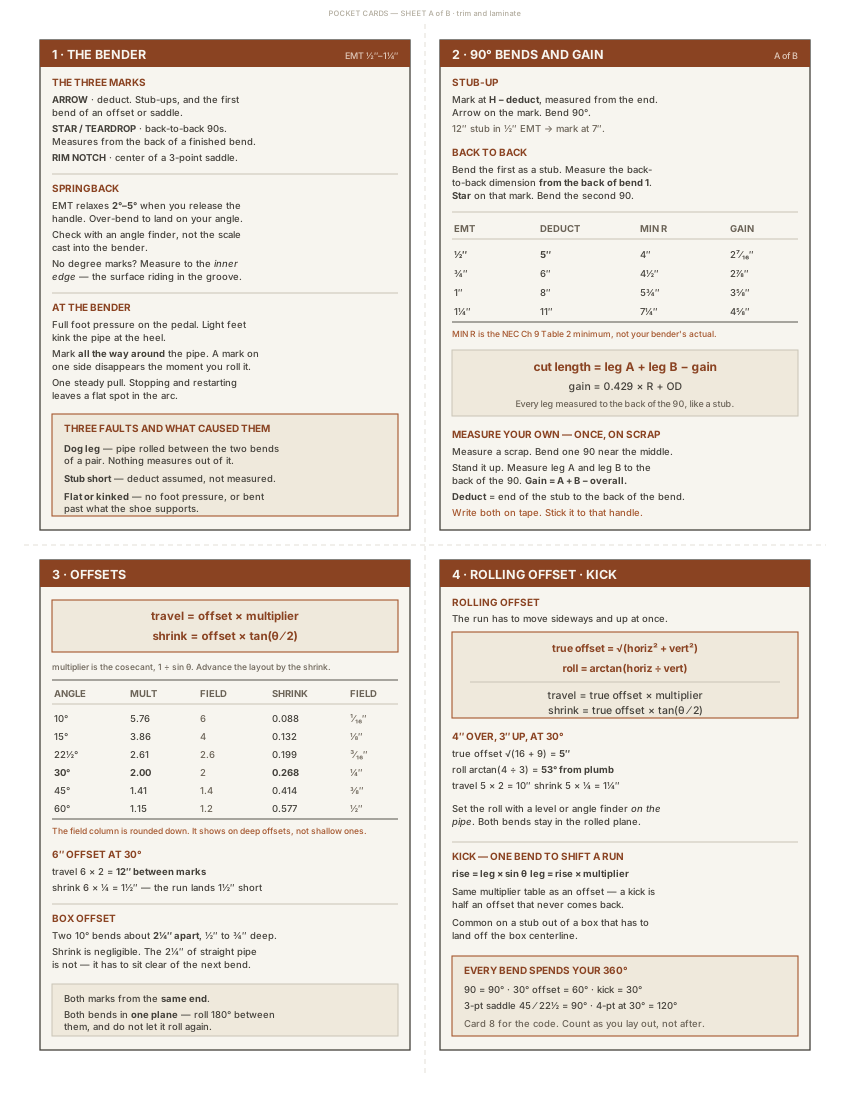
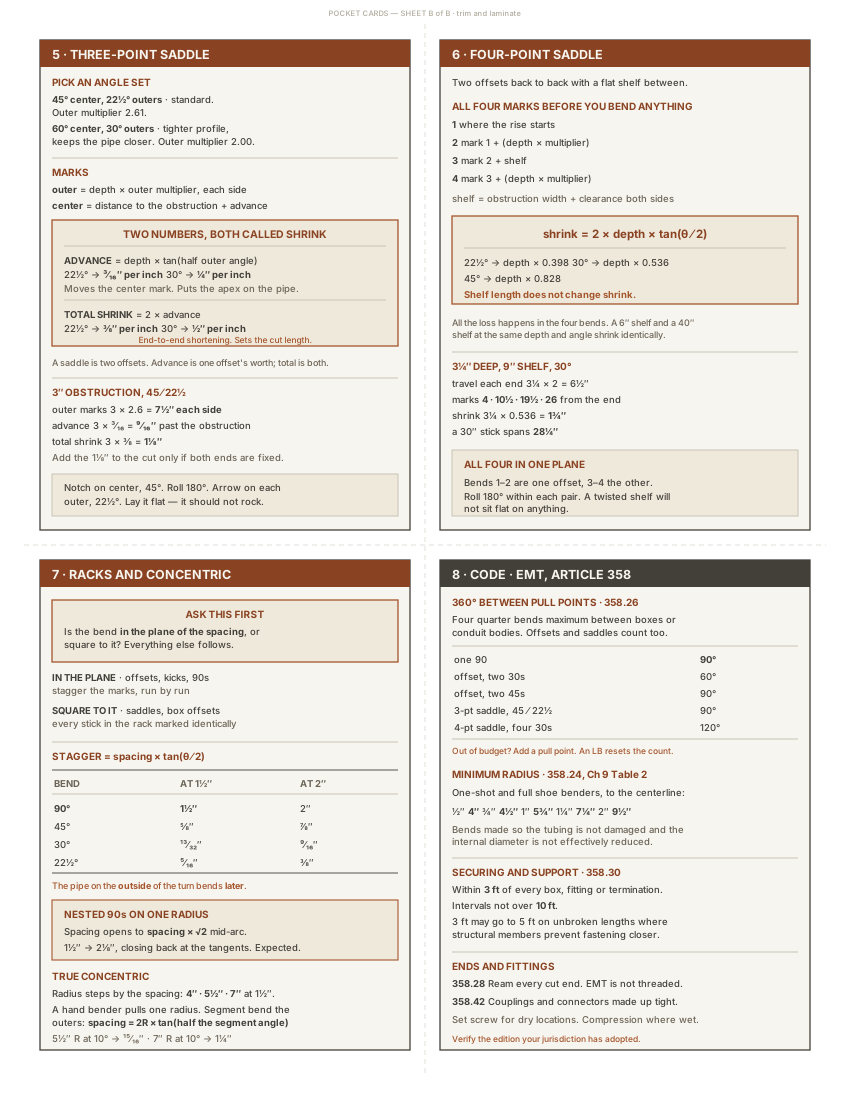
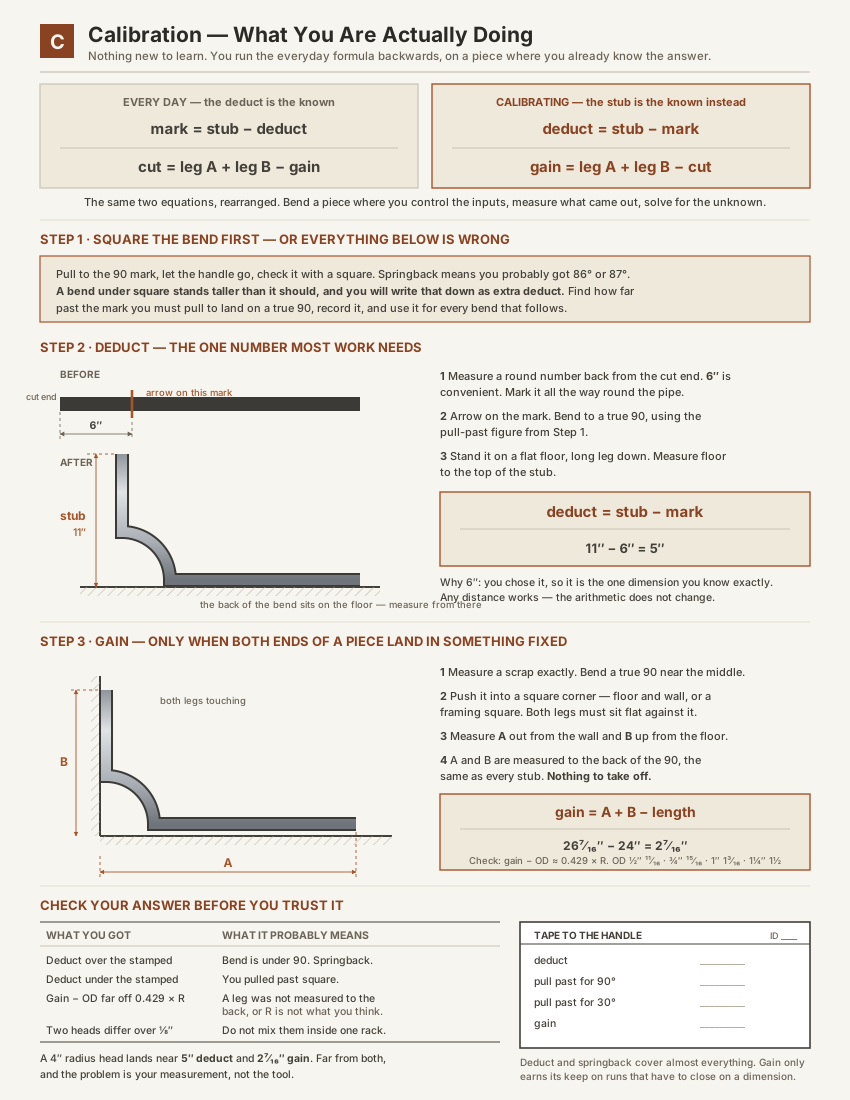
EMT hand bending · 1/2" conduit
Bending Lab Book
Nine hands-on labs, from your first box offset to the Rev K wall. Work through them in order, at your own pace. Each lab ends with a sign-off, and you don't start the next one until your instructor signs it.
Every lab sheet
Goal, what you need, the numbers explained before you use them, numbered steps, how to tell it's right, and what to check when it isn't.
Labs 4 to 8
Part A and B on scrap. Part C is your team's real Rev K pieces, worked out for the joint submittal. Nothing gets cut until the submittal is signed.
The clips
Short sections of Mel's videos (The Art of Conduit Bending, Holmz Law), matched to the steps. Watch them before you bend.
Lab 1
Box offsets (the start)
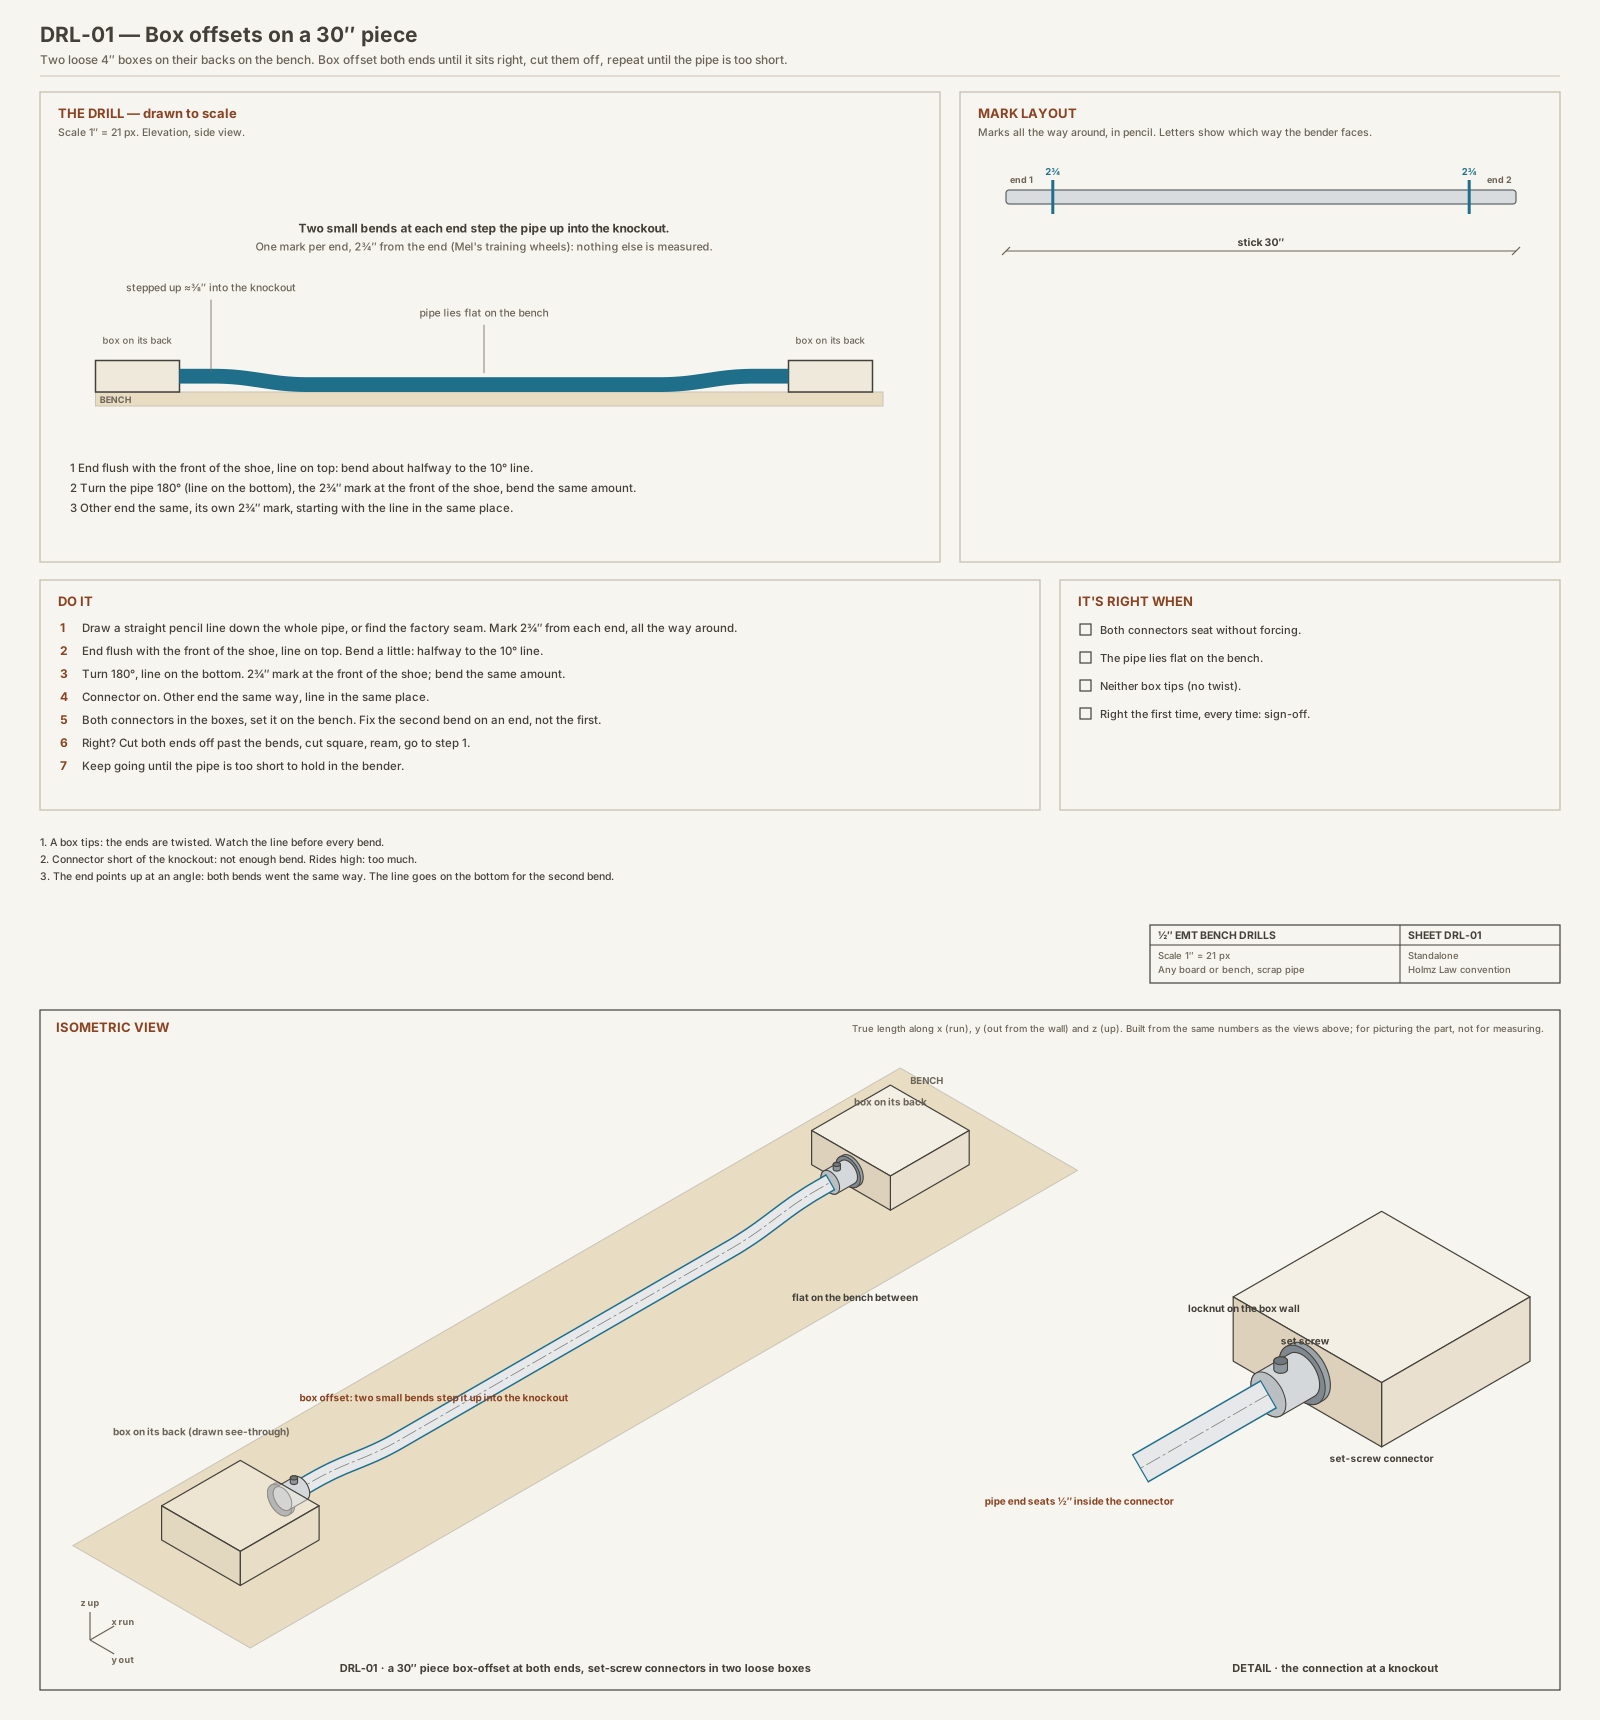
Goal: get the feel of the bender. Bend box offsets on both ends of a piece until it sits right in two boxes. Cut them off and do it again until the pipe is too short to bend. One mark goes on the pipe (Mel's "training wheels"); nothing else is measured. You are learning what a bend feels like.
You need: two 30" pieces of 1/2" EMT, a 1/2" hand bender, a pencil, a hacksaw, a reamer, safety glasses, gloves, and two loose 4" square boxes with 1/2" connectors, lying on their backs on the bench.
What a box offset is: a box's knockout sits a little up off the surface the box is mounted on. A box offset is two small bends that step the pipe up that little bit, so the pipe can lie flat and still go straight into the box. On most boxes the knockout sits 3/8" up; some sit 5/8" or 3/4" (Mel).
Steps
- Draw a straight pencil line down the whole pipe, or find the factory seam. It keeps both ends pointing the same way. Then mark 2 3/4" from the end, all the way around: Mel's training-wheels mark for the second bend.
- Put one end in the bender, flush with the front of the shoe, with the line on top.
- Bend a little. The bottom of the pipe should stop about halfway to the 10° line. If it felt like a real bend, it's too much.
- Turn the pipe 180° so the line is on the bottom. Slide it in until the 2 3/4" mark is at the front of the shoe, and bend the same amount.
- Put a connector on that end.
- Do the other end the same way: its own 2 3/4" mark, starting with the line in the same place as step 2.
- Put both connectors into the boxes and set it down on the bench.
- It's right when both connectors seat without forcing, the pipe lies flat on the bench, and both boxes sit flat without tipping.
- If it isn't right, fix the second bend on that end, not the first.
- When it sits right, cut both ends off just past the bends, cut square. Ream both ends and go back to step 1.
- Keep going until the pipe is too short to hold in the bender. Then start the second piece.
The math behind it (for when box sets have to match)
A box offset is an ordinary offset with a tiny rise: the rise is how far the knockout sits off the surface (3/8" on most boxes, 5/8" or 3/4" on some). Two equal bends at angle θ step the pipe up by the rise when the bends are this far apart:
- Distance between bends = rise ÷ sin θ. 1 ÷ sin θ is the multiplier cast on the shoe.
- Mel's way (Box Sets Pt. 1): bend both to 10°. Multiplier 1 ÷ sin 10° = 5.76. For a 3/8" knockout: 0.375 × 5.76 = 2.16, call it 2 1/8" between the marks. Each mark goes at the front of the shoe, not the arrow (the hook needs pipe to grab).
- Why the training-wheels 2 3/4" works: with the marks 2 3/4" apart, the angle that lifts 3/8" is sin⁻¹(0.375 ÷ 2.75) = 7.8°. That is a bit short of the 10° line, which is why Mel says to stop about halfway to it. Making the first bend flush with the front of the shoe, with no mark, keeps the box offset close to the end: a tighter box set than the common shop marks of 2" to the first bend and 4 1/4" to 4 1/2" to the second.
- Shrink is too small to matter: a 3/8" offset at 10° shrinks 0.375 × tan 5° = 0.033", about 1/32".
| Knockout rise | Marks apart at 10° (rise × 5.76) | Angle with marks 2 3/4" apart |
|---|---|---|
| 3/8" | 2 1/8" | 7.8° |
| 1/2" | 2 7/8" | 10.5° |
| 5/8" | 3 5/8" | 13.1° |
| 3/4" | 4 5/16" | 15.8° |
The multipliers tradesmen use for any offset (1 ÷ sin θ) and the shrink per inch of rise (tan of half the angle):
| Angle | Multiplier | Shrink per inch of rise |
|---|---|---|
| 5° | 11.47 (Mel: 11.4) | 0.044" |
| 10° | 5.76 | 0.087" (about 3/32") |
| 22 1/2° | 2.61 | 0.199" (about 3/16") |
| 30° | 2.00 | 0.268" (card: 1/4") |
| 45° | 1.41 | 0.414" (card: 3/8") |
| 60° | 1.15 | 0.577" (card: 1/2") |
On the job many electricians skip the marks once their hands know it, and some carry a one-squeeze box-offset bender (Greenlee's Little Kicker, up to 0.56" of offset). Learn it by hand first.
If it isn't sitting right
- A box tips: the two ends are twisted against each other. Watch the pencil line before every bend.
- A connector won't reach down into the knockout: not enough bend.
- A connector rides high over the knockout: too much bend.
- The end points up at an angle instead of running level: both bends went the same way. The line goes on the bottom for the second bend.
Sign-off: your instructor signs you off when your pieces sit right the first time, every time. No sign-off, no 90s.
Clips from Mel's videos
Each clip plays only the part of the video that matches the step.
Before Lab 2
The card
You start with a pencil and an index card, not a bender. Mel's rule is that bending is the easy part; the numbers are the hard part, so you learn them first.
1. Watch one video (11 min): How To Teach Yourself Conduit Bending.
2. Write this card by hand and keep it in your pocket.
| Offset angle | Multiplier | Shrink per inch of rise |
|---|---|---|
| 30° | 2 | 1/4" |
| 45° | 1.4 | 3/8" |
| 60° | 1.2 | 1/2" |
90° deduct: 1/2" EMT = 5", 3/4" EMT = 6", 1" EMT = 8". These are book numbers. In Lab 2 you find your own bender's real deduct and use that from then on.
3. Learn what each number does.
- Multiplier: an offset is two bends. Rise × multiplier = the distance between the two marks. A 4" rise at 30° is 4 × 2 = 8" between marks.
- Deduct: the bend itself adds length to the stub, so you mark short. A 10" stub on 3/4" EMT is marked at 10 − 6 = 4" from the end, and the arrow goes on that mark.
- Shrink: going up and over uses pipe, so the run comes up short by rise × shrink. A 4" rise at 30° shrinks 4 × 1/4 = 1". You add it to your measurement so the offset lands where you want it.
- Decimal to fraction: multiply the decimal by 8. 0.6 × 8 = 4.8, so about 5/8".
4. Work these on paper. Answers are below; cover them first.
- 30° offset, 5" rise. Distance between marks? Shrink?
- 45° offset, 6" rise. Distance between marks? Shrink?
- 60° offset, 3" rise. Distance between marks? Shrink?
- 12" stub on 1/2" EMT. Where is the mark?
- 16" stub on 3/4" EMT. Where is the mark?
- A box is 40" from the end of your pipe and 4" higher. 30° bends. Where do the two marks go?
5. Tomorrow: rewrite the card from memory, then write and solve 10 problems of your own. This is Module 1. When you can do it without the card, take the Module 1 test, then move to measuring in Module 2.
Answers: 1) 10", 1-1/4". 2) 8-3/8", 2-1/4". 3) 3-5/8", 1-1/2". 4) 7". 5) 10". 6) First mark at 40 + 1 = 41"; second mark 8" back toward the end, at 33".
Clips from Mel's videos
Each clip plays only the part of the video that matches the step.
Lab 2
Chart your bender
Goal: find out what your bender does with your pipe and your pull, and add the marks the shoe doesn't have. From here on you bend by your chart, not by the book.
Watch: Charting your Bender (39 min). Parts A–D follow it in Mel's order: center marks, gain and setback, radius, a 15° stop mark. Part E adds checks from his other videos.
You need: the 1/2" hand bender you'll keep using, about six 30" pieces of 1/2" EMT, a digital angle finder, a torpedo level, two straightedges (a level, strut, or straight pipe), a tape, a pencil, a paint pen or scribe for the shoe, and your card.
How the marks work
Every mark is cast into one shoe, built around one radius. There are two kinds:
- Position marks (arrow, star, notch) say where along the pipe the bend happens. The arrow is where a stub bend starts, the star is the back of a 90, and the notch is the center of a 45. They can only be off if the pipe doesn't follow the shoe exactly, and then they're all off together, by about the same amount. One test 90 checks all three.
- Degree lines (10, 22-1/2, 30, 45, 60) say how far to pull. The pipe springs back a little when you let off, and "parallel to the line" is your eye. So the lines aren't wrong; you're learning how far your pull has to go.
Part A · Center marks (Mel's step 1)
Mel adds a center mark for every bend he uses a lot. The shoe already has the 45 (the notch). Add 30 first, then 10, 22-1/2 and 60. Each piece also teaches you your pull on that line.
- Take a scrap, any length that's easy to bend. Mark it near one end. This mark goes on the arrow, and it's how you put the bend back in the shoe exactly where it was made.
- Put the mark on the arrow. Pull toward 30 with your weight under control, no jerking, so you can stop when you want. Stop when the bottom of the pipe is parallel to the 30 line, just above it, not touching it.
- Read it with the angle finder and write it down (example: "30 line = 28°"). Put it back on the mark and finish to exactly 30°. Mel checks his with a torpedo level and goes back for a little more. How far past (or short of) the line you had to go is your pull for that line.
- Lay the bend flat on the bench. Hold a straightedge along one straight leg and draw a line across the bend. Do the same from the other leg. The middle of the X is the center of the bend. Mark it all the way around.
- Put the piece back in the bender exactly as it was: first mark on the arrow, pipe at the angle you bent.
- Where the center mark lines up with the shoe, mark the shoe and label it ("30C"). Mel etches his with a grinder; a paint pen works.
- Do steps 1–6 again for 10°, 22-1/2°, 60° and 45°. Your 45 X should land on the notch. If it doesn't, your X is off, not the notch: redraw it more carefully before you trust your other center marks.
Part B · Gain, deduct and setback (Mel's step 2)
- Measure a fresh piece and write its exact length down (example: 30"). You have to know the length before you bend.
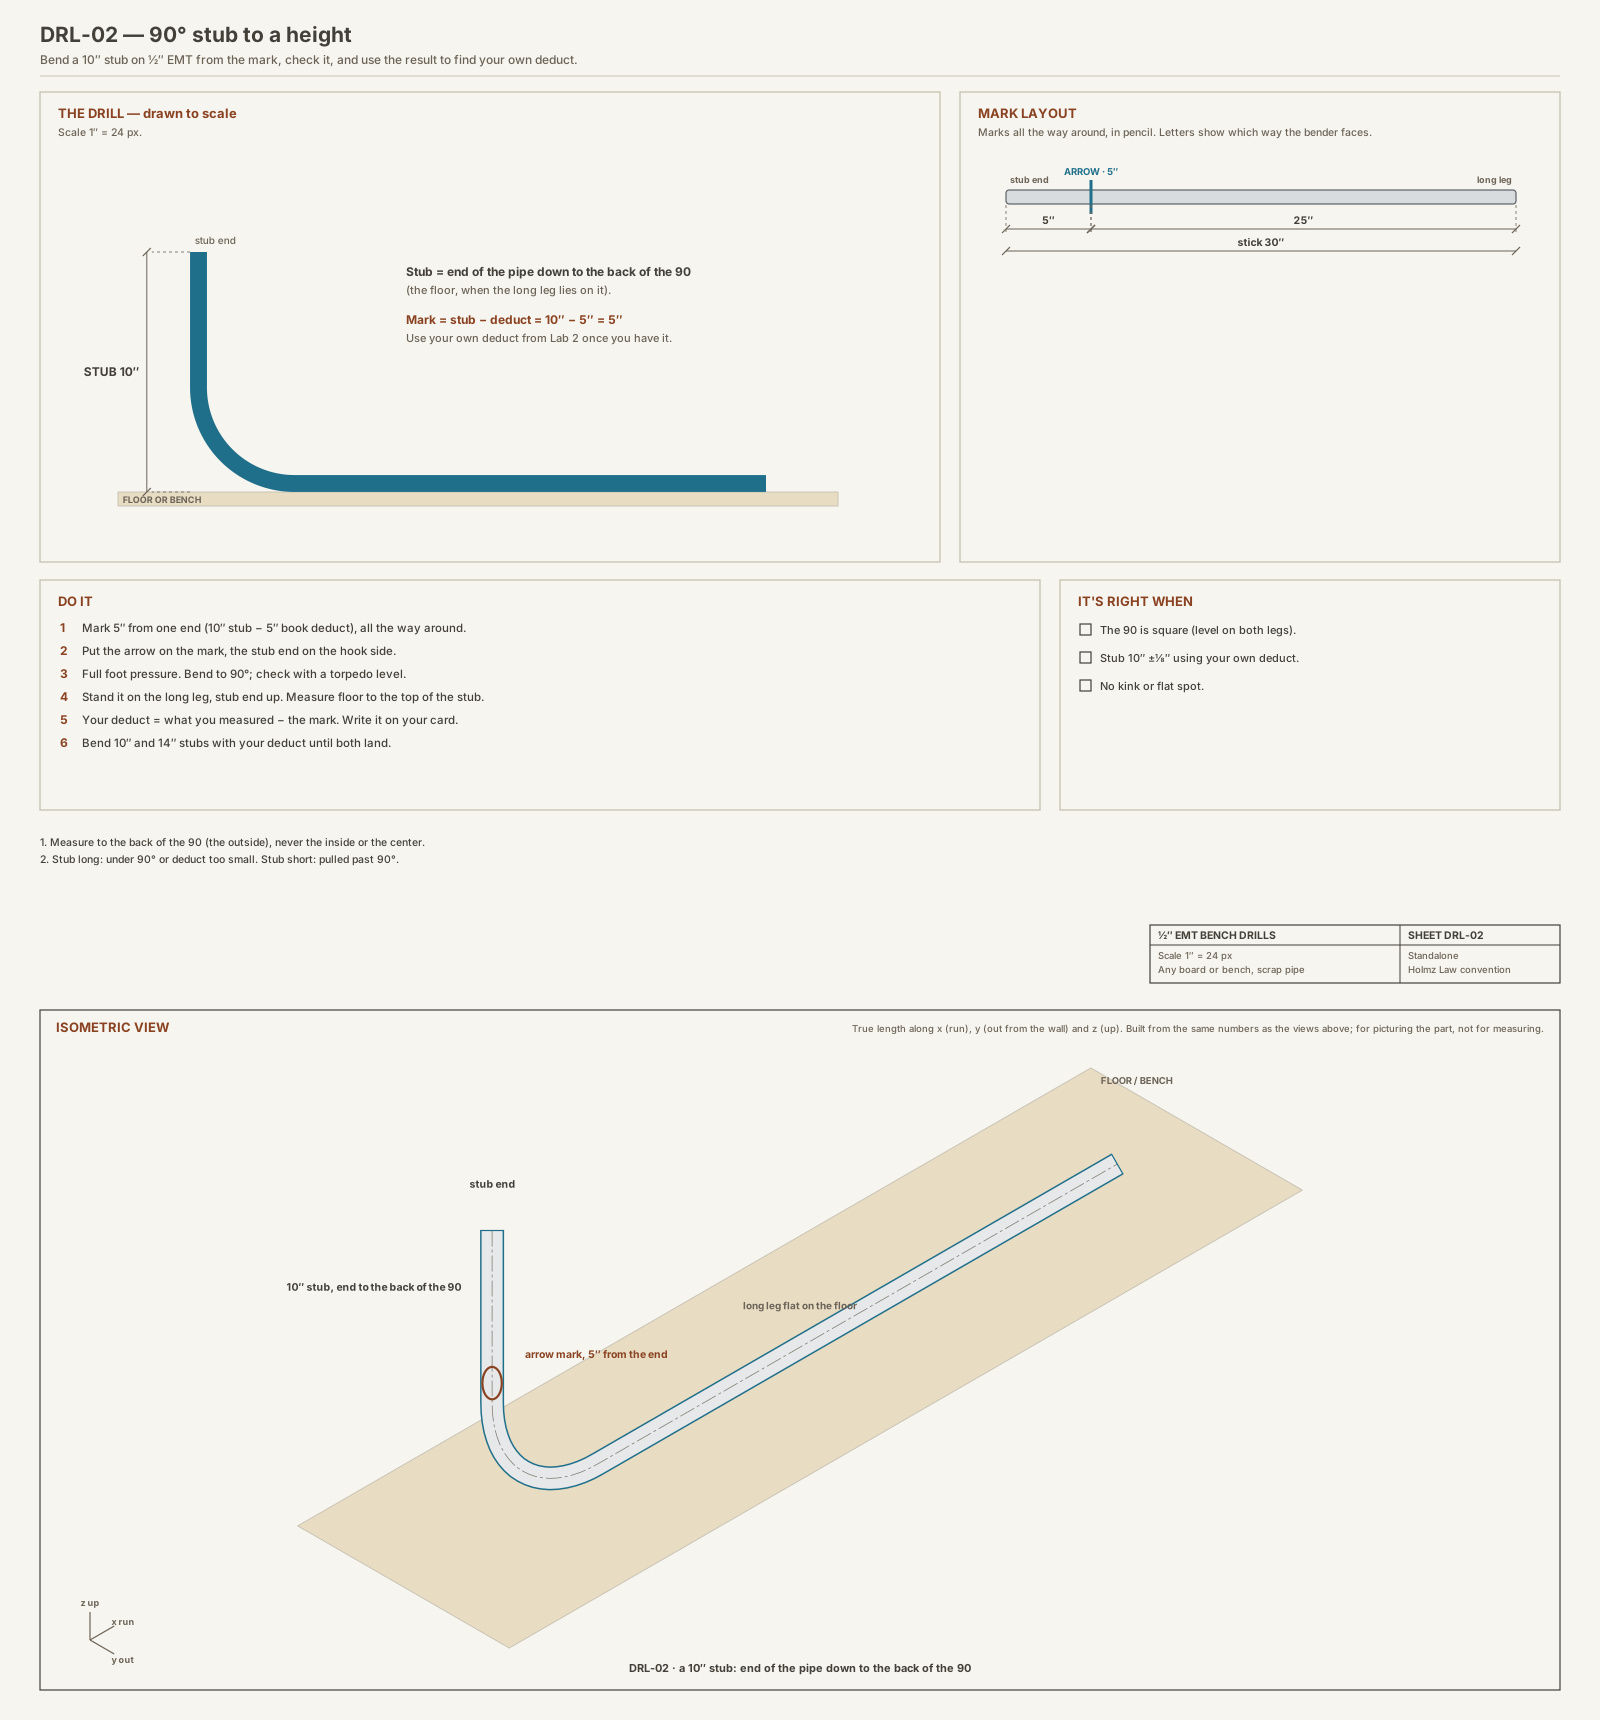
- Mark it 5" from one end. Mel puts his scrap in the bender anywhere; you put the arrow on 5", the book deduct for 1/2" EMT, so the same 90 also gives your deduct. Before you bend, also mark the pipe right at the front of the hook; you need it in Part E.
- Bend a true 90 and check it with the torpedo level. Past a certain point, step to the side, keep hold of the handle, push with your foot and lift the stub.
- Write down the bender make and size and the length from step 8. Lay a straightedge against each leg and measure to it: the leg (the long side) and the stub (the 5" end). Both are measured to the back of the 90.
- Gain = leg + stub − the length from step 8. Mel's 3/4" Klein: 17-1/2 + 15-1/8 − 29-3/4 = 2-7/8". Yours on 1/2" EMT should be about 2-7/16". Benders of the same model can differ by 1/8"; that's why you chart yours.
- Deduct = stub − 5". If the stub reads 10", your deduct is 5". If it reads 10-1/8", your deduct is 5-1/8", and the star and notch run about 1/8" the same way.
- Setback = deduct − gain. Mel: 6 − 2-7/8 = 3-1/8". It locates the back of the 90 from your mark, so you can lay out a second bend before the first one is made.
Part C · Radius (Mel's step 3)
You need the radius to bend one 90 around another, and for the checks in Part E.
- Lay the test 90 from Part B flat. On each leg, mark where the pipe starts to lift off the surface. Those are the start and end of the bend.
- Measure straight across between the two marks, at the center of the pipe, not the inside. That's the chord. Mel hooks his tape at 1" and takes the inch off. His chord: 7".
- Radius = 0.707 × chord. Mel types sin 45 × chord into his phone; sin 45 is 0.707. His: 4.94, which he calls 5". On 1/2" EMT expect about 4".
Part D · A stop mark for 15° (Mel's last trick)
- Mark a fresh piece, put the mark on the arrow and bend exactly 15°, checked with the angle finder.
- Leave it in the bender and mark the shoe where the bottom of the pipe reaches. Label it "15". Next time, bend until the pipe reaches that mark. It's a stop mark, not a center mark.
Part E · Prove the bender makes the math (from Mel's other videos)
Every number you'll use from now on (deduct, gain, multipliers, shrink) assumes the pipe bends around a known radius, with each bend's center landing where you think. This part proves it for your bender. The charting video doesn't cover it; the clips come from his other videos.
- Front of hook. On the test 90, measure from the front-of-hook mark you made in step 9 to the start-of-bend mark from step 15. Write it down; it never changes for this bender.
- Check gain against the radius. Your Part B gain was measured to the back of each leg. Subtract the pipe's outside diameter (1/2" EMT: 0.706") to get the gain at the pipe's center. It should equal 0.429 × radius. Example: radius 4" gives 1.72"; add back 0.71" and your measured gain should be about 2-7/16". Within 1/8" means your bender makes the gain the math says.
- Check a center by calculation. For a 30° bend: developed length (the curved part) = 0.01745 × radius × 30. The center is half of that from the start of the bend. Mark a fresh piece 15" from one end. From that mark, measure half the developed length plus your front-of-hook distance toward the hook side, and mark it. Put the front of the hook on that mark and bend an exact 30. Draw the X: it should land on 15", and agree with your 30C mark from Part A. Two methods, one answer.
- Check shrink. Measure a fresh piece. Bend a 30° offset with a 4" rise: two marks 8" apart, both on the arrow, the second bend with the pipe turned 180°. Lay it flat and measure end to end along the direction of the legs. Original length − that = your shrink. Your card says 4 × 1/4 = 1". Within 1/8" means the shrink chart works on your bender.
Part F · Write your chart
On the back of your card, write: bender make and size; your deduct, gain and setback; your radius and front-of-hook distance; how far past or short of each degree line you pull; and which center and stop marks are on your shoe. Keep the same bender for every lab from here on. If you change benders, chart the new one.
It's right when
- You bend a 10" stub using your own deduct and it measures 10" ±1/8".
- You mark a fresh piece 15" from one end, put that mark on your 30C mark, bend a 30 using your pull, and the X lands on the mark ±1/8".
- Your measured gain minus the pipe's outside diameter is within 1/8" of 0.429 × your radius.
- Your 4" offset at 30° shrinks 1" ±1/8".
Sign-off: your instructor checks your chart card and watches both test bends.
Clips from Mel's videos
Each clip plays only the part of the video that matches the step.
Lab 3
The cross: first 90s on the wall
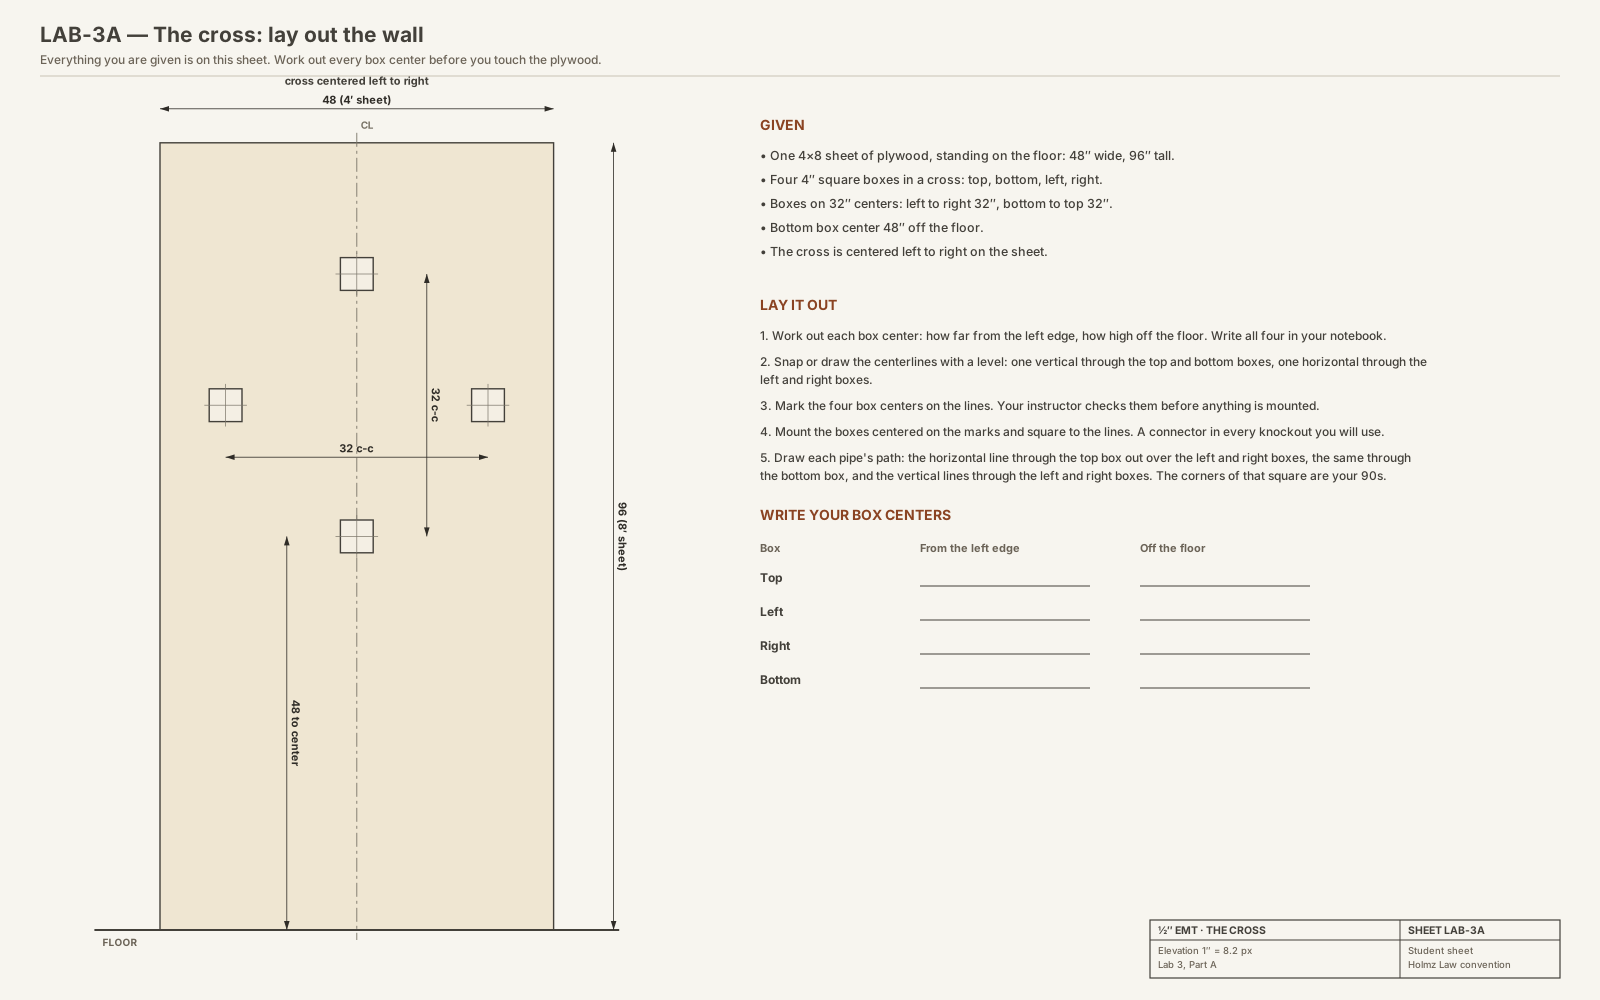
Goal: lay out four boxes on a wall from a few given dimensions, then run conduit around them in a circle with four 90s, plus one straight piece across the middle. Every piece gets a box offset at both ends, as in Lab 1.
Given (that's all you get):
- One 4×8 sheet of plywood, standing vertical (48" wide, 96" tall).
- Four 4" square (1900) boxes in a cross: top, bottom, left, right.
- The boxes are on 32" centers: left to right is 32", top to bottom is 32".
- The bottom box center is 48" off the floor.
- The whole cross is centered left to right on the sheet.
What you build:
- Four corner pieces running top → right → bottom → left → top. Each one leaves a box sideways or from the top or bottom, makes one 90, and enters the next box.
- One straight piece from the left box to the right box.
- A box offset on both ends of all five pieces, so every pipe lies flat on the plywood.
You need: 1/2" EMT, a 1/2" hand bender, a torpedo level, a tape, a pencil, a 4' level or straightedge, a hacksaw, a reamer, four 4" square boxes, 1/2" connectors, straps and screws, safety glasses and gloves. Bring your card.
Part A · Lay out the wall
- Work out where each box center goes, measured from the floor and from the left edge of the sheet. Write all four in your notebook before you touch the plywood.
- Draw the centerlines on the plywood with a level: one vertical line through the top and bottom boxes, and one horizontal line through the left and right boxes.
- Mark the four box centers, and have your instructor check them before you mount anything.
- Mount the boxes, centered on the marks and square to the lines, then put a connector in every knockout you will use.
- Draw the path of each pipe on the plywood: the horizontal line through the top box out to above the right and left boxes, the same through the bottom box, and the vertical lines down through the left and right boxes. The corners of that square are where your 90s go.
Part B · The straight piece (warm-up)
- Bend a box offset on one end of a piece, as in Lab 1.
- Seat it in the left box, hold it along the line, and mark it where it reaches into the right box's connector.
- Cut, ream, and box offset that end. Install it. It should seat in both connectors and lie flat.
Part C · The four 90s
This is your first 90. Two numbers from your card come in here.
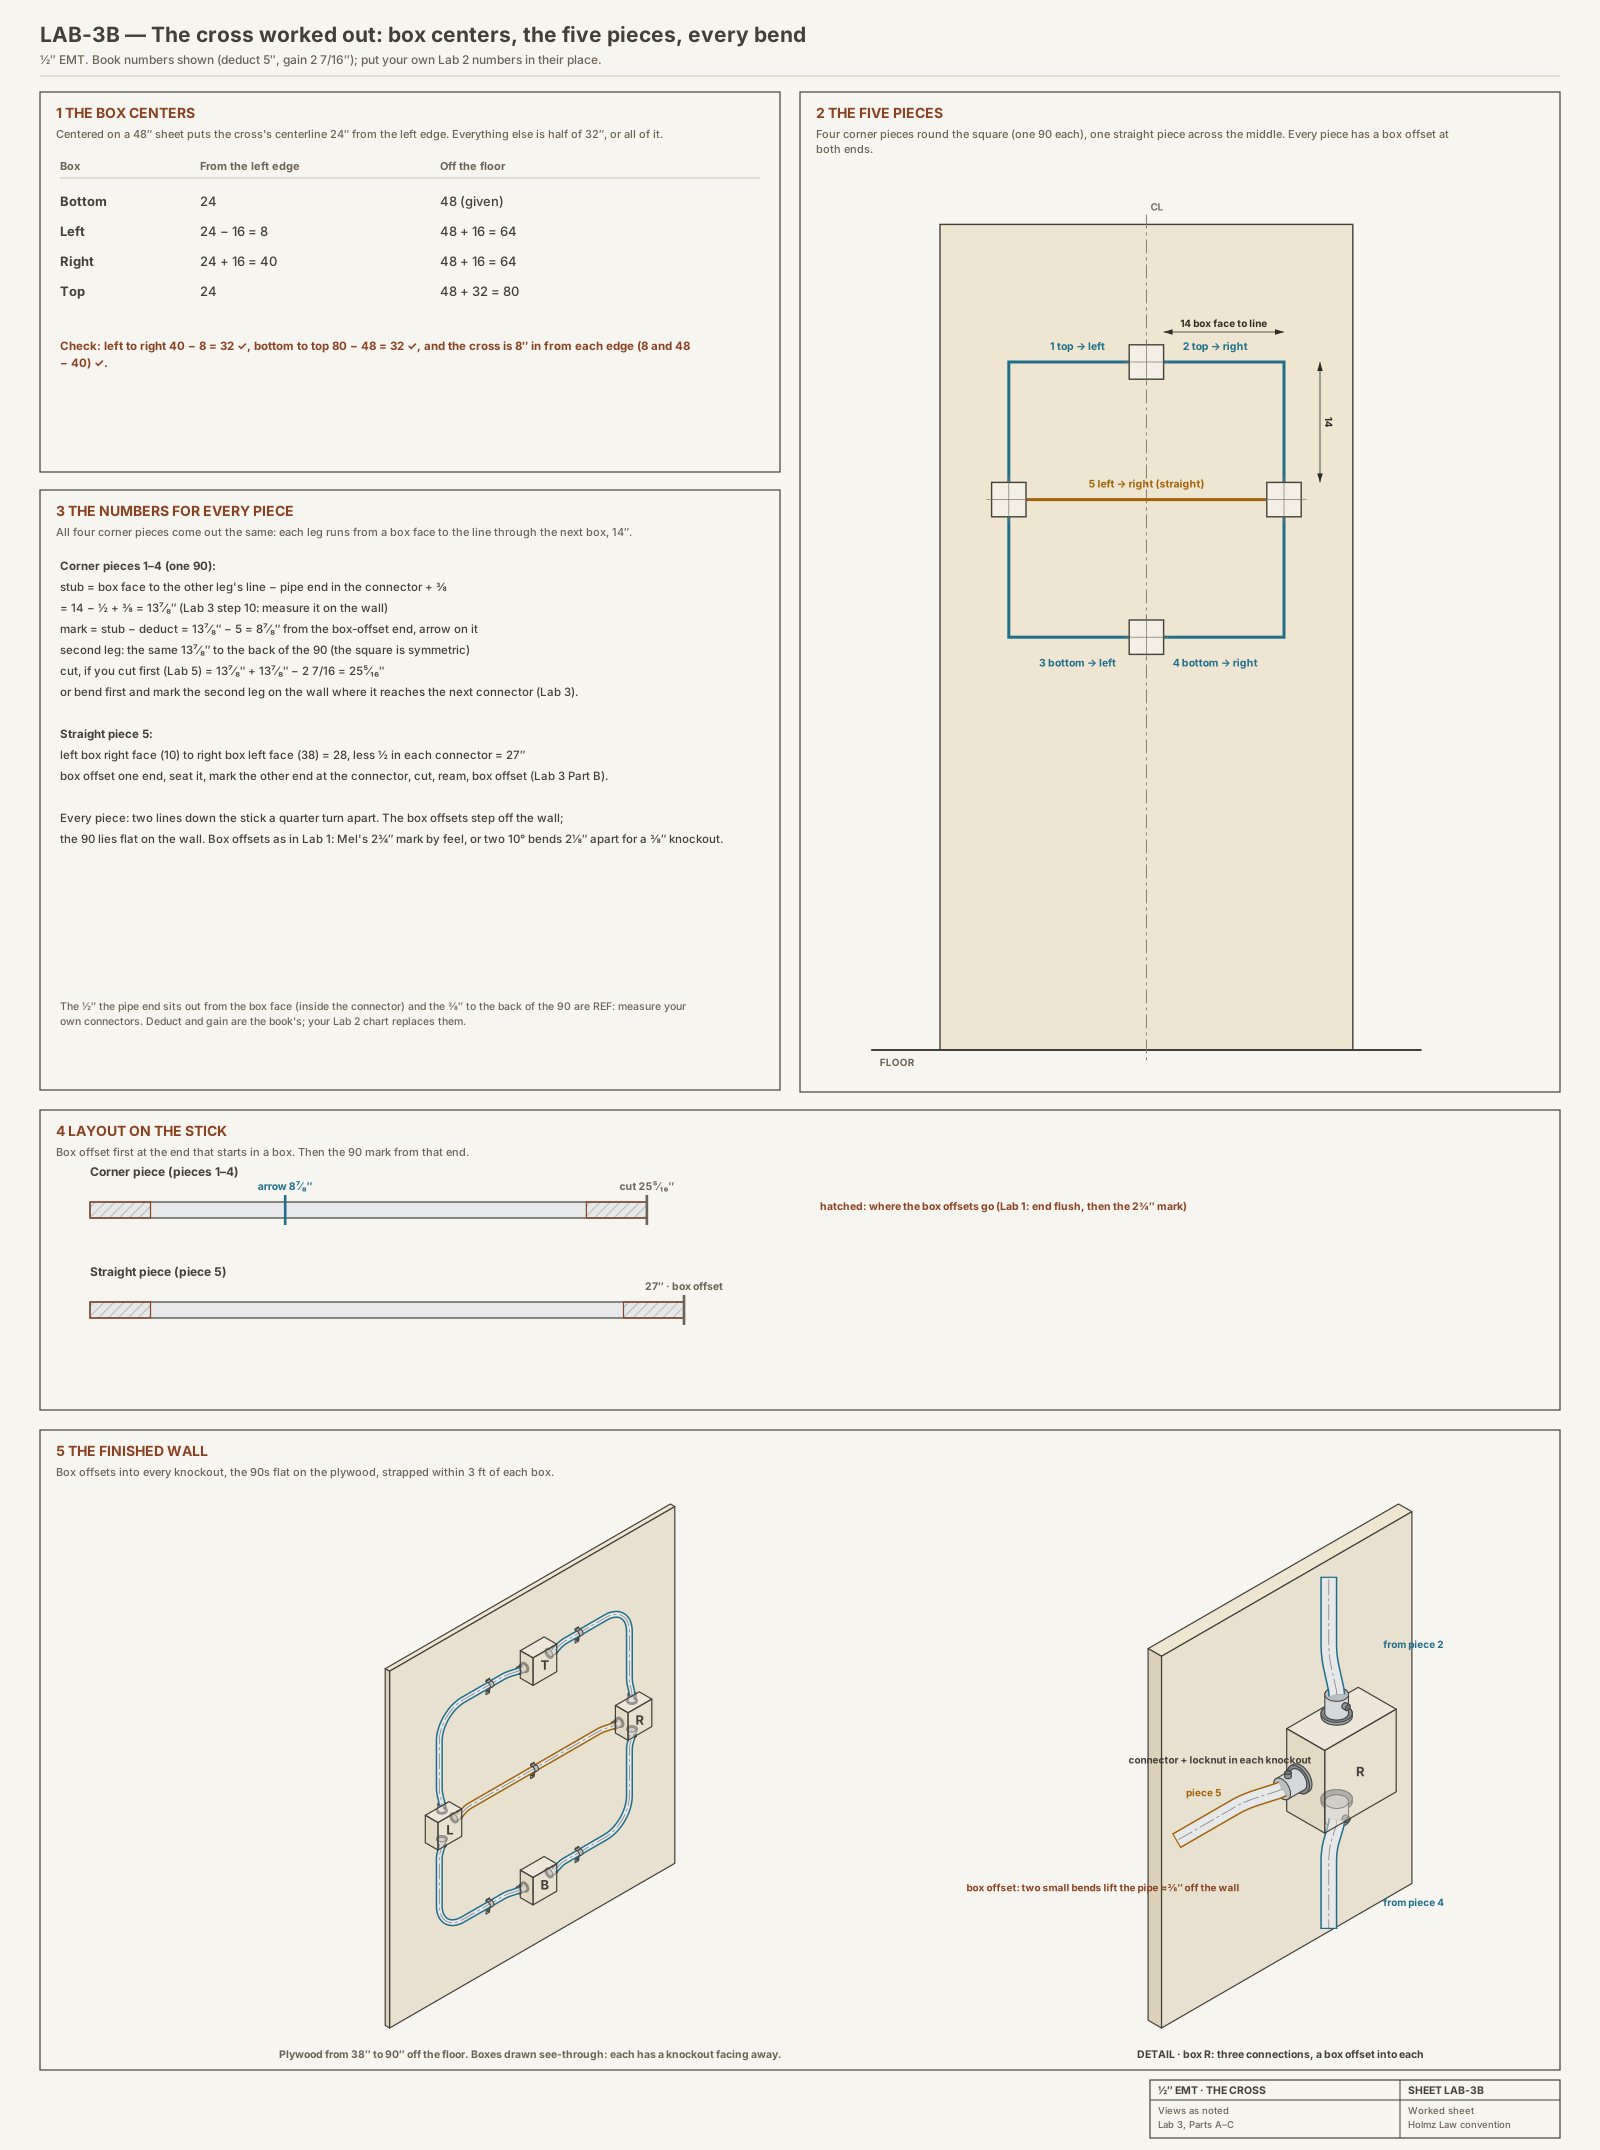
- Stub: the length of the leg from the end of the pipe to the back (outside) of the 90.
- Deduct: the bend uses up pipe, so you mark short. Mark = stub − deduct. Use the deduct from your chart (Lab 2), not the stamp.
For each corner:
- Bend a box offset on one end.
- With that end seated in its box, measure from where the pipe end sits in the connector to the line you drew for the other leg. That line is the center of the other leg; the back of the 90 is half a pipe width past it, so add 3/8" for 1/2" EMT. That is your stub. Write it down.
- Mark stub − deduct from that end, all the way around.
- Put the arrow on the mark. Before you bend, look at your pencil line: the box offset has to step out from the wall, while the 90 lies flat on the wall. Turn the pipe until that's true.
- Bend the 90 and check it with the torpedo level.
- Hold it on the wall with the first end in its box. Mark the second leg where it reaches into the next box's connector.
- Cut, ream, box offset that end, and install.
- Repeat for the other three corners.
It's right when all five pieces seat in their connectors without forcing, lie flat on the plywood, run on the lines you drew, and every 90 is square.
If it isn't right
- The stub is long or short: check you measured to the back of the 90, and that the arrow was on the mark.
- The pipe lifts off the plywood near a box: the box offset turned with the 90. Keep the line where it belongs before each bend.
- A 90 is over or under: check it with the level before you install, and fix it in the bender.
Sign-off: your instructor checks your layout before mounting, then the finished wall.
Instructor key (box centers, if the sheet sits on the floor): bottom 24" from the left edge and 48" up; left 8" and 64"; right 40" and 64"; top 24" and 80". The cross centers on 24" across and 64" up.
Clips from Mel's videos
Each clip plays only the part of the video that matches the step.
Lab 4
Offsets (Rev K: OL pieces)
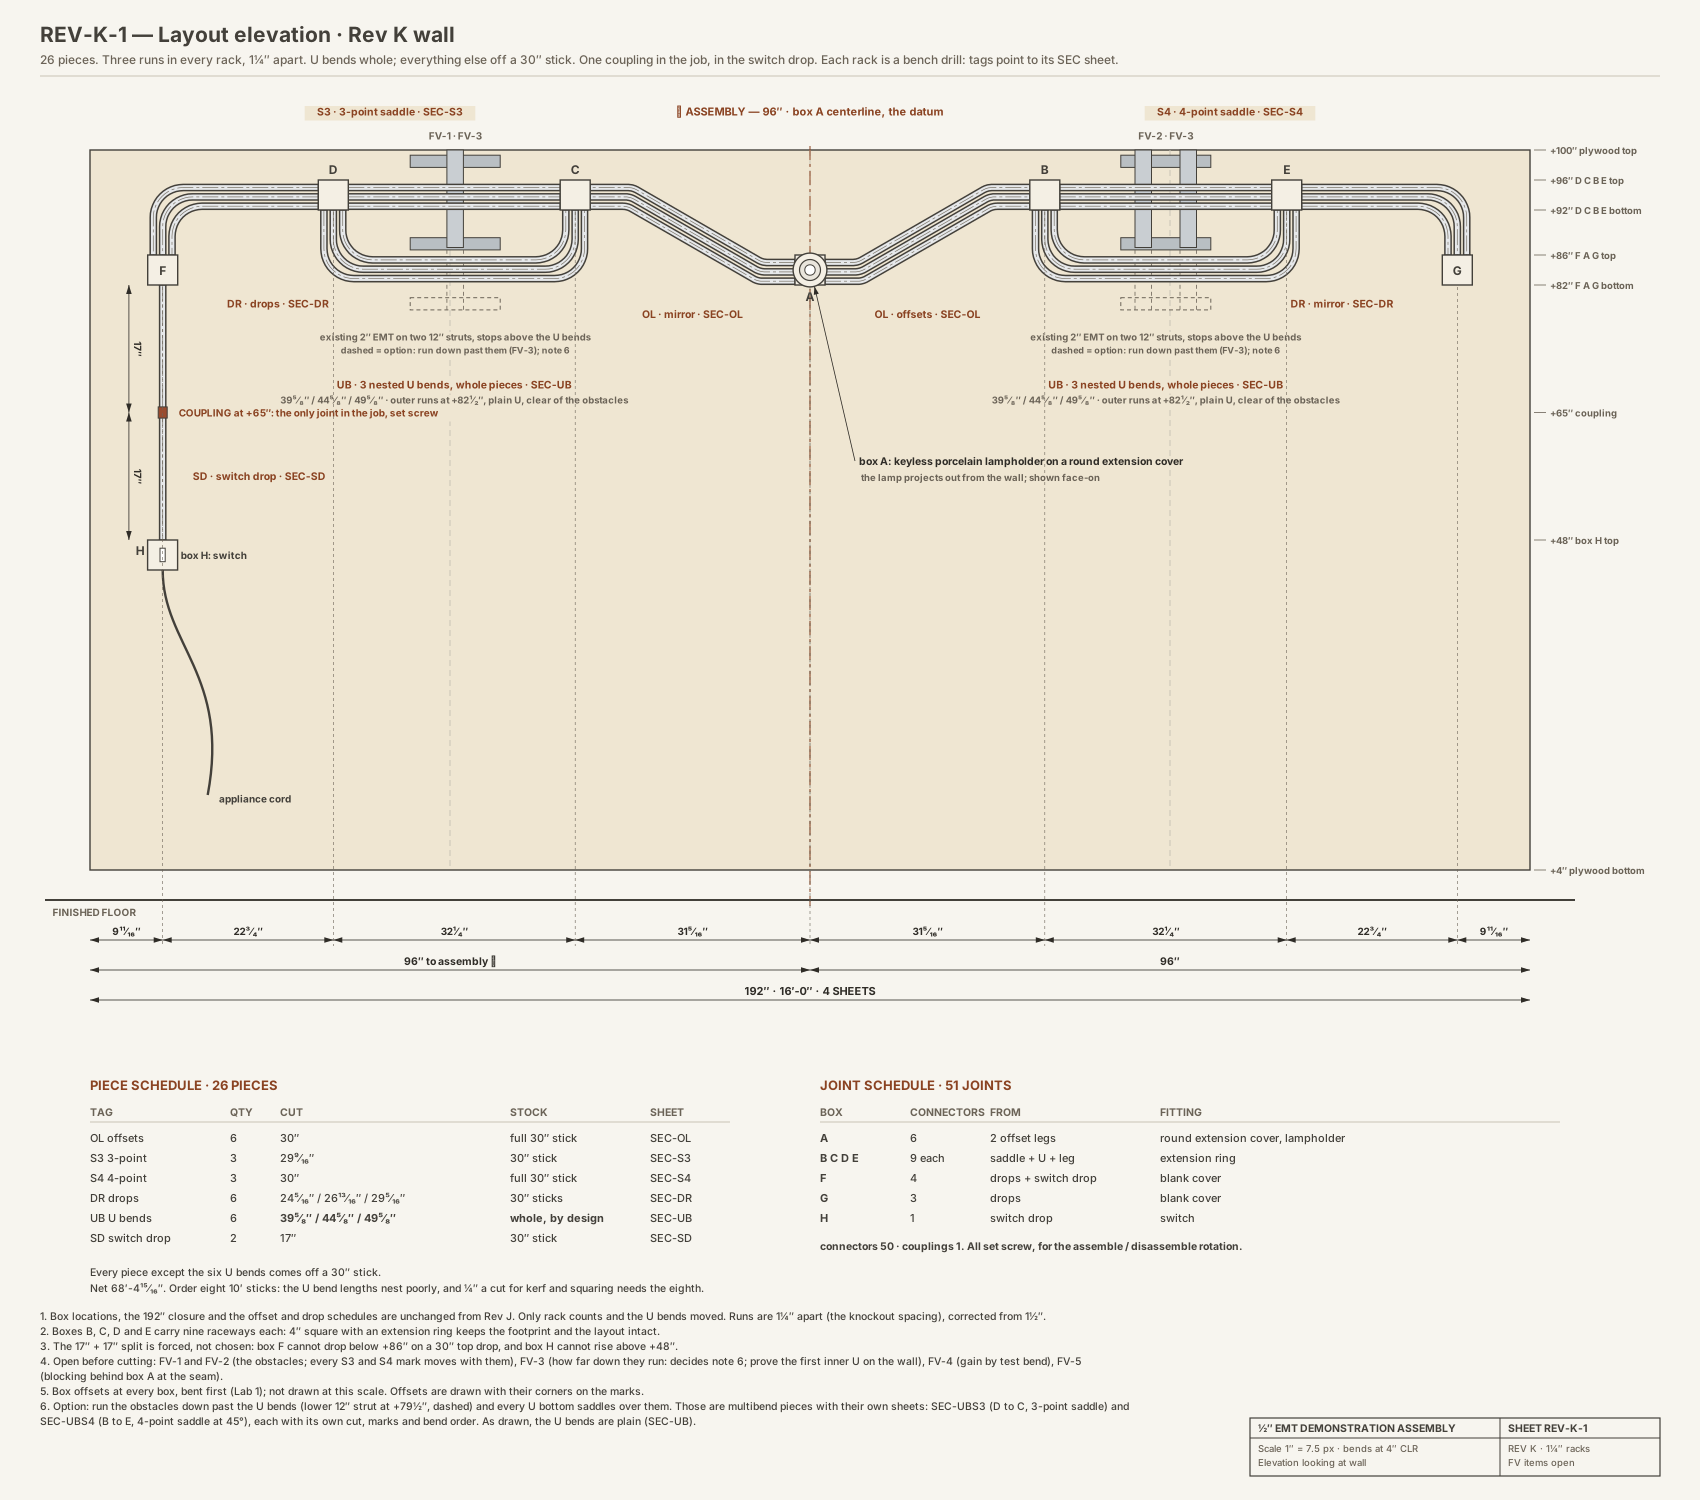
Goal: bend a 30° offset that lands where you want it, then bend three side by side that stay evenly spaced. On the Rev K wall these are the six OL pieces that drop from box C and box B down to box A. Your team bends one run in each rack.
Watch: Predetermined Offset Shrink Method (34 min), Stop Dogging Your Conduit (12 min), Parallel Offsets (42 min).
You need: your charted bender, your card, 1/2" EMT scrap and 30" sticks, angle finder, torpedo level, tape, pencil, hacksaw, reamer, two loose boxes with connectors, safety glasses and gloves.
The numbers (all on your card)
- Rise: how far the pipe has to move over. Measure it bottom of pipe to bottom of target.
- Distance between marks = rise × multiplier. At 30° the multiplier is 2, so a 4" rise puts the marks 8" apart.
- Shrink = rise × shrink per inch. At 30° that's 1/4" per inch, so a 4" rise shrinks 1". Going over uses pipe, so the run comes up short by that much unless you add it in.
- Stagger (for three pipes side by side) = spacing between pipe centers × the same 1/4" per inch. Mel calls it the parallel adjustment; it's the same number as shrink.
Part A · One offset that lands (scrap)
Mel's shrink method: put the shrink in before you mark, so the offset lands on target.
- Set a loose box on the bench and a target: the pipe has to land in the box 40" from the end and 4" higher. Write down: distance 40", rise 4".
- Shrink = 4 × 1/4 = 1". First mark (A) = 40 + 1 = 41" from the end.
- Distance between marks = 4 × 2 = 8". Second mark (B) goes 8" back toward the end you measured from, at 33".
- Draw a line down the pipe (or use the seam). Mark A and B all the way around, in pencil.
- Bend A first: arrow on A, your back to B. Bend to 30° using your pull from Lab 2. Keep the bottom of the pipe parallel to the line, not touching it.
- Slide to B. Turn the pipe 180°, line on the bottom, and check that the first bend is straight up and down (no dog). Arrow on B, bend 30°.
- Check: lay it on the floor. Both straight parts lie flat and the pipe doesn't rock. The rise reads 4" bottom to bottom, and the end lands at 40".
- If it's off, fix it in the bender lightly. Under-bend and add rather than over-bend and pull back.
Repeat with other rises (3", 6", 10") until it lands first try.
Part B · Three offsets that stay evenly spaced (scrap)
Three offsets bent from the same marks bunch together through the bends. The fix is to shift each pipe's marks a little.
- Bend one 4" offset with no change. That's your reference pipe.
- Pick a spacing between pipe centers (use 2" for practice). Stagger = 2 × 1/4 = 1/2".
- Second pipe: move both marks 1/2" farther from the end. Third pipe: 1" farther. The distance between marks never changes.
- If the next pipe sits on the inside of the bend instead of the outside, move the marks the other way (subtract).
- Lay the three together. The spacing should be even through the bends. Then bend one set with no stagger and see the bunching for yourself.
Part C · Your Rev K OL pieces
Given (from the student brief): OL runs drop from the main box row down to box A, 10" offset, 30° bends, three runs per rack, every piece off a 30" stick, a box offset at both ends.
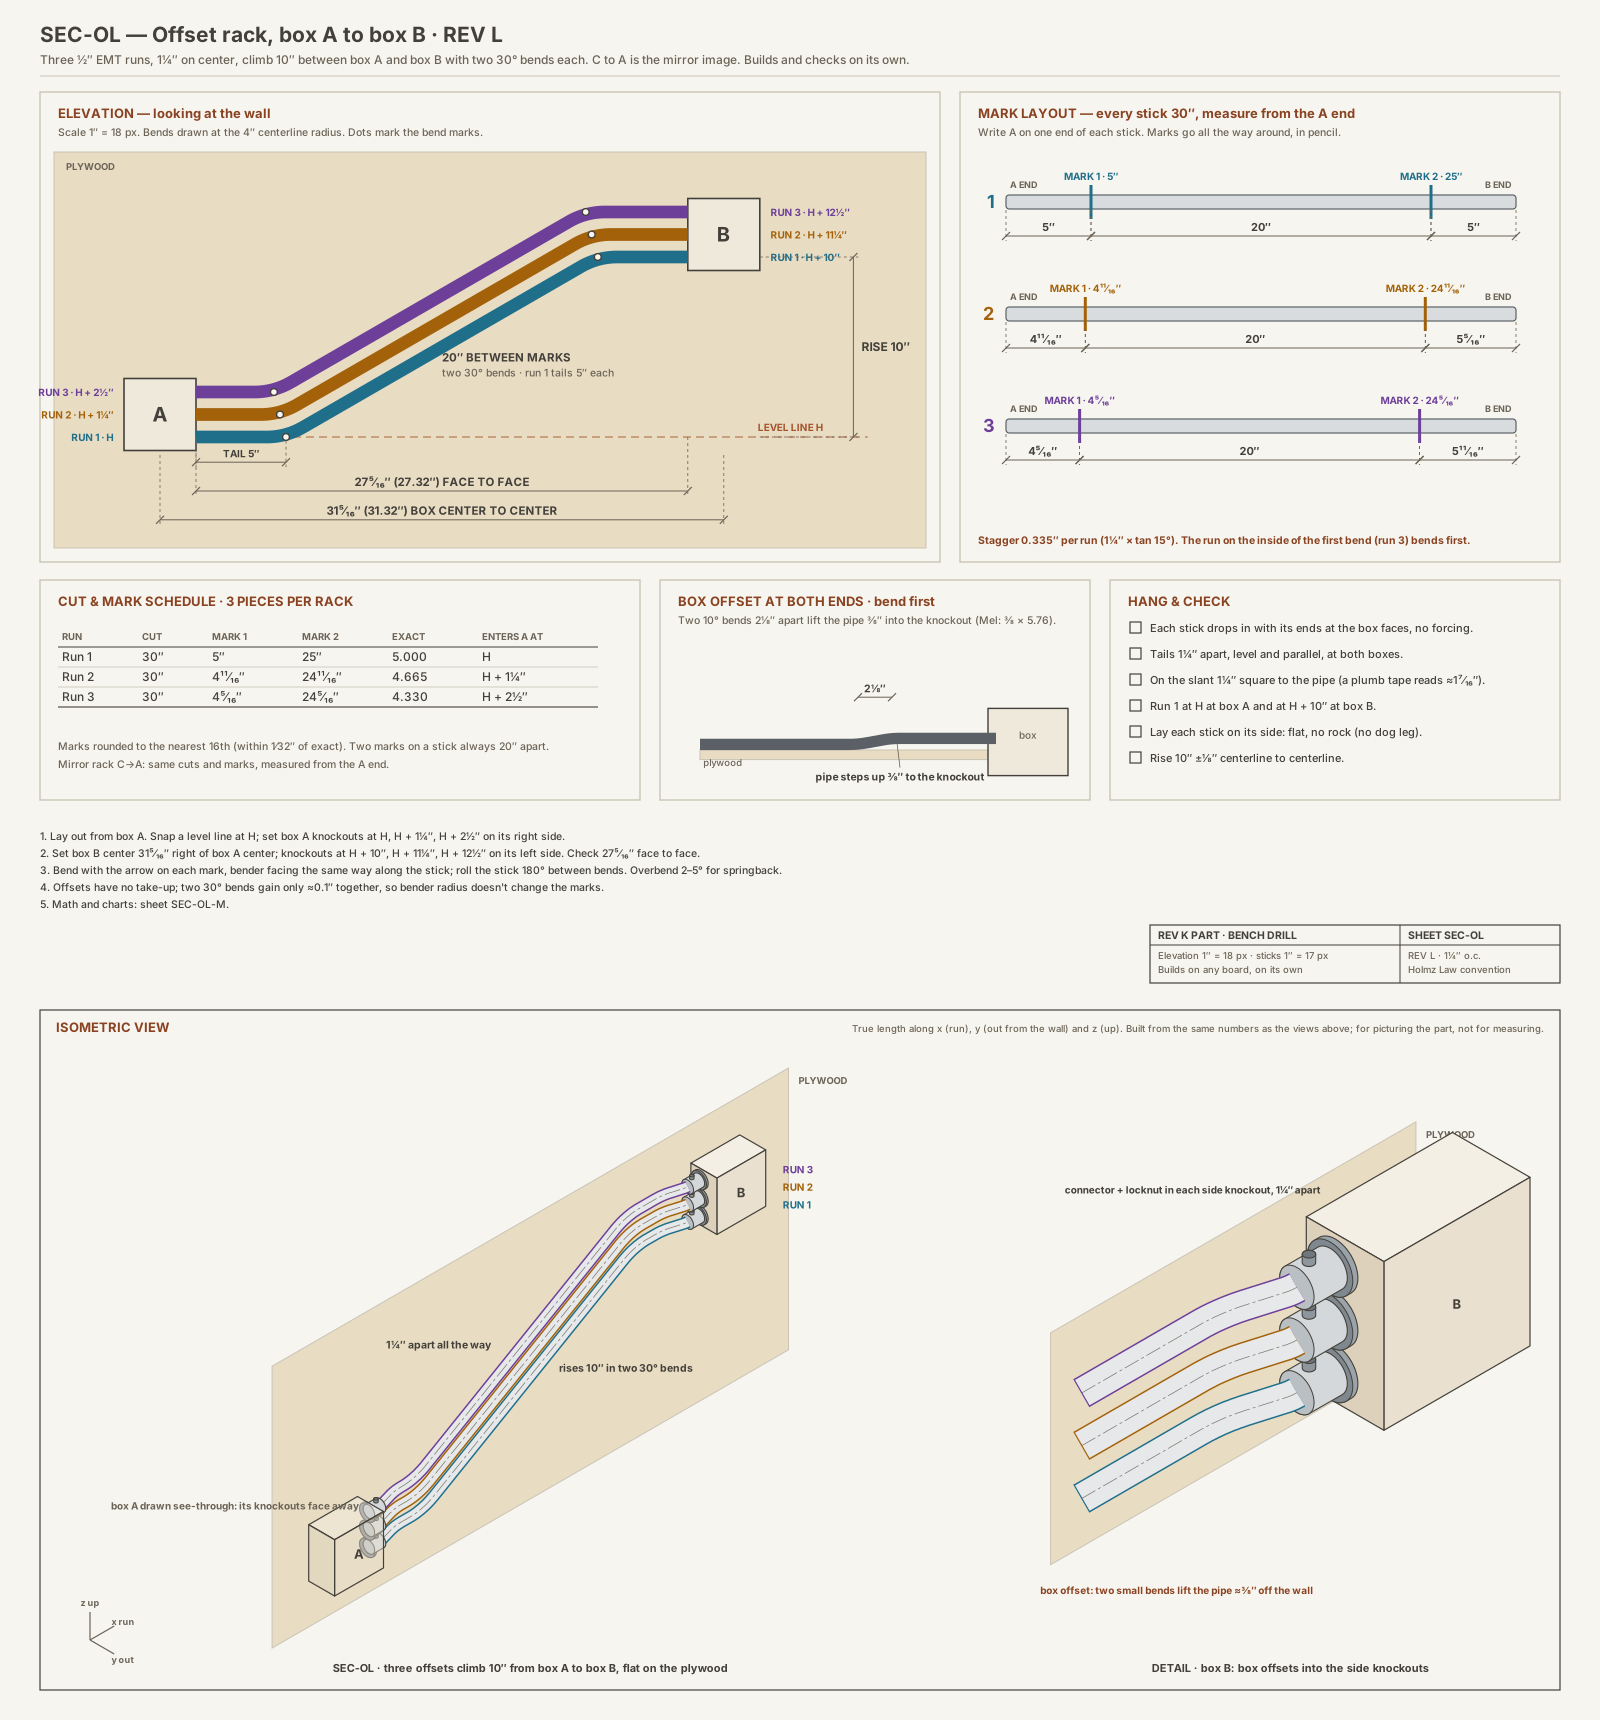
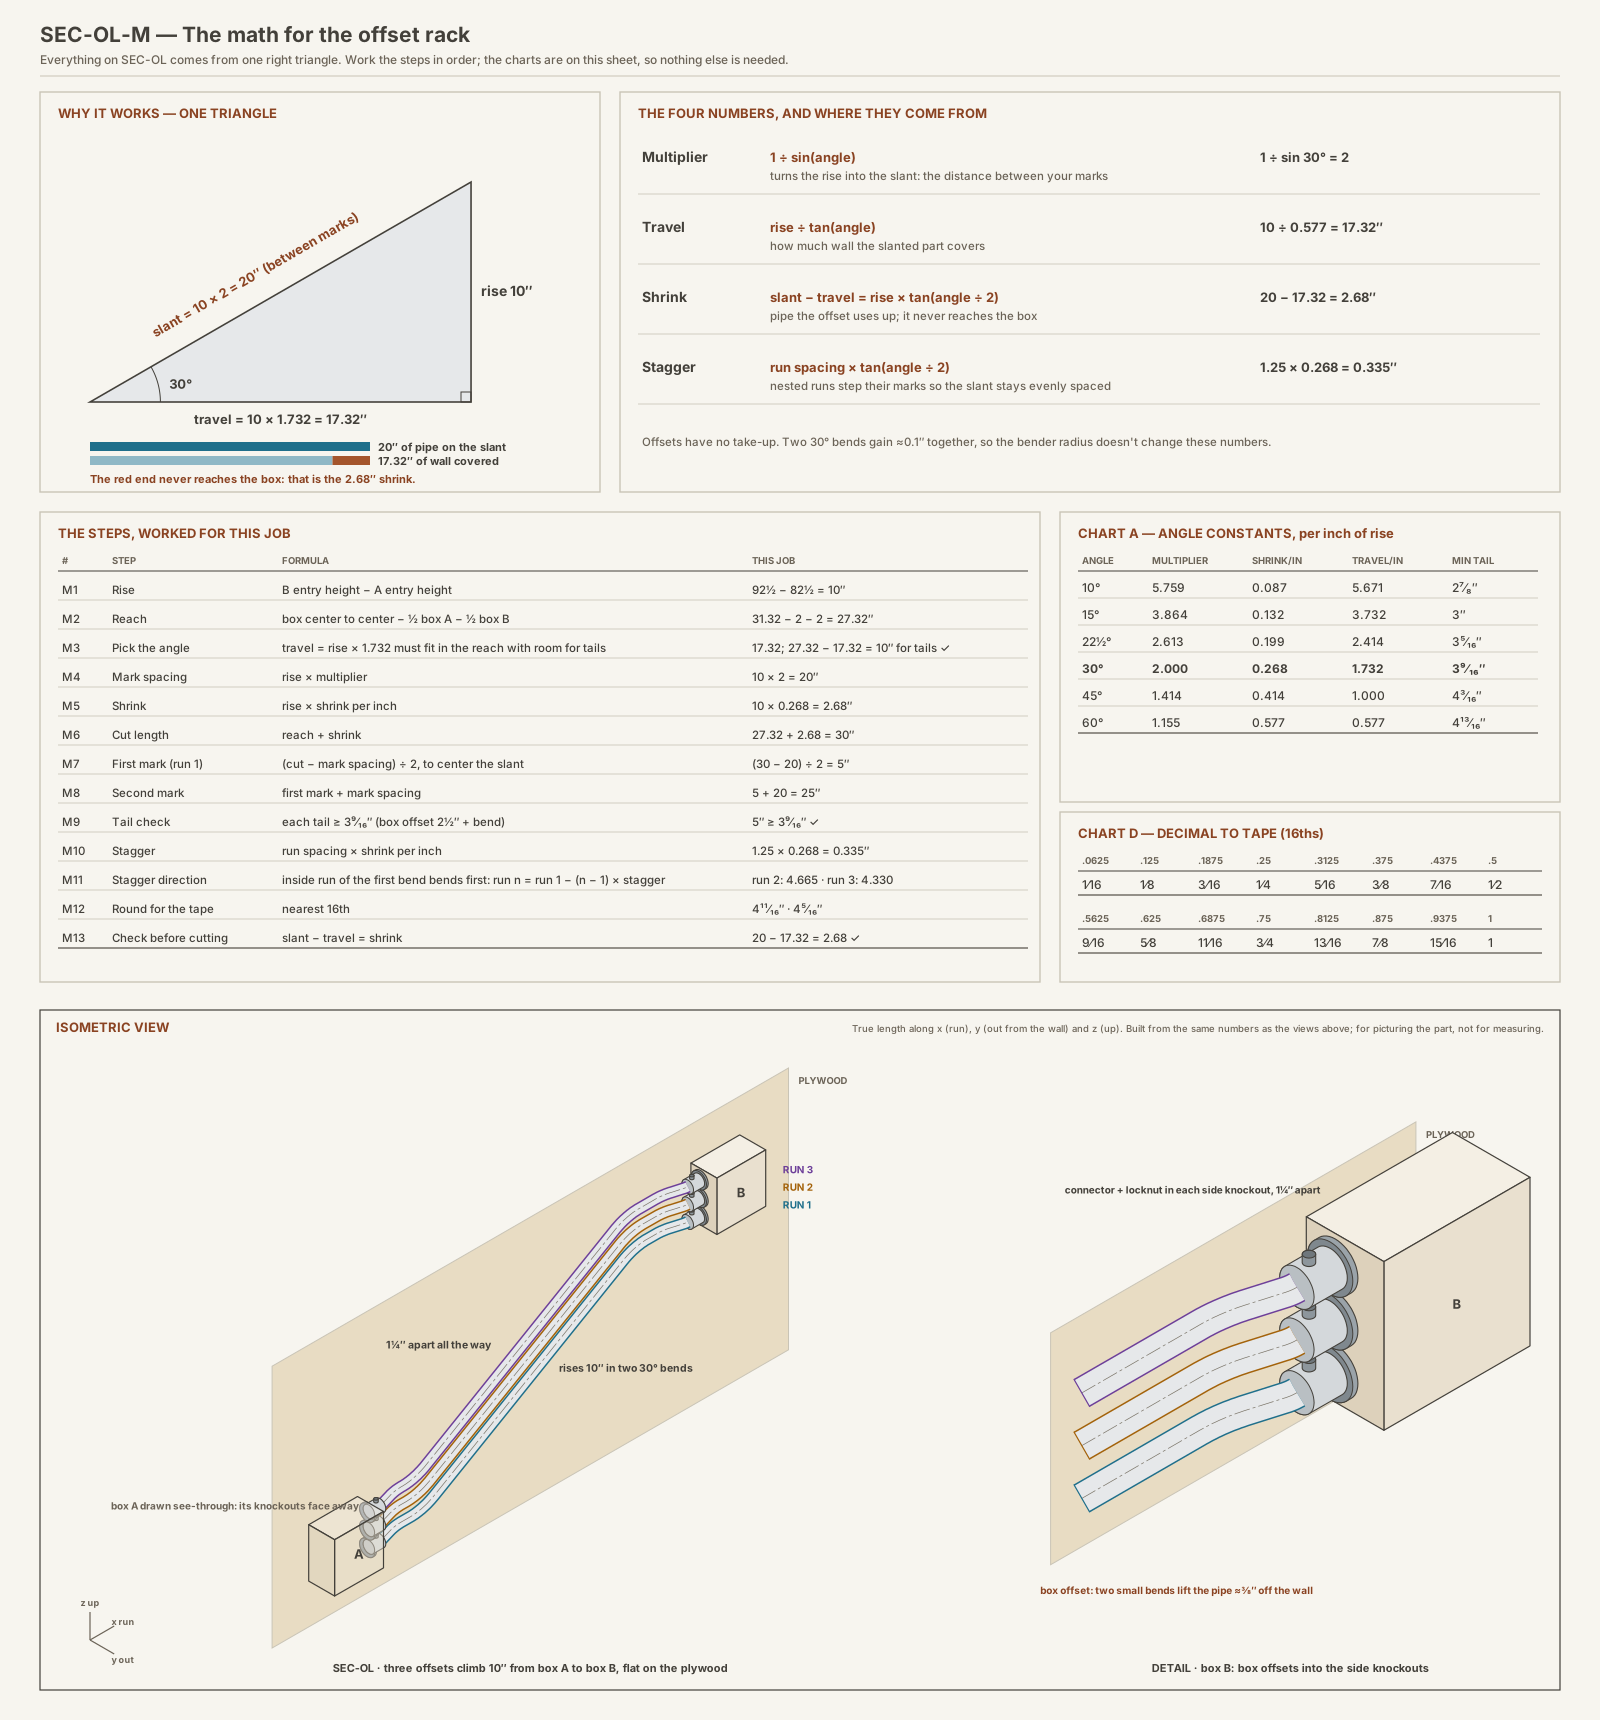
The method, step by step: any offset rack
These 13 steps work for any offset between two boxes, one run or many. Each step shows the formula, the Rev K numbers, and a second job worked the same way. Another job: two 4″ boxes 26″ center to center, a 6″ climb, three runs 1½″ apart.
- 1Find the rise
How far the pipe has to climb. Measure both ends to the same reference (pipe center, or bottom of pipe at both).
Formularise = height at box B − height at box AThis job92½ − 82½ = 10″Another job6″ (measured) - 2Find the reach
The straight wall distance the pipe has to cover, box face to box face. For 4″ boxes, take 2″ off each center.
Formulareach = center to center − ½ box A − ½ box BThis job31.32 − 2 − 2 = 27.32″Another job26 − 2 − 2 = 22″ - 3Pick the angle
The slanted part has to fit between two tails long enough for a box offset (2½″ straight) plus the bend. Mel's rule: use the smallest angle that fits. Smaller angles pull wire easier and look cleaner; 30° is the everyday choice when it fits.
Formulatravel = rise ÷ tan(angle) must be ≤ reach − 2 × min tailThis job
Rev K uses 30° (22½° doesn't fit).Angle Travel Room for it 10° 56.713″ 21.62″ too long 15° 37.321″ 21.267″ too long 22½° 24.142″ 20.729″ too long 30° 17.321″ 20.176″ fits 45° 10″ 19.006″ fits 60° 5.774″ 17.701″ fits Another job
Smallest that fits: 22½°.Angle Travel Room for it 10° 34.028″ 16.3″ too long 15° 22.392″ 15.947″ too long 22½° 14.485″ 15.409″ fits 30° 10.392″ 14.856″ fits 45° 6″ 13.686″ fits 60° 3.464″ 12.381″ fits - 4Distance between the marks
The length of the slanted pipe. The multiplier turns the rise into that length.
Formulamarks apart = rise × multiplier, multiplier = 1 ÷ sin(angle)This job10 × 2 = 20″Another job6 × 2.613 = 15.679 = 15¹¹⁄₁₆″ - 5Shrink
The slant is longer than the wall it covers. That difference is pipe that never reaches the far box.
Formulashrink = rise × tan(angle ÷ 2)This job10 × 0.268 = 2.679″Another job6 × 0.199 = 1.193″ - 6Cut length
Enough pipe to cover the reach plus what the offset eats. Box offsets shrink so little (≈1⁄32″) that you can ignore them.
Formulacut = reach + shrinkThis job27.32 + 2.679 = 30″Another job22 + 1.193 = 23.193 = 23³⁄₁₆″ - 7First mark (the first run)
Center the slant between the boxes, so both tails are equal. If something is in the way, set the first mark where the slant has to start instead.
Formulafirst mark = (cut − marks apart) ÷ 2, from the A endThis job(30 − 20) ÷ 2 = 5″Another job(23.193 − 15.679) ÷ 2 = 3.757 = 3³⁄₄″ - 8Second mark
Same end, one spacing further.
Formulasecond mark = first mark + marks apartThis job5 + 20 = 25″Another job3.757 + 15.679 = 19⁷⁄₁₆″ - 9Tail check
Both tails have to hold a box offset and clear the bend. If one is short, use a steeper angle or move the slant.
Formulaeach tail ≥ 2½″ + 4″ × tan(angle ÷ 2)This job5″ and 5″ ≥ 3⁹⁄₁₆″ ✓Another job3³⁄₄″ and 3³⁄₄″ ≥ 3⁵⁄₁₆″ ✓ - 10Stagger for the other runs
Runs side by side need their marks shifted, or they bunch together on the slant. The shift is the same number as the shrink per inch, times the spacing.
Formulastagger = run spacing × tan(angle ÷ 2)This job1.25 × 0.268 = 0.335″Another job1.5 × 0.199 = 0.298″ - 11Which way the stagger goes
The run on the inside of the first bend (the side the pipe turns toward) bends first: its marks move toward the A end. Each run further in moves one more stagger.
Formularun n mark = run 1 mark − (n − 1) × staggerThis jobrun 1: 5 · run 2: 4.665 · run 3: 4.33Another jobrun 1: 3.757 · run 2: 3.459 · run 3: 3.161 - 12Round for the tape
Work in decimals, round only at the end, to the nearest 16th.
Formuladecimal × 16, round, over 16This job5″ · 4¹¹⁄₁₆″ · 4⁵⁄₁₆″Another job3³⁄₄″ · 3⁷⁄₁₆″ · 3³⁄₁₆″ - 13Check before you cut
Prove the numbers hang together before any pipe is cut.
Formulaslant − travel = shrink, and tail + marks apart + tail = cutThis job20 − 17.32 = 2.68 ✓ · 5 + 20 + 5 = 30 ✓Another job15.679 − 14.485 = 1.193 ✓ · 3.757 + 15.679 + 3.757 = 23.193 ✓
What changes if…
| If this changes… | …these change | …these stay the same |
|---|---|---|
| Boxes farther apart | reach, cut, tails | marks apart, shrink, stagger |
| Rise | marks apart, shrink, cut, maybe the angle | stagger |
| Run spacing | stagger only | everything else |
| Angle | marks apart, shrink, cut, stagger, min tail | reach |
Your own job
Copy this onto your notebook page and work it before you cut.
| Step | Your job |
|---|---|
| 1 Rise | |
| 2 Reach | |
| 3 Angle | |
| 4 Marks apart | |
| 5 Shrink | |
| 6 Cut | |
| 7 First mark | |
| 8 Second mark | |
| 9 Tail check | |
| 10 Stagger | |
| 11 Run 2 / run 3 marks | |
| 12 Rounded | |
| 13 Check |
- With your team, work out for your run: distance between marks, shrink, how far the offset reaches, where the first mark sits from the box-A end, and your run's stagger. Check whether your run sits on the inside or outside of the bend.
- Check the straight pipe: each end needs room for a box offset clear of the bend. If it doesn't fit on a 30" stick, find out why before you go on.
- Write it all in the team notebook for the submittal. Don't cut until the submittal is signed.
- After sign-off: draw two lines down the stick, a quarter-turn apart. Use one for the box offsets (they step off the wall) and the other for the offset bends (they lie flat on the wall).
- Bend the box offsets on both ends first, then the offset. Tag the piece (for example OL-L-top) as soon as it comes off the bender.
Part D · Build this section on its own
The OL section can be built, checked and signed off without the rest of the wall. Do it this way if the full Rev K wall isn't going up this time, or to prove your offsets before the full assembly.
- Mount only the two boxes this section connects: box A, then box C (or box B for the right side). Box A is the datum: its centerline sits on the center seam. Place box C from your team's layout, then measure it back from box A: the distance across and the difference in height must match your layout within 1/8".
- Put a connector in each knockout the three runs use.
- Install the three OL pieces, inside run first. Each one seats in both connectors without forcing and lies flat on the plywood. Strap each run within 3' of each box.
- Check the section with a tape: the runs sit the same distance apart at box C, at box A, and in the middle of the offset. Write the three readings down.
- Your instructor signs off the section. When the whole wall goes up later, these same pieces go in unchanged.
It's right when your scrap offsets land within 1/8" of target and lie flat, your three-pipe set stays evenly spaced through the bends, and your OL pieces match the signed submittal and seat in both boxes.
Sign-off: your instructor signs off Parts A and B before you bend Part C.
If it isn't right
- Lands short by about the shrink: you forgot to add it.
- Pipe rocks on the floor: dog leg. Check the line is straight up and down before the second bend.
- Rise too big or too small: the two bends aren't the same angle. Check each with the angle finder.
- The three pipes bunch in the middle: no stagger, or it went the wrong way.
Clips from Mel's videos
Each clip plays only the part of the video that matches the step.
Lab 5
Drops (Rev K: DR pieces)
Goal: cut a piece to length before you bend it, so a 90 lands right on both legs; then bend three 90s that rack together. On the Rev K wall these are the six DR pieces that turn down from box D to box F and from box E to box G. Your team bends one run in each rack.
You need: your charted bender and chart card, 1/2" EMT scrap and 30" sticks, torpedo level, angle finder, tape, pencil, hacksaw, reamer, two loose boxes with connectors, safety glasses and gloves.
The numbers
- Stub and drop: the two legs of the 90. Measure both to the back of the 90, same as always.
- Mark = stub − your deduct. Arrow on the mark.
- Cut length = stub + drop − your gain. The bend cuts the corner, so the pipe needs less than the two legs added up. This is the first time you use your gain from Lab 2.
- Rack stagger for 90s = the spacing between pipe centers. In Lab 4 the stagger was spacing × 1/4 for a 30°; for a 90 the multiplier is 1. Each pipe farther out gets a longer stub and a longer drop by one spacing, so its cut is two spacings longer.
Part A · Cut first, then bend (scrap)
- Target: a 12" stub and a 10" drop, both to the back. Write them down.
- Cut length = 12 + 10 − your gain. Cut a piece exactly that long and ream it.
- Mark = 12 − your deduct. Arrow on the mark, bend a true 90, check with the level.
- Stand it on each leg and measure: the stub should read 12" and the drop 10", each ±1/8".
- If the drop comes out long or short, your gain is off. Check it against your chart before you go on.
Repeat with two other sizes until both legs land first try.
Part B · Three 90s that rack (scrap)
- Use a 2" spacing for practice. Pipe 1 (inside): 12" stub, 10" drop. Pipe 2: 14" and 12". Pipe 3: 16" and 14".
- Work out each cut length and mark. Each cut should come out 4" longer than the one before (two spacings).
- Cut, bend, and lay the three together in a corner, inside to outside.
- Check: the straight legs sit 2" apart all the way along, and all three are square.
- Look at the bends: the gap opens to about 2-13/16" through the middle of the curve, then closes again. That's normal for three pipes bent on one bender (spacing × 1.41). Don't try to fix it by moving marks; you'll only throw the straight legs out.
Part C · Your Rev K DR pieces
Given (from the student brief): the drops leave the side of box D or E, make one 90, and enter the top of box F or G. Three runs per rack, every piece off a 30" stick, a box offset at both ends. The bottom drop leg is tight.
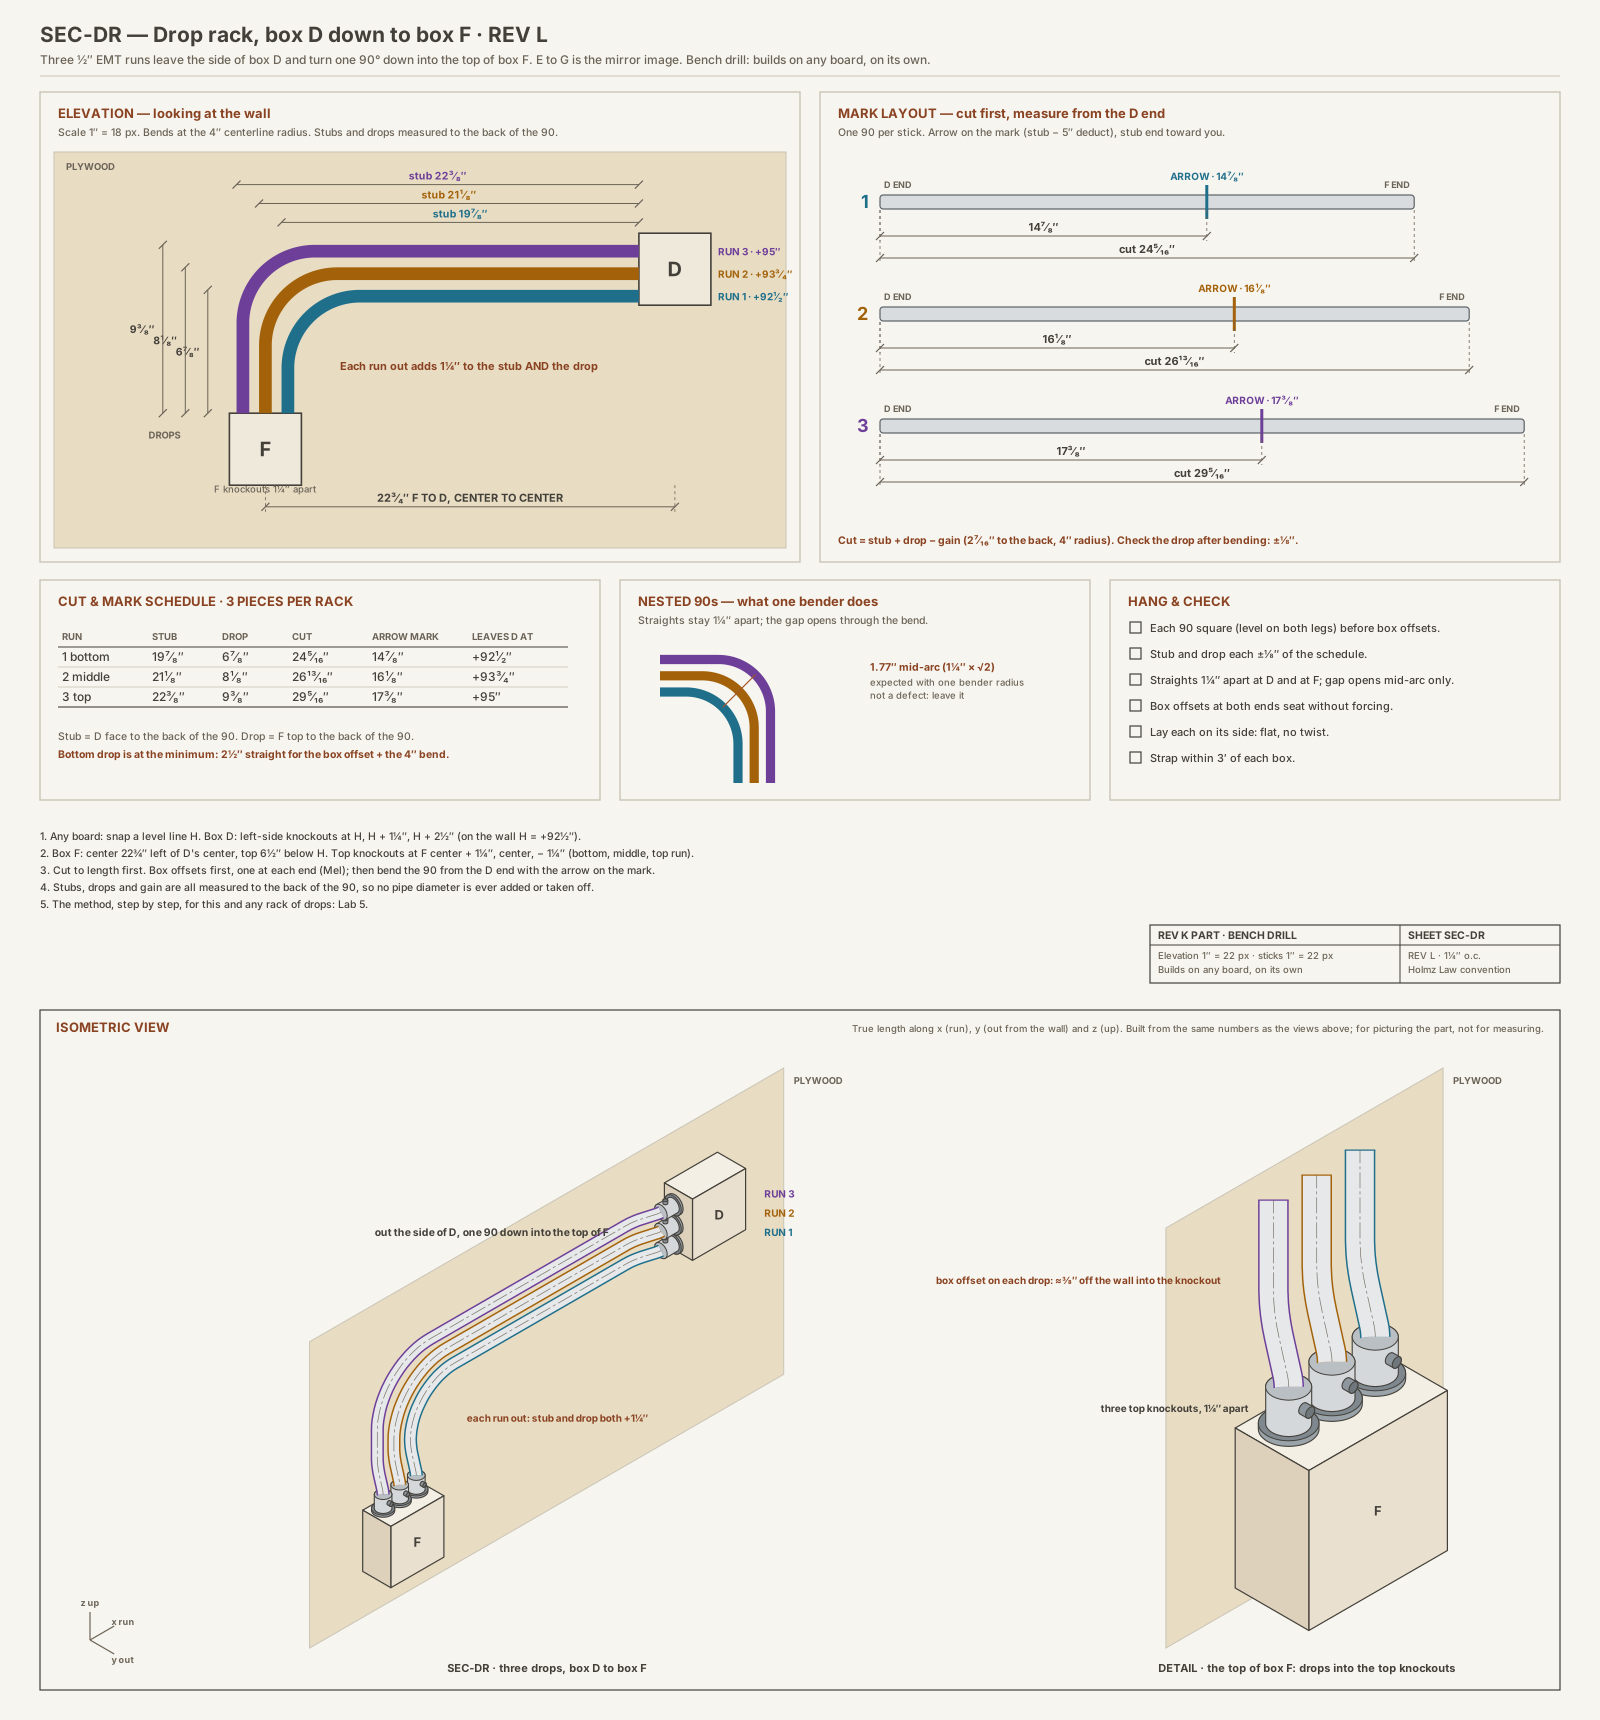
The method, step by step: any rack of drops
These 10 steps work for any 90 that leaves one box and turns into another, one run or a rack. Another job: a rack leaving a box with a 14″ stub and a 10″ drop to the first knockout, runs 1½″ apart.
- 1Measure the stub (the leg leaving the first box)
From the face of the box the pipe leaves, to the back of the 90. On the wall the back of the 90 is the far side of the leg that turns down, so measure to that knockout's center and add half a pipe (11⁄32″ for ½″ EMT).
Formulastub = box face to knockout center + ½ ODThis job19.5 + 0.353 = 19⁷⁄₈″Another job14 + 0.353 = 14³⁄₈″ - 2Measure the drop (the leg into the second box)
From the top of the box the pipe drops into, up to the back of the 90: the top of the level leg.
Formuladrop = box top to the level leg's center + ½ ODThis job6.5 + 0.353 = 6⁷⁄₈″Another job10 + 0.353 = 10³⁄₈″ - 3Gain for your bender
The bend cuts the corner, so the pipe needs less than the two legs added. Use the gain you measured in Lab 2 (to the back). For a 4″ radius it works out to 0.429 × radius + one pipe diameter.
Formulagain = 0.4292 × R + OD (or your Lab 2 number)This job1.717 + 0.706 = 2⁷⁄₁₆″Another jobsame bender: 2⁷⁄₁₆″ - 4Cut length
Cut first, so both legs land without trimming.
Formulacut = stub + drop − gainThis job19.853 + 6.853 − 2.423 = 24⁵⁄₁₆″Another job14.353 + 10.353 − 2.423 = 22⁵⁄₁₆″ - 5Bend mark
Arrow on the mark, measured from the stub end. The 5″ deduct is the book number for ½″; use your Lab 2 deduct.
Formulamark = stub − deductThis job19.853 − 5 = 14⁷⁄₈″Another job14.353 − 5 = 9³⁄₈″ - 6Shortest-leg check
Each leg needs 2½″ of straight pipe for its box offset plus the bend itself. Measured to the back that's 2½ + radius + ½ OD.
Formulaeach leg ≥ 2½ + R + ½ ODThis job6⁷⁄₈″ ≥ 6⁷⁄₈″ ✓ (exactly at the minimum)Another job10³⁄₈″ ≥ 6⁷⁄₈″ ✓ - 7The other runs
Racked 90s on one bender: each run farther out adds one spacing to BOTH legs (Mel's parallel adjustment for a 90 is the spacing × 1). So each cut grows by two spacings.
Formulastub, drop + spacing per run; cut + 2 × spacingThis jobrun 1: 19⁷⁄₈″ / 6⁷⁄₈″ / cut 24⁵⁄₁₆″ · run 2: 21¹⁄₈″ / 8¹⁄₈″ / cut 26¹³⁄₁₆″ · run 3: 22³⁄₈″ / 9³⁄₈″ / cut 29⁵⁄₁₆″Another jobrun 1: 14³⁄₈″ / 10³⁄₈″ / cut 22⁵⁄₁₆″ · run 2: 15⁷⁄₈″ / 11⁷⁄₈″ / cut 25⁵⁄₁₆″ · run 3: 17³⁄₈″ / 13³⁄₈″ / cut 28⁵⁄₁₆″ - 8Marks for the other runs
Same rule: each mark moves out by one spacing.
Formulamark n = mark 1 + (n − 1) × spacingThis job14⁷⁄₈″ · 16¹⁄₈″ · 17³⁄₈″Another job9³⁄₈″ · 10⁷⁄₈″ · 12³⁄₈″ - 9What to expect at the bend
One radius for every pipe means the gap opens through the curve, to spacing × 1.41 at the middle, and closes again. True concentric bends need a bigger radius per pipe (segment bending).
Formulamid-arc gap = spacing × √2This job1.25 × 1.414 = 1.768″Another job1.5 × 1.414 = 2.121″ - 10Check before you cut
Run the cut back through the formula: the drop should come out right.
Formuladrop = cut − stub + gainThis job24.283 − 19.853 + 2.423 = 6.853 ✓Another job22.283 − 14.353 + 2.423 = 10.353 ✓
What changes if…
| If this changes… | …these change | …these stay the same |
|---|---|---|
| Boxes farther apart | stubs, cuts, marks | drops, gain |
| Boxes at a different height | drops, cuts | stubs, marks |
| Run spacing | every run after the first | run 1 |
| Different bender | gain, deduct, cuts, marks | stubs, drops |
Your own job
Copy this onto your notebook page and work it before you cut.
| Step | Your job |
|---|---|
| 1 Stub | |
| 2 Drop | |
| 3 Gain | |
| 4 Cut | |
| 5 Mark | |
| 6 Shortest leg | |
| 7 Other runs | |
| 8 Their marks | |
| 9 Mid-arc gap | |
| 10 Check |
- With your team, work out for your run: stub and drop to the back, mark, and cut length. Use the box locations from your layout.
- Check the shortest leg: it needs room for the box offset and the bend. If it doesn't fit, find out why before you go on.
- Write it all in the team notebook for the submittal. Don't cut until the submittal is signed.
- After sign-off: cut to length and ream. Draw two lines down the stick a quarter-turn apart: one for the box offsets (they step off the wall), one for the 90 (it lies flat on the wall).
- Bend the box offsets on both ends, then the 90. Tag the piece (for example DR-L-bottom).
Part D · Build this section on its own
The DR section builds, checks and signs off without the rest of the wall. Sheet SEC-DR has every number.
- Mount only box D and box F (or E and G). Box F's center sits 22¾" left of box D's center; F's bottom is 10" lower than D's. Check both against your layout within 1/8".
- Install the three drops, bottom run first. Each seats in both connectors, lies flat, and is strapped within 3' of each box.
- Check with a tape: the straights sit 1¼" apart at D and at F. The gap opening through the bends is expected.
- Your instructor signs off the section. These pieces go into the full wall later unchanged.
It's right when your scrap 90s land on both legs within 1/8", your three-pipe rack holds even spacing on the straight legs, and your DR pieces match the signed submittal and seat in both boxes.
Sign-off: your instructor signs off Parts A and B before you cut Part C.
If it isn't right
- The stub is right but the drop is off: your gain is wrong, or you measured a leg to the wrong side.
- Both legs are long: the bend is under 90. Check with the level before you take it out.
- The rack's straight legs aren't evenly spaced: the stubs or drops didn't step by exactly one spacing.
- The gap opens in the middle of the curve: that's expected. Leave it.
Clips from Mel's videos
Each clip plays only the part of the video that matches the step.
Lab 6
U-bends (Rev K: UB pieces)
Goal: bend two 90s in the same direction on one stick, a U, so both legs and the distance between them land on target; then nest three. On the Rev K wall these are the six UB pieces that hang below the box row, from the bottom of box D to the bottom of box C, and from B to E. They're the longest pieces in the job and the only ones not cut from a 30" stick. Your team bends one U in each rack.
You need: your charted bender and chart card, 1/2" EMT (full sticks for Part C), torpedo level, angle finder, tape, pencil, hacksaw, reamer, two loose boxes with connectors, safety glasses and gloves.
The numbers
- Stub: each leg of the U, measured to the back of the 90. On the wall that's from the box bottom down to the lowest point of the pipe.
- Back to back: from the back of one 90 to the back of the other, across the outside of the U. If you know the distance between the two box centers, add one pipe diameter (1/2" EMT: 11/16"), because both backs sit on the outside.
- Cut length = stub + stub + back to back − (2 × your gain). Two 90s, so two gains.
- Nesting three Us: each U farther out gets both stubs longer by one spacing and its back to back longer by two spacings, so its cut is four spacings longer.
Part A · One U that lands (scrap)
- Target: 8" stubs and a 20" back to back. Write them down.
- Cut length = 8 + 8 + 20 − (2 × your gain). Cut it and ream it.
- Draw a straight line down the pipe (or use the seam) so both 90s stay in one plane.
- First 90: mark at 8" from one end, then mark 8 − your deduct and put the arrow on that one. Bend a true 90, check with the level.
- Second 90: from the 8" mark (the back of the first 90, not the deducted mark), measure 20" along the pipe and mark it.
- Turn the bender around. Put the point of the star on the 20" mark, line up your pencil line so the second 90 goes the same way as the first, and bend a true 90.
- Check: lay it on the floor, open side up. Both stubs read 8", the back to back reads 20", both legs are square, and it lies flat without rocking.
Repeat until it lands first try.
Part B · Three nested Us (scrap)
- Use a 2" spacing. Inside U: 8" stubs, 20" back to back. Middle: 10" and 24". Outside: 12" and 28".
- Work out each cut. Each should come out 8" longer than the one before (four spacings).
- Cut, bend, and nest the three on the floor, inside to outside.
- Check: the straight runs sit 2" apart all the way along. Through both corners the gap opens a little and closes again, the same as in Lab 5. That's expected; leave it.
Part C · Your Rev K UB pieces
Given (from the student brief): the U-bends run box to box, D to C and B to E, three nested, entering the box bottoms, kept whole. A box offset at both ends. The existing 2" conduits cross the area where the Us hang (FV-3).
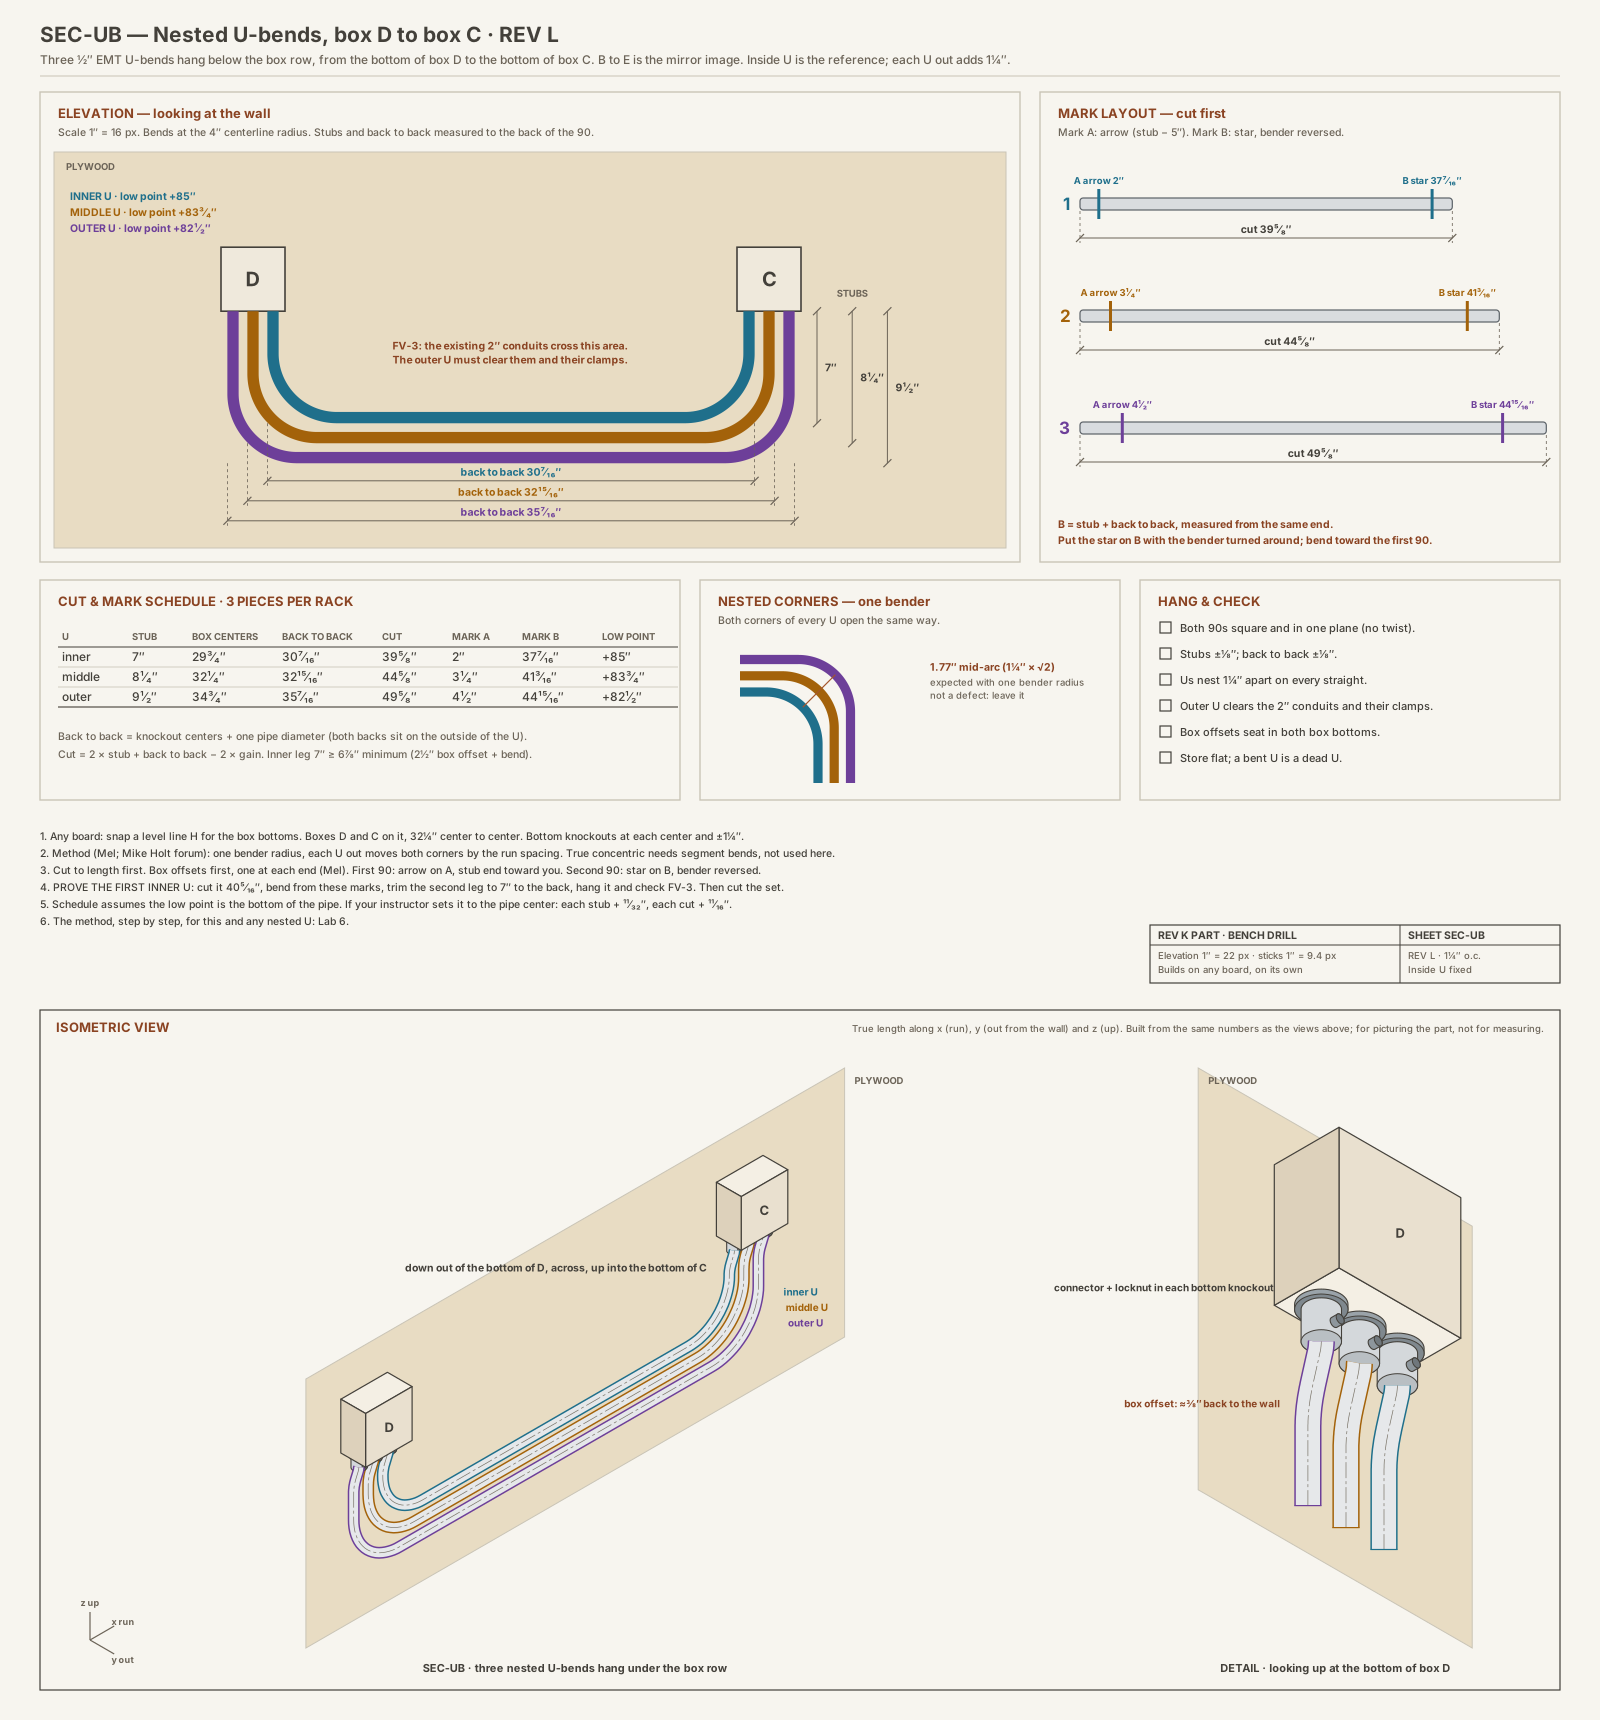
The method, step by step: any nested U
These 10 steps work for any back-to-back 90s, one U or a nest. Another job: two boxes whose knockouts are 24″ apart, an 8″ inside U, Us 1½″ apart.
- 1Stub (each leg of the U)
From the box bottom down to the lowest point of the pipe: that's the back of the 90. Pick it to clear whatever the U hangs over.
Formulastub = box bottom to the low pointThis job92 − 85 = 7″Another job8″ (chosen) - 2Knockout centers
The horizontal distance between the two knockouts this U enters.
Formulameasure knockout center to knockout centerThis job32¼ − 1¼ − 1¼ = 29¾″Another job24″ (measured) - 3Back to back
Mel measures back of 90 to back of 90. On a U both backs are on the outside, so add one pipe diameter to the centers.
Formulaback to back = centers + ODThis job29.75 + 0.706 = 30⁷⁄₁₆″Another job24 + 0.706 = 24¹¹⁄₁₆″ - 4Cut length
Two legs, the bottom, and two gains (one per 90).
Formulacut = 2 × stub + back to back − 2 × gainThis job14 + 30.456 − 4.846 = 39⁵⁄₈″Another job16 + 24.706 − 4.846 = 35⁷⁄₈″ - 5Mark A (first 90, on the arrow)
From one end, stub minus your deduct.
FormulaA = stub − deductThis job7 − 5 = 2″Another job8 − 5 = 3″ - 6Mark B (second 90, on the star)
From the same end: the stub (where the back of the first 90 lands) plus the back to back. Turn the bender around and put the star on B; the star is the back of the 90.
FormulaB = stub + back to backThis job7 + 30.456 = 37⁷⁄₁₆″Another job8 + 24.706 = 32¹¹⁄₁₆″ - 7Shortest-leg check
Each leg needs room for a box offset plus the bend.
Formulastub ≥ 2½ + R + ½ ODThis job7 ≥ 6⁷⁄₈″ ✓Another job8 ≥ 6⁷⁄₈″ ✓ - 8Nesting the next Us
The inside U is the reference (Mel: the first pipe gets no adjustment). Each U out adds one spacing to each stub and two spacings to the centers, so its cut is four spacings longer.
Formulastub + s · centers + 2s · cut + 4sThis job7″ / 30⁷⁄₁₆″ / cut 39⁵⁄₈″ · 8¹⁄₄″ / 32¹⁵⁄₁₆″ / cut 44⁵⁄₈″ · 9¹⁄₂″ / 35⁷⁄₁₆″ / cut 49⁵⁄₈″Another job8″ / 24¹¹⁄₁₆″ / cut 35⁷⁄₈″ · 9¹⁄₂″ / 27¹¹⁄₁₆″ / cut 41⁷⁄₈″ · 11″ / 30¹¹⁄₁₆″ / cut 47⁷⁄₈″ - 9Marks for the other Us
Both rules move with the stub.
FormulaA = stub − 5 · B = stub + back to backThis job2″ & 37⁷⁄₁₆″ · 3¹⁄₄″ & 41³⁄₁₆″ · 4¹⁄₂″ & 44¹⁵⁄₁₆″Another job3″ & 32¹¹⁄₁₆″ · 4¹⁄₂″ & 37³⁄₁₆″ · 6″ & 41¹¹⁄₁₆″ - 10Check before you cut
The second leg comes out of the cut: it should equal the stub.
Formulacut − B + gain = stubThis job39.61 − 37.456 + 2.423 = 4.577 ✓Another job35.86 − 32.706 + 2.423 = 5.577 ✓
What changes if…
| If this changes… | …these change | …these stay the same |
|---|---|---|
| Hang it lower | stubs, cuts, mark A, mark B | back to back |
| Boxes farther apart | back to back, cut, mark B | stubs, mark A |
| Spacing between Us | every U after the first | the inside U |
| Different bender | gain, deduct, cut, mark A | stubs, back to back |
Your own job
Copy this onto your notebook page and work it before you cut.
| Step | Your job |
|---|---|
| 1 Stub | |
| 2 Knockout centers | |
| 3 Back to back | |
| 4 Cut | |
| 5 Mark A | |
| 6 Mark B | |
| 7 Shortest leg | |
| 8 Next Us | |
| 9 Their marks | |
| 10 Check |
- Measure the 2" obstacle groups first, especially how far down they run (FV-3). The low point of your outer U has to clear them.
- With your team, work out for your U: stubs, back to back (box centers plus one pipe diameter), cut length, and both marks. Use the box locations from your layout.
- Write it in the team notebook for the submittal. Don't cut until the submittal is signed. These are the most expensive pieces in the job.
- After sign-off: cut to length and ream. Draw two lines down the stick a quarter-turn apart, one for the box offsets and one for the two 90s.
- Bend the box offsets on both ends first, then the first 90 on the arrow and the second on the star. Tag the piece (for example UB-L-outer).
- Store it flat on the rack right away. A bent U is a dead U.
Part D · Build this section on its own
The UB section builds, checks and signs off without the rest of the wall. Sheet SEC-UB has every number.
- Mount only box D and box C (or B and E), 32¼" center to center, bottoms at the same height. Check against your layout within 1/8".
- If the 2" conduits aren't on your wall, mark how far down they would run (FV-3) with a level line, so you can see the outer U clears it. If your instructor runs them down past the Us instead, every U gets a saddle in its bottom: Lab 8B.
- Install the Us inside first. Each seats in both box bottoms and lies flat on the plywood.
- Check: the Us sit 1¼" apart on every straight; the corners open a little and that's expected. Your instructor signs off the section.
It's right when your scrap U lands within 1/8" on both stubs and the back to back, your nested set holds even spacing on the straight runs, and your UB pieces match the signed submittal, seat in both boxes, and clear the 2" conduits.
Sign-off: your instructor signs off Parts A and B before you cut Part C.
If it isn't right
- Back to back is off by about a pipe diameter: you measured from the deducted mark or to a center, not back to back.
- Second leg comes out long or short: the star wasn't on the mark, or the second 90 isn't square.
- The U rocks on the floor: the second 90 is twisted against the first. Watch the line before the second bend.
- Cut came out wrong: check you subtracted two gains, not one.
Clips from Mel's videos
Each clip plays only the part of the video that matches the step.
Lab 7
3-point saddle (Rev K: S3 pieces)
Goal: bend a 3-point saddle that rides up over a round obstacle, centered on it, and know how much shorter it makes the pipe. On the Rev K wall these are the three S3 pieces between box D and box C that cross the single 2" conduit. Your team bends one of the three.
You need: your charted bender and chart card, 1/2" EMT scrap and 30" sticks, a piece of 2" pipe or any round obstacle about 3" tall, angle finder, torpedo level, tape, pencil, hacksaw, reamer, two loose boxes with connectors, safety glasses and gloves.
The numbers
A 3-point saddle is three bends: a 45° in the middle and a 22-1/2° on each side. Mel names it by the side bends, so this is a "22-1/2 saddle."
- Depth: how high the pipe has to go to clear the obstacle, clamps included. Measure from the surface to the top of the obstacle.
- Side marks = depth × 2-1/2, measured out from the center mark on each side.
- Center-mark advance = depth × 3/16". Add it to your measurement to the obstacle's center, in the direction you measured, so the top of the saddle lands on the obstacle.
- Total shrink = depth × 3/8". That's how much shorter the whole stick reaches end to end. It's exactly twice the advance, because a saddle is really two offsets.
- Don't mix them up. The advance places the center mark; the total shrink sets the cut length. Using one where the other belongs is the most common saddle mistake.
Part A · The standard 3-point (scrap)
- Lay the obstacle on the floor and set the end of your pipe a measured distance from its center (example: 20"). Measure the depth (example: 3").
- Center mark = 20 + (3 × 3/16) = 20-9/16" from the end. Mark it all the way around.
- Side marks = 3 × 2-1/2 = 7-1/2" each side of the center mark. Mark both all the way around.
- Draw a line down the pipe (or use the seam).
- Put the center mark on the notch and bend 45°.
- Turn the pipe 180° so the line is on the bottom. Put one side mark on the arrow, bender facing the center bend, and bend 22-1/2°.
- Take it out, turn it end for end, and bend the other side mark the same way to 22-1/2°.
- Check: lay it over the obstacle. It clears, the top is centered on the obstacle within 1/4", and both ends lie flat without rocking.
Part B · Mel's push-through method (scrap)
When the saddle has to sit close to the end of the pipe, there's nothing left to grab for the last bend. Mel's method keeps the pipe in the bender the whole time.
- Center mark = distance + depth × 3/16", the same as Part A.
- Side marks = depth × 3 each side (not 2-1/2), because every bend goes on the notch.
- Bend in this order without taking the pipe out: one side mark on the notch to 22-1/2°; slide to the center, turn 180°, notch, 45°; slide to the last side mark, turn 180°, notch, 22-1/2°.
- Try it with the obstacle 10" from the pipe end. Then try Part A at 10" and see why Mel's method exists.
Use the standard method (Part A) on the Rev K wall. Your team's marks have to match each other and the answer key.
Part C · Your Rev K S3 pieces
Given (from the student brief): a 3-point saddle on the left between box D and box C, over the single existing 2" conduit on strut, about 3" tall. Every piece off a 30" stick. A box offset at both ends.
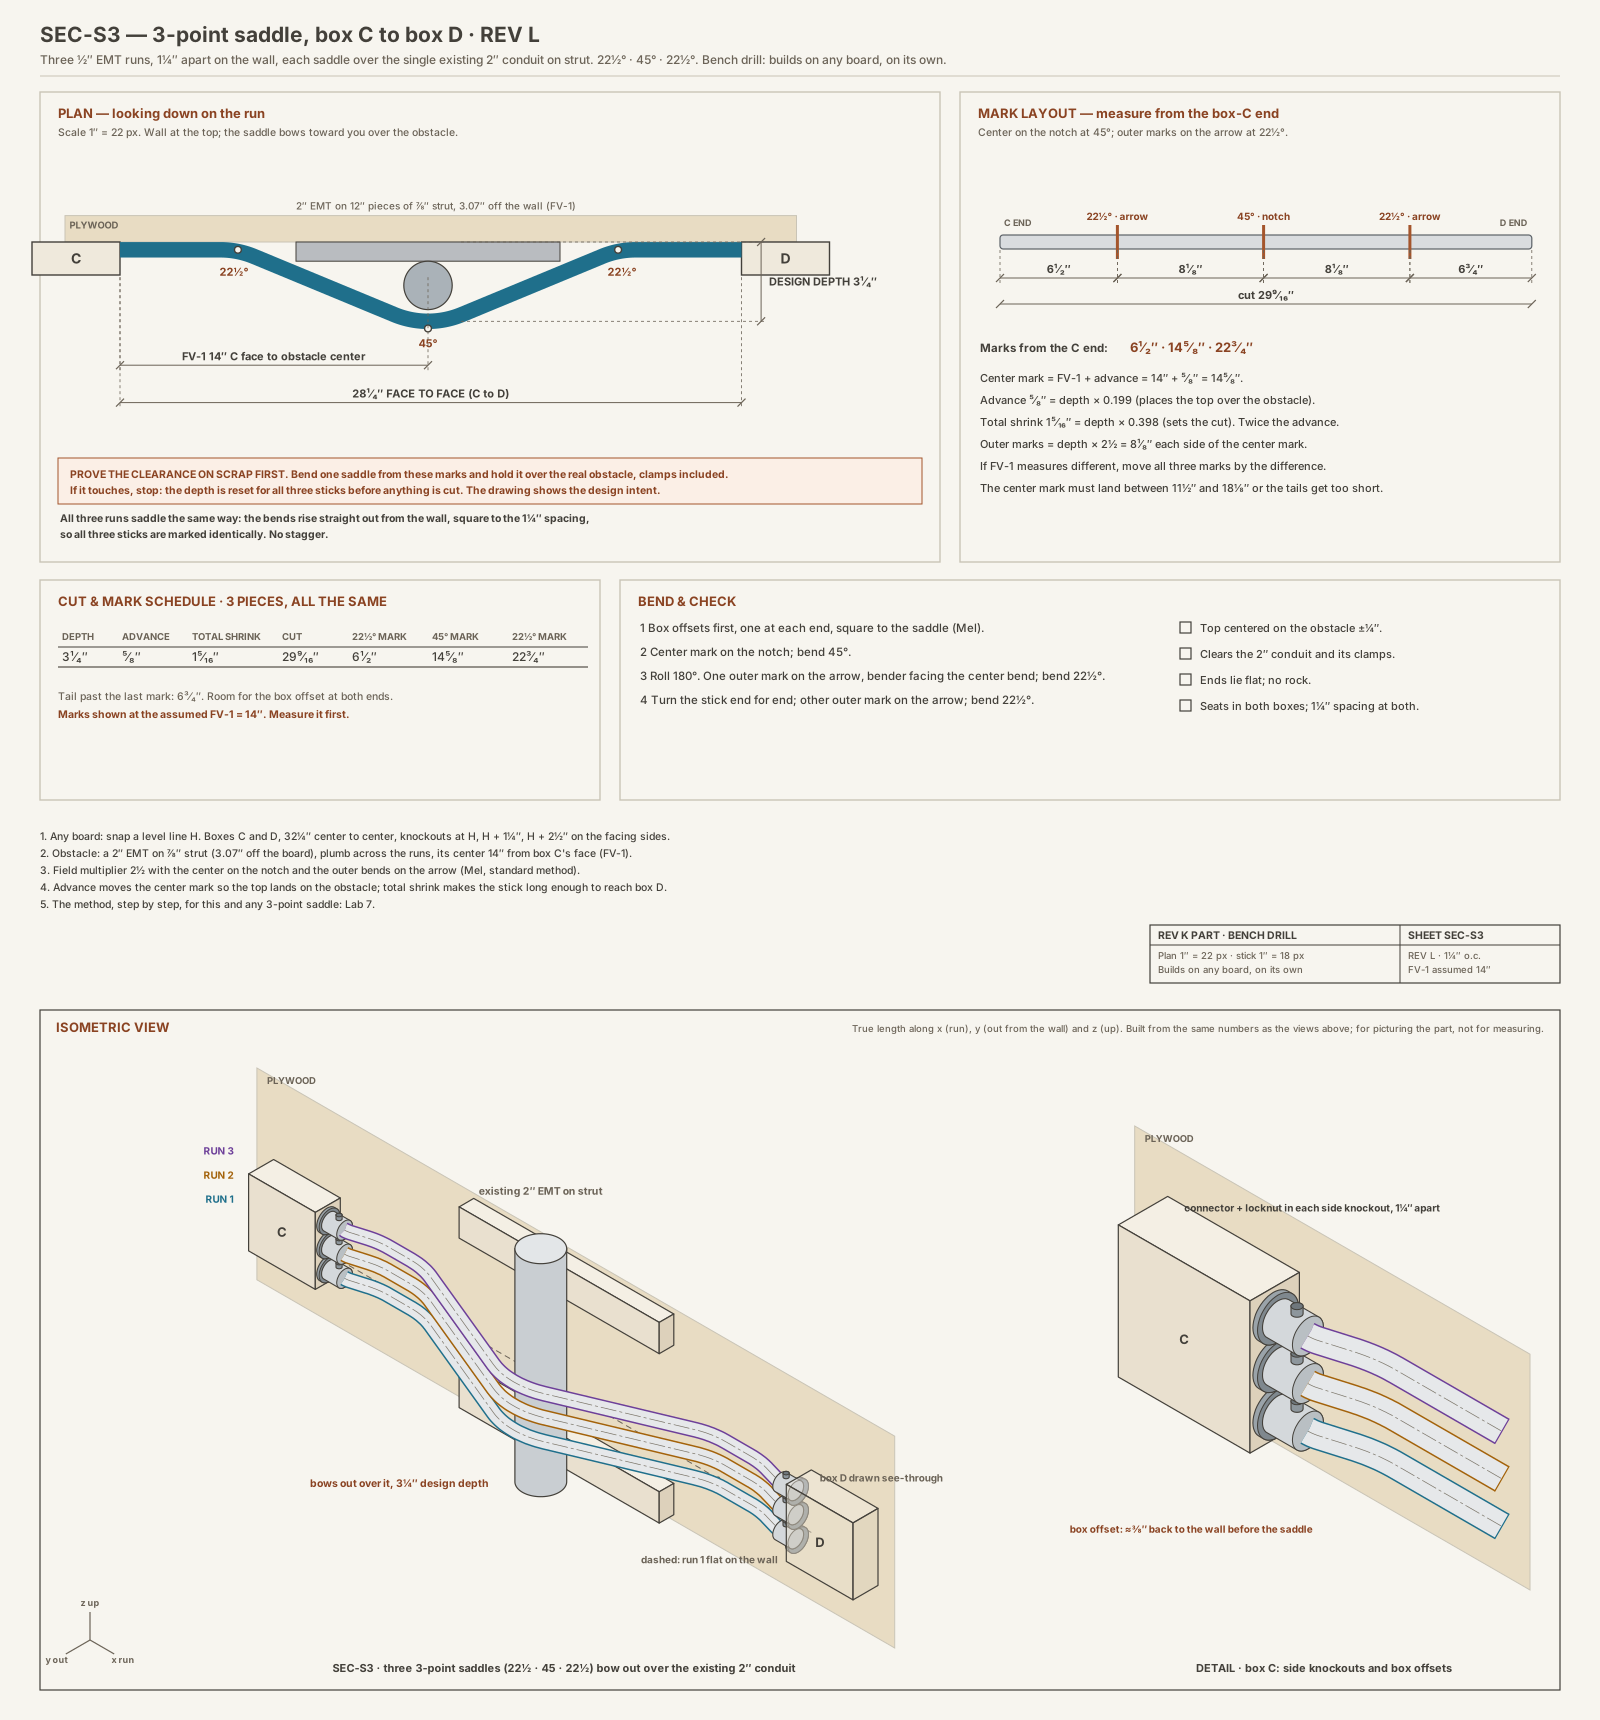
The method, step by step: any 3-point saddle
These 9 steps work for any 22½° / 45° / 22½° saddle over a round obstacle. Another job: a 2¼″ deep saddle over an obstacle 18″ from the box, boxes 36″ face to face.
- 1Depth
How far off the wall the pipe has to go: the obstacle's height including its strut and clamps, plus a little clearance. Prove it by bending one on scrap over the real obstacle before cutting the set.
Formuladepth = obstacle + clamps + clearanceThis job3¼″ (Rev K design)Another job2¼″ (a 1″ EMT on strut + clearance) - 2Distance to the obstacle
From the end of the pipe (the box face) to the obstacle's center.
Formulameasure: box face to obstacle centerThis job14″ (FV-1)Another job18″ - 3Center-mark advance
The saddle shortens the pipe, so the top would land short of the obstacle. Move the center mark forward by half the total shrink.
Formulaadvance = depth × 0.199 (≈3⁄16″ per inch)This job3.25 × 0.199 = ⁵⁄₈″Another job2.25 × 0.199 = ⁷⁄₁₆″ - 4Center mark (45°, on the notch)
Add the advance in the direction you measured. Mel: add, never subtract.
Formulacenter = distance + advanceThis job14 + 0.646 = 14⁵⁄₈″Another job18 + 0.448 = 18⁷⁄₁₆″ - 5Outer marks (22½°, on the arrow)
The standard field multiplier for a 22½° / 45° / 22½° saddle is 2½, with the center on the notch and the sides on the arrow.
Formulaouter = center ± depth × 2½This job14.646 ± 8.125 = 6¹⁄₂″ and 22³⁄₄″Another job18.448 ± 5.625 = 12¹³⁄₁₆″ and 24¹⁄₁₆″ - 6Total shrink and cut
A saddle is two offsets, so it shrinks twice the advance. The stick has to cover the reach plus that.
Formulatotal shrink = depth × 0.398 · cut = reach + total shrinkThis job1⁵⁄₁₆″ · 28¼ + 1.293 = 29⁹⁄₁₆″Another job⁷⁄₈″ · 36 + 0.895 = 36⁷⁄₈″ - 7Tail check
Both tails need room for a box offset (2½″ straight plus the bend, ≈3⁵⁄₁₆″ at 22½°).
Formulafirst mark ≥ 3⁵⁄₁₆″ · cut − last mark ≥ 3⁵⁄₁₆″This job6¹⁄₂″ and 6³⁄₄″ ✓Another job12¹³⁄₁₆″ and 12¹³⁄₁₆″ ✓ - 8Several runs
When the saddle rises straight out from the wall, square to the spacing between runs, every run is marked the same: no stagger. (If the runs were stacked in the same plane as the saddle, use the offset stagger from Lab 4.)
Formulastagger = 0 when bends are square to the spacingThis joball three the sameAnother joball the same - 9Bend order
Box offsets first, one at each end (Mel: on a short piece they go on before the main bends). Then the center on the notch to 45°. Roll 180°, one outer mark on the arrow facing the center bend, 22½°. Turn the stick end for end, last mark the same way.
Formulabox offsets → center → side → sideThis jobbox offsets · 45° · 22½° · 22½°Another jobbox offsets · 45° · 22½° · 22½°
What changes if…
| If this changes… | …these change | …these stay the same |
|---|---|---|
| Obstacle farther from the box | all three marks move by the same amount | depth, spacing, cut |
| Deeper obstacle | advance, outer marks, shrink, cut | distance to obstacle |
| Boxes farther apart | cut, far tail | marks |
Your own job
Copy this onto your notebook page and work it before you cut.
| Step | Your job |
|---|---|
| 1 Depth | |
| 2 Distance to obstacle | |
| 3 Advance | |
| 4 Center mark | |
| 5 Outer marks | |
| 6 Shrink and cut | |
| 7 Tails | |
| 8 Stagger? | |
| 9 Bend order |
- Measure the obstacle yourself (FV-1): the distance from box C's face to the 2" conduit's center, and its height including the strut and clamps.
- With your team, work out: depth, center-mark advance, center mark from the box-C end, side marks, total shrink, and cut length. Check there's enough straight pipe at each end for the box offsets.
- All three S3 sticks are marked the same. These bends rise straight out from the wall, square to the spacing between the pipes, so there's no stagger. Work out why before the submittal.
- Write it in the team notebook for the submittal. Don't cut until the submittal is signed.
- After sign-off: cut and ream, draw two lines a quarter-turn apart, bend the box offsets on both ends, then the saddle. Tag it (S3-1, S3-2, S3-3).
Part D · Build this section on its own
The S3 section builds, checks and signs off without the rest of the wall. Sheet SEC-S3 has every number, and a warning to read first.
- Mount only box C and box D, 32¼" center to center. Mount a 2" EMT on 7/8" strut between them, its center 14" from box C's face (or measure where yours is: that's FV-1, and every mark moves with it).
- Bend one saddle on scrap and hold it over the obstacle first. If the pipe touches the obstacle or its clamps, stop: your instructor resets the depth for all three sticks before anything is cut.
- Install the three saddles. Each clears the 2" conduit and its clamps, seats in both boxes, and lies flat.
- Check: the runs sit 1¼" apart at both boxes. Your instructor signs off the section.
It's right when your scrap saddles clear the obstacle, center within 1/4", and lie flat; and your S3 piece matches the signed submittal, clears the 2" conduit and its clamps, and seats in both boxes.
Sign-off: your instructor signs off Parts A and B before you cut Part C.
If it isn't right
- The top lands past the obstacle by about the advance: you added the advance the wrong way, or not at all.
- The stick comes up short at the box: you used the advance (3/16") where the total shrink (3/8") belongs.
- It rocks on the floor: one side bend is twisted. Watch the line.
- It doesn't clear: depth measured to the pipe, not to the top of the clamps.
Clips from Mel's videos
Each clip plays only the part of the video that matches the step.
Lab 8
4-point saddle (Rev K: S4 pieces)
Goal: bend a 4-point saddle: two offsets on one stick, up and over a wide obstacle and back down, all four bends in one plane. On the Rev K wall these are the three S4 pieces between box B and box E that cross the pair of 2" conduits. Your team bends one of the three.
You need: your charted bender and chart card, 1/2" EMT scrap and 30" sticks, a wide obstacle (a box or a block about 3" tall and 8"–10" wide), angle finder, torpedo level, tape, pencil, hacksaw, reamer, two loose boxes with connectors, safety glasses and gloves.
The numbers
(all from Lab 4)
- Rise: the obstacle's height, clamps included.
- Width: the obstacle's width along the pipe, plus any clearance you want.
- Spacing for each offset = rise × multiplier (30°: × 2).
- Shrink for each offset = rise × shrink per inch (30°: 1/4"). A 4-point is two offsets, so the stick's total shrink is twice that.
Part A · Edge-of-obstacle method (scrap)
Mel lays a 4-point out from the near edge of the obstacle, not its center.
- Measure from the end of the pipe to the near edge of the obstacle (example: 20"). Measure its height (3") and width (8").
- One offset's shrink = 3 × 1/4 = 3/4". Mark A = 20 + 3/4 = 20-3/4" from the end.
- Mark B = A − spacing (3 × 2 = 6"), back toward the end: 14-3/4".
- Mark C = A + width: 28-3/4".
- Mark D = C + spacing: 34-3/4". Write a letter beside each mark and mark them all the way around.
- Draw a line down the pipe (or use the seam). All four bends have to stay in one plane.
- Bend A on the arrow to 30°, with your back to B. Slide to B, turn the pipe 180°, arrow on B, bend 30°. That's the first offset.
- Turn the bender around. C on the arrow with the bender facing A, bend 30°. Slide to D, turn 180°, bend 30°.
- Check: lay it over the obstacle. The flat top clears it, both ends lie flat on the floor, and nothing rocks.
- To correct it, adjust the outside bends (B and D), not the inside ones. Add bend if the ends don't touch the floor; take some out if they lift too much.
Mel's own habit is to bend A, then C, then the outside bends, so the pipe is still in front of him while he lines up the inside pair. Try it both ways and see which dogs less for you.
Part B · Mel's push-through 4-point (scrap, optional)
For a saddle near the end of the stick. All four bends go on the arrow, in order A, B, C, D, without taking the pipe out. You first measure your own offset constant for the angle (Mel's 3/4" EMT at 30° was 5-1/2"; find yours on scrap), then A = edge − (rise × 1.73 + offset constant). Watch the clip before you try it.
Part C · Your Rev K S4 pieces
Given (from the student brief): a 4-point saddle on the right between box B and box E, over the pair of existing 2" conduits on strut, about 3" tall. Four 30° bends. Every piece off a 30" stick. A box offset at both ends.
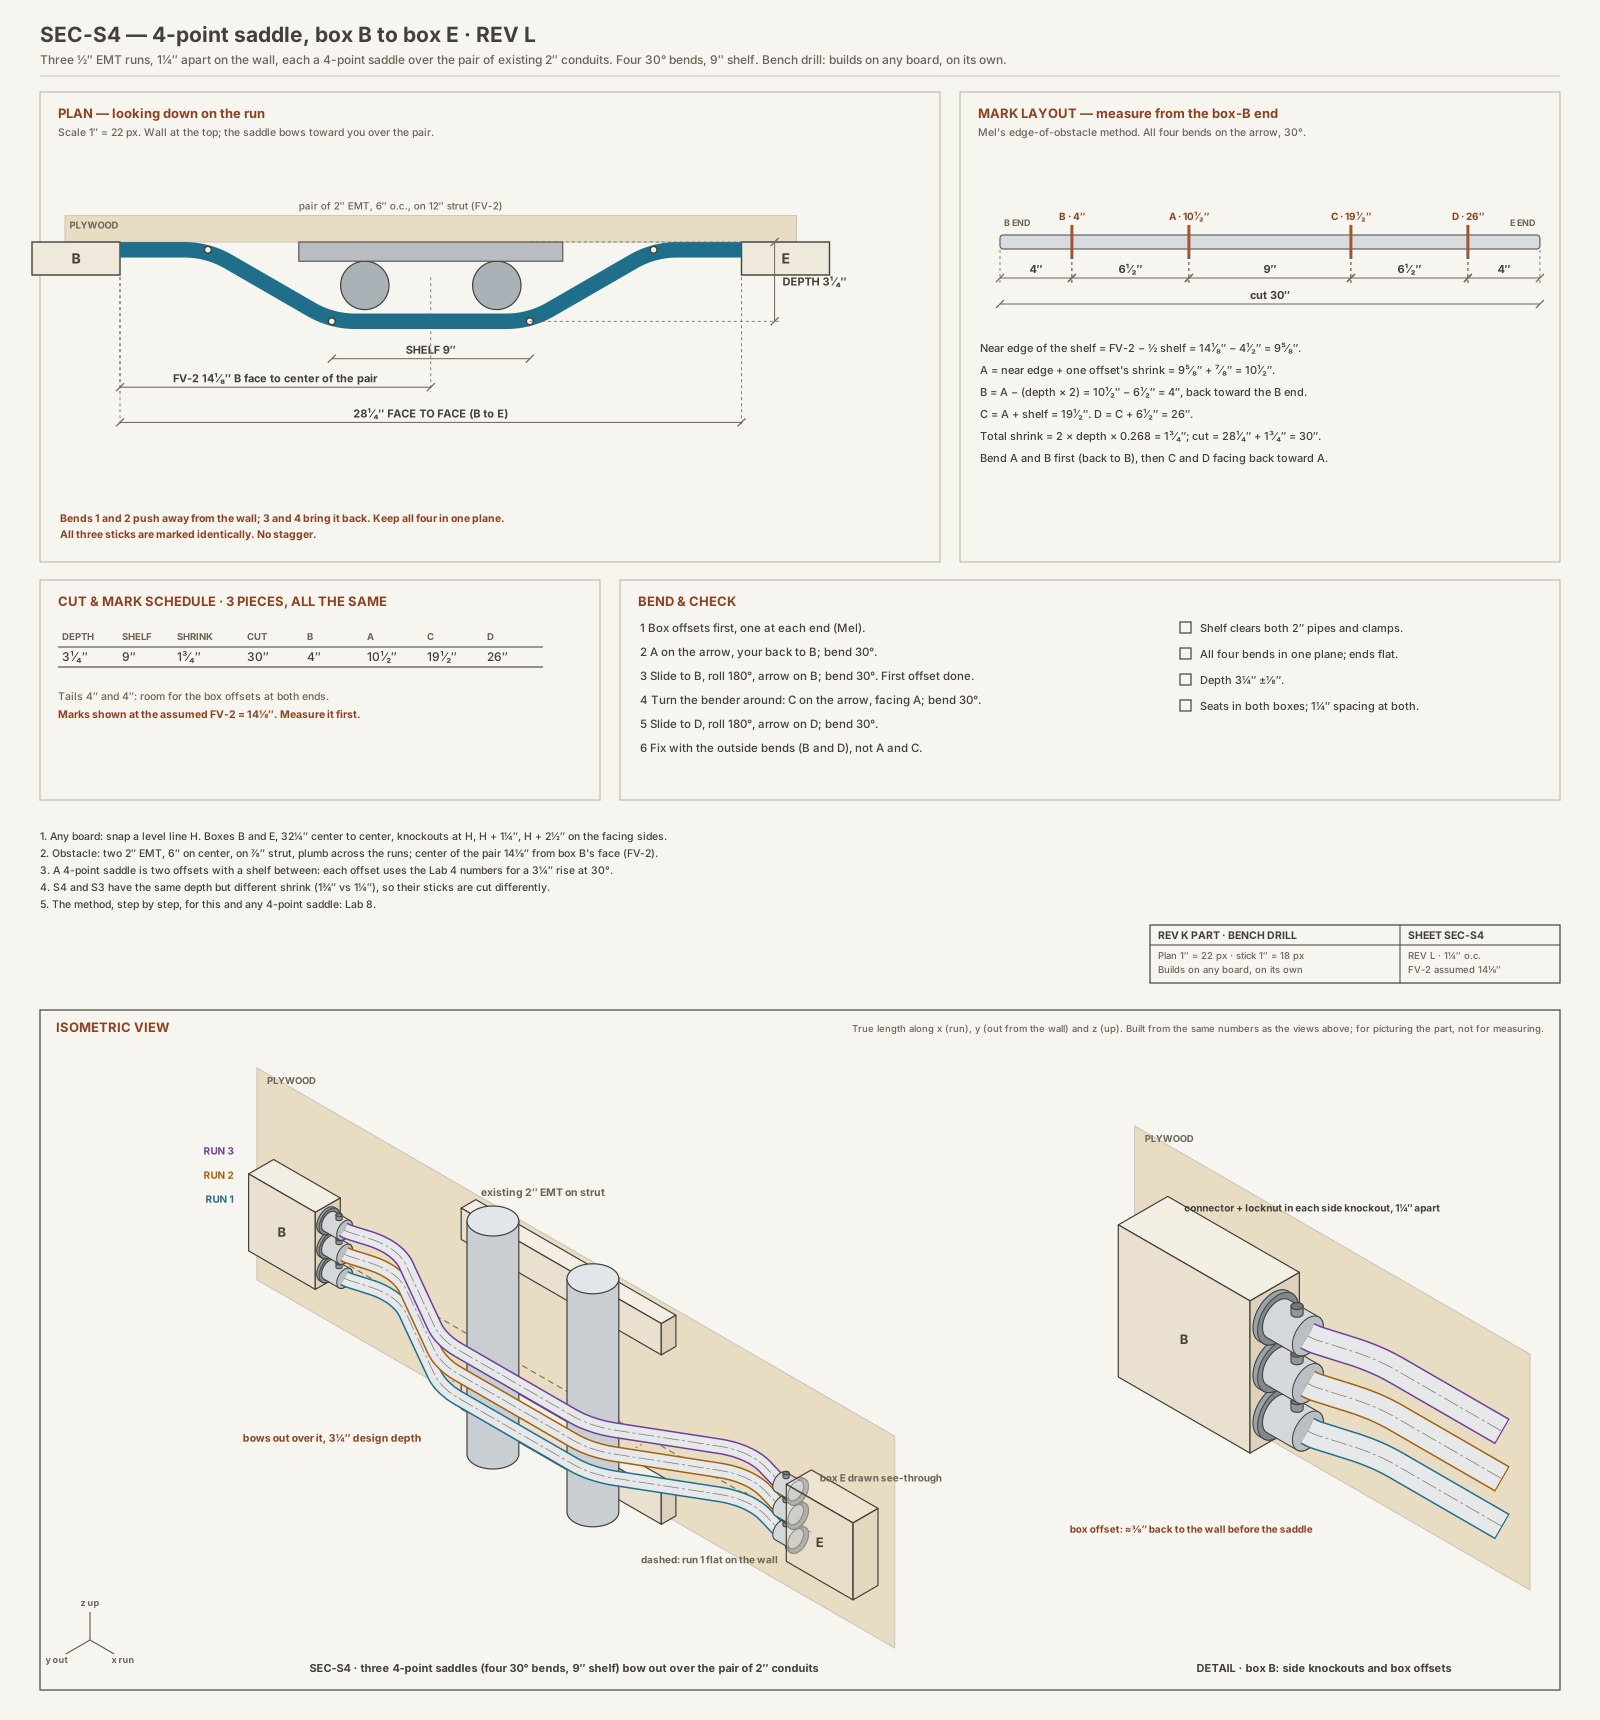
The method, step by step: any 4-point saddle
These 11 steps work for any 4-point saddle over a wide obstacle. Another job: a 2½″ deep, 12″ wide box 20″ from the end, boxes 40″ face to face.
- 1Depth and shelf
Depth: how far off the wall, clamps included. Shelf: the obstacle's width plus clearance, so the flat part covers it.
Formuladepth = obstacle + clamps + clearance · shelf = width + clearanceThis job3¼″ deep · 9″ shelfAnother job2½″ deep · 12″ shelf - 2Where the obstacle is
From the box face to the center of the obstacle.
Formulameasure: box face to obstacle centerThis job14⅛″ (FV-2)Another job20″ - 3Offset numbers (30°)
Each side of a 4-point is an ordinary offset (Lab 4).
Formulaspacing = depth × 2 · shrink = depth × 0.268This job6¹⁄₂″ · ⁷⁄₈″Another job5″ · ¹¹⁄₁₆″ - 4Near edge of the shelf
Mel lays a 4-point out from the edge, not the center.
Formulaedge = obstacle center − ½ shelfThis job14.125 − 4.5 = 9⁵⁄₈″Another job20 − 6 = 14″ - 5Mark A
The first offset shrinks the pipe, so add one offset's shrink to land the shelf on the obstacle.
FormulaA = edge + shrinkThis job9.625 + 0.871 = 10¹⁄₂″Another job14 + 0.67 = 14¹¹⁄₁₆″ - 6Mark B
One offset spacing back toward the measured end.
FormulaB = A − spacingThis job4″Another job9¹¹⁄₁₆″ - 7Mark C
The far end of the shelf.
FormulaC = A + shelfThis job19¹⁄₂″Another job26¹¹⁄₁₆″ - 8Mark D
One offset spacing past C.
FormulaD = C + spacingThis job26″Another job31¹¹⁄₁₆″ - 9Cut
Two offsets, so twice the shrink.
Formulacut = reach + 2 × shrinkThis job28¼ + 1.742 = 30″Another job40 + 1.34 = 41⁵⁄₁₆″ - 10Tail check
Both tails ≥ 3⁹⁄₁₆″ at 30° for the box offsets.
FormulaB ≥ 3⁹⁄₁₆″ · cut − D ≥ 3⁹⁄₁₆″This job4″ and 4″ ✓Another job9¹¹⁄₁₆″ and 9¹¹⁄₁₆″ ✓ - 11Bend order
A then B (back to B), turn the bender around, C then D facing A. Fix with B and D, not A and C. All four in one plane.
FormulaA → B → C → DThis joball on the arrow, 30°Another joball on the arrow, 30°
What changes if…
| If this changes… | …these change | …these stay the same |
|---|---|---|
| Wider obstacle | shelf, C, D, nothing else | A, B, cut |
| Deeper obstacle | spacing, shrink, every mark, cut | shelf |
| Obstacle moves | all four marks by the same amount | cut |
Your own job
Copy this onto your notebook page and work it before you cut.
| Step | Your job |
|---|---|
| 1 Depth / shelf | |
| 2 Obstacle center | |
| 3 Spacing / shrink | |
| 4 Near edge | |
| 5 A | |
| 6 B | |
| 7 C | |
| 8 D | |
| 9 Cut | |
| 10 Tails | |
| 11 Bend order |
- Measure the pair yourself (FV-2): box B's face to the near edge of the pair, the pair's total width including clamps, and its height.
- With your team, work out: rise, spacing, shrink, all four marks from the box-B end, total shrink, and cut length. Check there's straight pipe at each end for the box offsets.
- Like S3, all three S4 sticks are marked the same; there's no stagger.
- Compare your S4 with your team's S3: same height, same sort of stick, but they don't reach the same distance. Work out why before the submittal.
- Write it in the team notebook for the submittal. Don't cut until the submittal is signed.
- After sign-off: cut and ream, draw two lines a quarter-turn apart, bend the box offsets on both ends, then the four saddle bends. Tag it (S4-1, S4-2, S4-3).
Part D · Build this section on its own
The S4 section builds, checks and signs off without the rest of the wall. Sheet SEC-S4 has every number.
- Mount only box B and box E, 32¼" center to center. Mount two 2" EMT on strut between them, 6" apart, the center of the pair 14⅛" from box B's face (FV-2; every mark moves with it).
- Install the three saddles. Each shelf clears both 2" pipes and their clamps, all four bends sit in one plane, and each seats in both boxes.
- Check: the runs sit 1¼" apart at both boxes. Your instructor signs off the section.
It's right when your scrap 4-point clears the obstacle and lies flat with all four bends in one plane, and your S4 piece matches the signed submittal, clears both 2" conduits and their clamps, and seats in both boxes.
Sign-off: your instructor signs off Part A before you cut Part C.
If it isn't right
- It rocks or twists: one offset rolled against the other. Check the line before every bend.
- The top is too short for the obstacle: you laid C off from B instead of A.
- It lands short at the box: you forgot the shrink, or used one offset's shrink for the whole stick.
- "If you can mess up an offset, you can really mess up a four-point saddle" (Mel). Re-check alignment before each bend.
Clips from Mel's videos
Each clip plays only the part of the video that matches the step.
Lab 8B
U-bends with a saddle (Rev K option: UBS pieces)
Goal: bend a U whose bottom saddles over an obstacle: two 90s and a saddle on one stick, every bend in the right plane, both legs landing on target. On the Rev K wall this is an option: your instructor runs the existing 2" conduits down past the U-bends, and all six UB pieces become UBS pieces. It puts Labs 6, 7 and 8 on one stick, so do those first.
You need: your charted bender and chart card, 1/2" EMT (full sticks for Part B, scrap for Part A), the obstacle (2" EMT strapped to 12" pieces of strut, 3" off the wall), torpedo level, angle finder, tape, pencil, hacksaw, reamer, two loose boxes with connectors, safety glasses and gloves.
The numbers
- The U is Lab 6: stubs, back to back, the arrow for the first 90 and the star for the second.
- The saddle is Lab 7 (3-point, box D to box C, over the single 2") or Lab 8 (4-point, box B to box E, over the pair). Target depth 3¼" over the 3" obstacle.
- The 4-point in a U is bent at 45°, not 30°. At 30° the outer saddle bends land inside the inner U's 90s.
- Saddle marks are measured from the back of the first 90, along the bottom. The second 90 is laid out after the saddle, so the saddle's shrink never moves it.
- Cut = the Lab 6 U cut + the saddle's shrink. Mel's shrink rule counts sharp corners and real bends shrink less, so here you measure your own (Part A).
Part A · Prove it on scrap
- On scrap, draw two marks 30" apart. Lay out one saddle between them from your inner U's numbers.
- Bend it (Lab 7 or Lab 8 steps) and measure between the marks again. 30" minus that is your shrink. Write it down.
- Hold the saddle over the real obstacle, strut and all. It has to clear.
- Check the room: the inner U has only about 3" of straight between a 90 and the saddle. Put your bender on a scrap 90 at that distance and make sure the shoe fits.
Part B · Your Rev K UBS pieces
Given (from the student brief): the same boxes and U-bends as Lab 6, with the existing 2" run down past them and the lower strut at +79½", below the outer U.
- With your team, work out for your U: stubs, back to back, the saddle marks from the back of the first 90, and the cut (Lab 6 cut + your measured shrink).
- Write it in the team notebook for the submittal. Don't cut until the submittal is signed.
- After sign-off: cut and ream. Box offsets on both ends first, both kicked the same way (Mel).
- First 90 on the arrow, as in Lab 6.
- Lay the first stub flat on the floor, box offset pointing up. Hook your tape on the back of the 90 and mark the saddle along the bottom.
- Bend the saddle up off the floor, the same side the box offsets point.
- Lay it flat again. Tape on the floor from the back of the first 90: mark the back to back. Star on the mark, bender turned around, bend the second 90.
- Check the second leg against the stub, then tag it (for example UBS-L-outer) and store it flat.
Part C · Build this section on its own
The UBS section builds, checks and signs off without the rest of the wall. Sheets SEC-UBS3 and SEC-UBS4 have every number.
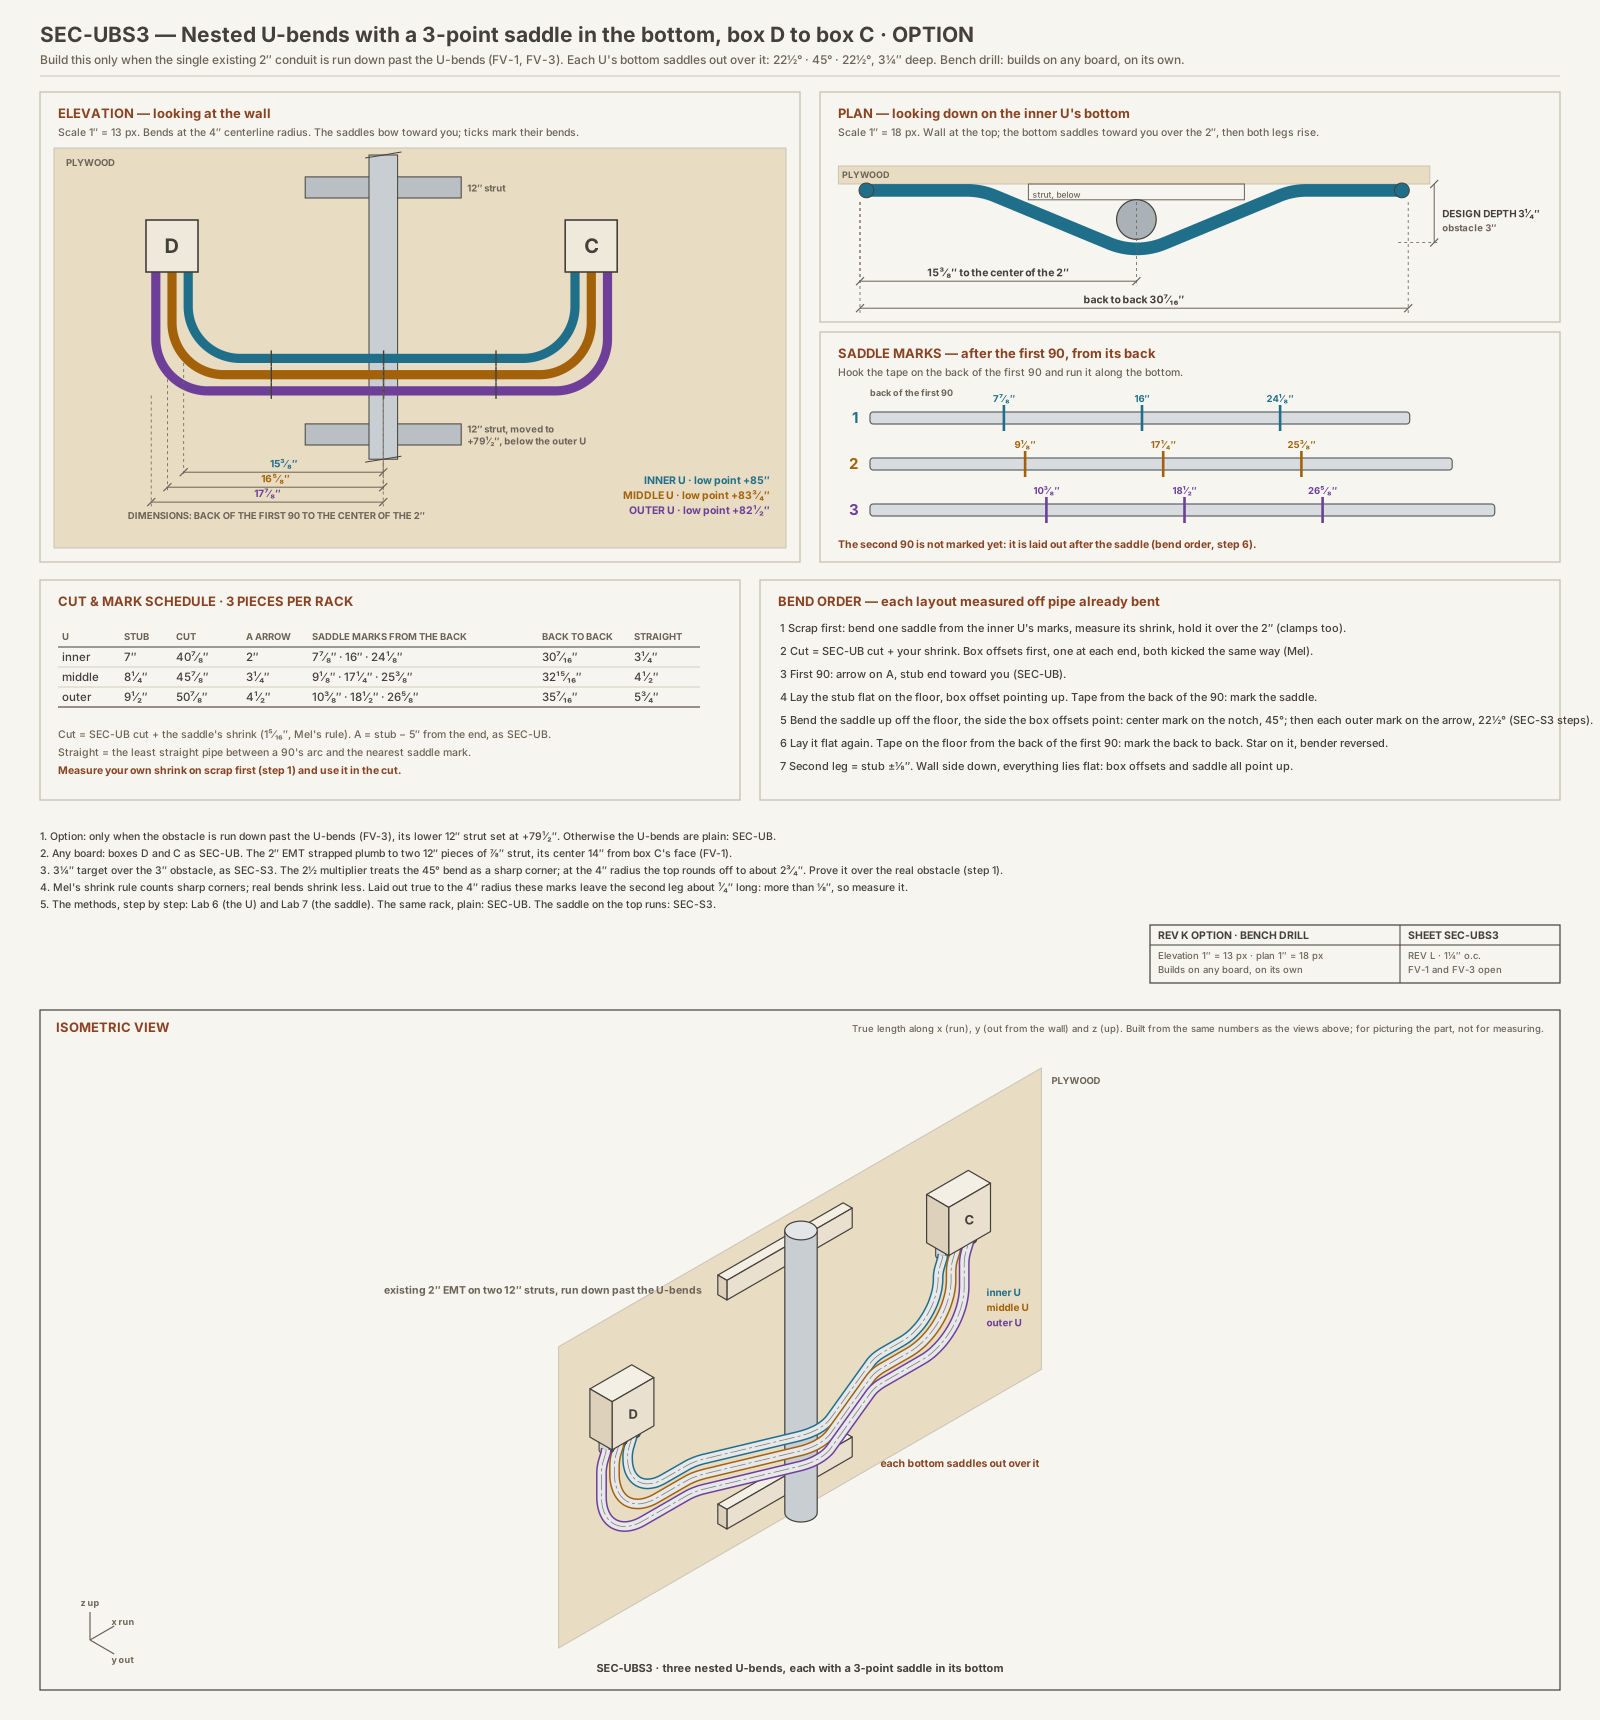
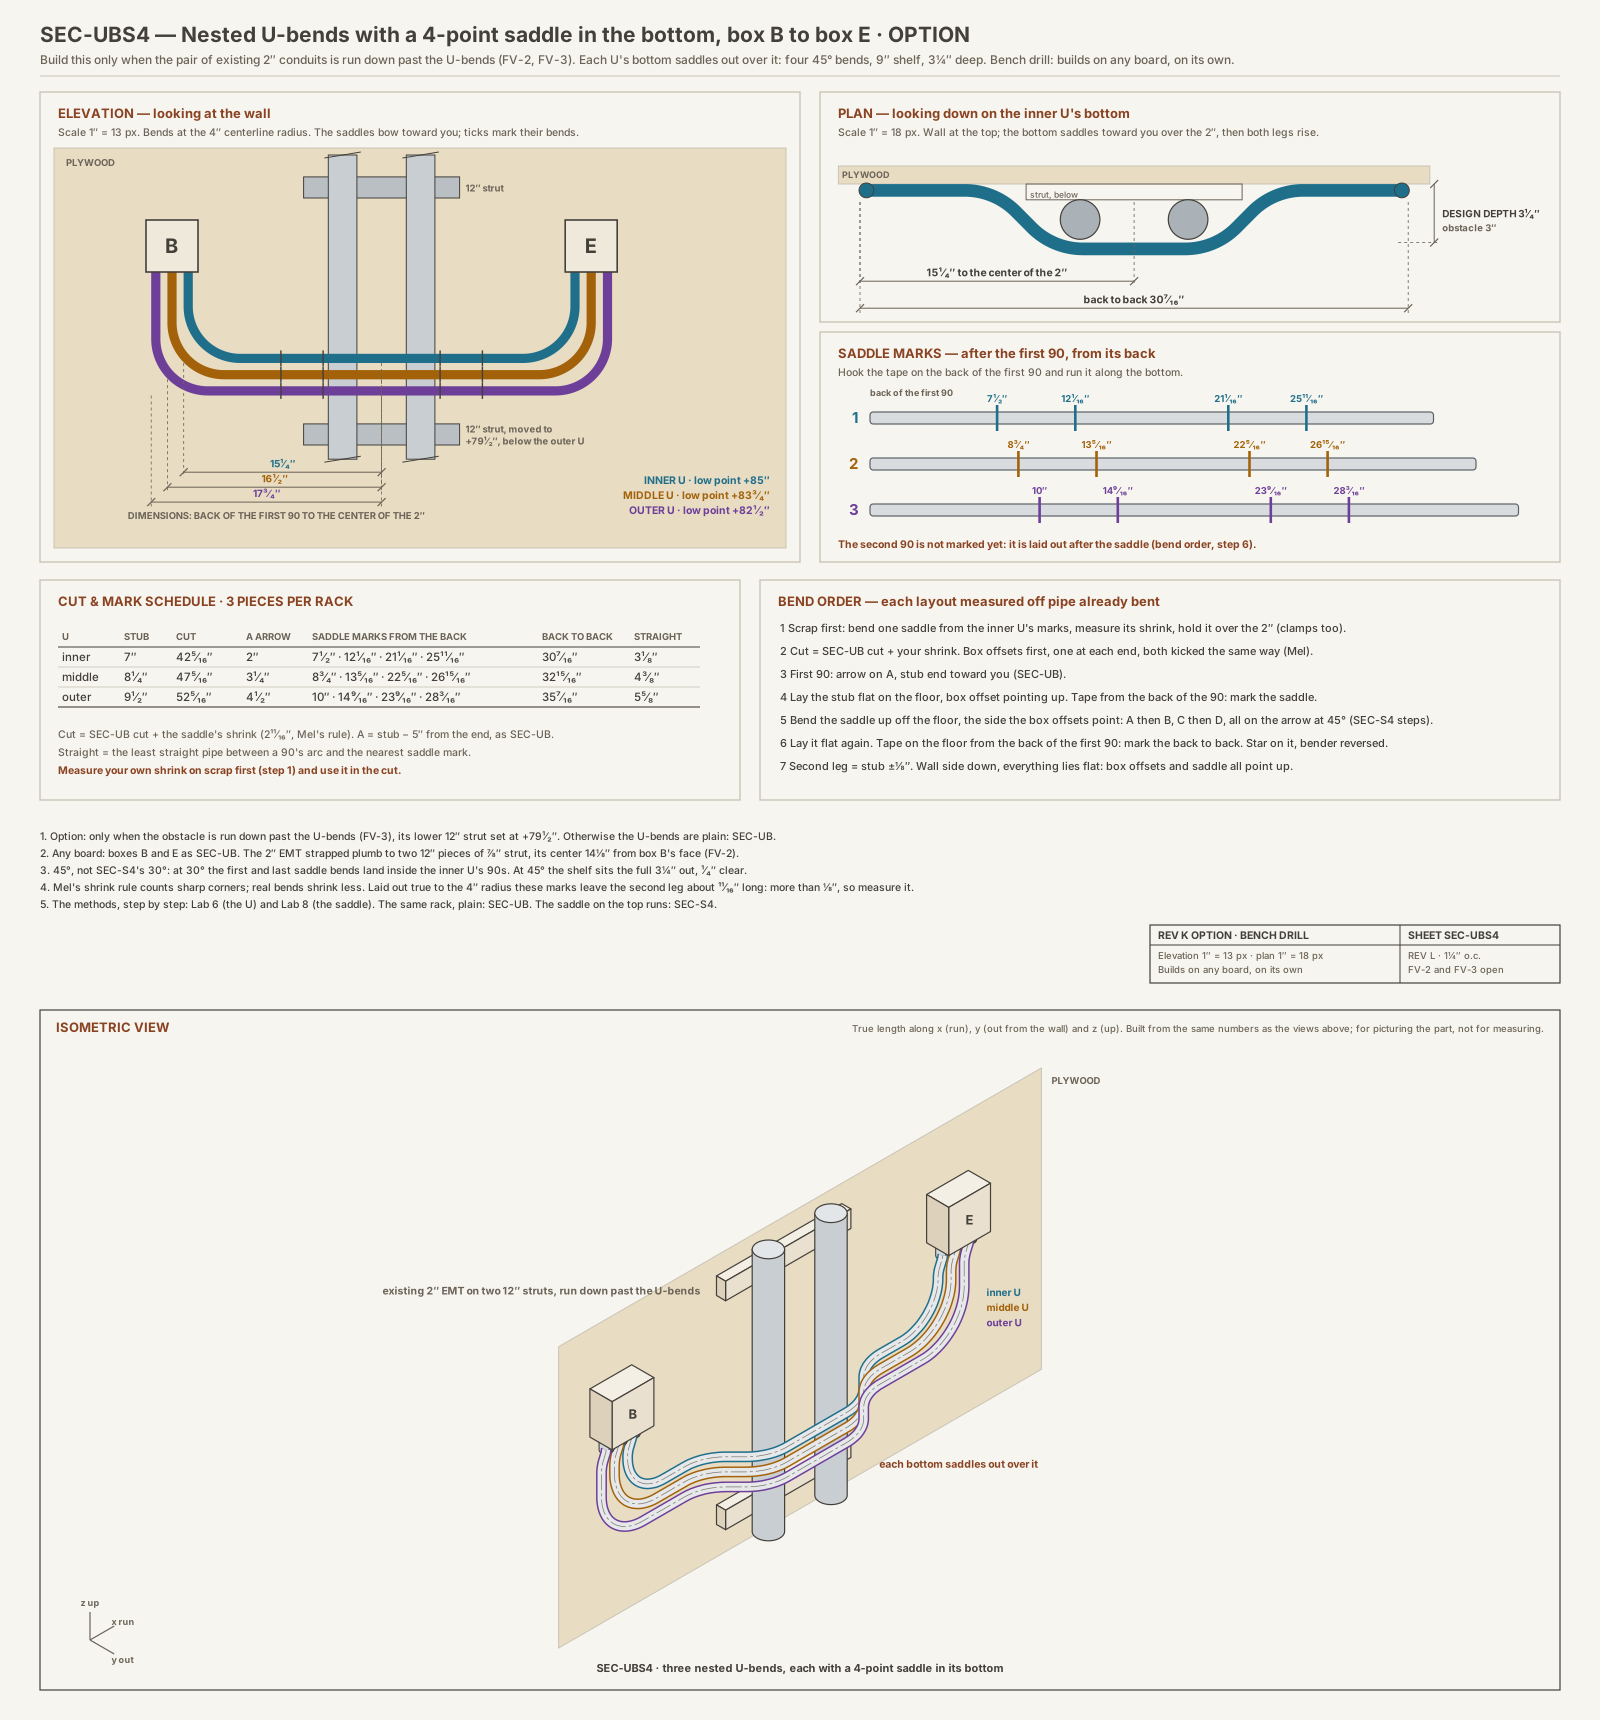
- Mount only box D and box C (or B and E), as Lab 6. Mount the 2" on two 12" pieces of strut, the lower one at +79½", its center where FV-1 (or FV-2) puts it.
- Install the Us inside first. Each seats in both box bottoms, and each saddle clears the 2".
- Check: the Us sit 1¼" apart on every straight, and the saddles nest. Your instructor signs off the section.
It's right when your scrap saddle clears the obstacle, each U's second leg comes out at the stub within 1/8", and the U lies flat wall side down with the box offsets and the saddle all pointing up.
Sign-off: your instructor signs off Part A before you cut Part B.
If it isn't right
- The second leg is long: you used the shrink rule, not the shrink you measured.
- The saddle points the wrong way, or the U won't lie flat: the stub wasn't flat on the floor when you bent the saddle. Use the lines down the pipe.
- The bender won't fit between the 90 and the saddle: that's the inner U's 3". Mel's push-through saddle (Lab 7, Part B) is his answer for saddles close to the end of the pipe.
- The U is too wide or narrow: measure the back to back from the back of the first 90, after the saddle, not from the end.
Clips from Mel's videos
Each clip plays only the part of the video that matches the step.
Lab 9
The Rev K wall: submittal, build, grade
Goal: three teams put Labs 4–8 together into one wall. You reconcile one set of numbers, bend everything, then each team assembles the whole wall in turn. The wall closes on exactly 192" (four sheets of plywood) if the numbers and the bending are right, and it shows you where they weren't.
You need: the student brief and rubric, your team notebook, every Part C worksheet from Labs 4–8, three identical charted benders, the job stock and fittings from the shop list, the 4×8 wall.
Step 1 · Measure the wall and the obstacles
- Measure the plywood, the seams, and both groups of existing 2" conduits: FV-1 (box C to the single 2"), FV-2 (box B to the pair), and FV-3 (how far down both groups run). Take FV-3 first; the U-bends hang into that area. If the 2" run down past the U-bends, the U pieces are the saddled ones (Lab 8B).
Step 2 · Compare benders
- Each team brings its Lab 2 chart. Compare deduct and gain. Benders that differ by more than 1/8" can't share a rack, because the pipes won't nest. Settle it before anyone derives anything.
Step 3 · Derive, then reconcile one submittal
- Each team finishes its Part C numbers from Labs 4–8, plus the box layout from the datum and the switch drop.
- Switch drop (SD): straight pipe from box F down to box H, joined by one coupling, with a box offset at each box end. No bends. Work out the piece lengths and where the coupling falls, and why it has to be two pieces.
- Meet as three teams and reconcile into one submittal: bender constants with the test-bend data behind them, all 26 cut lengths, every mark layout, the box schedule with a check string that adds up to 192", the material take-off, and your measurements of both obstacle groups.
- Write down where you disagreed and how you settled it. That's graded.
- Gate: your instructor checks the submittal against the key. Nobody cuts until it's signed.
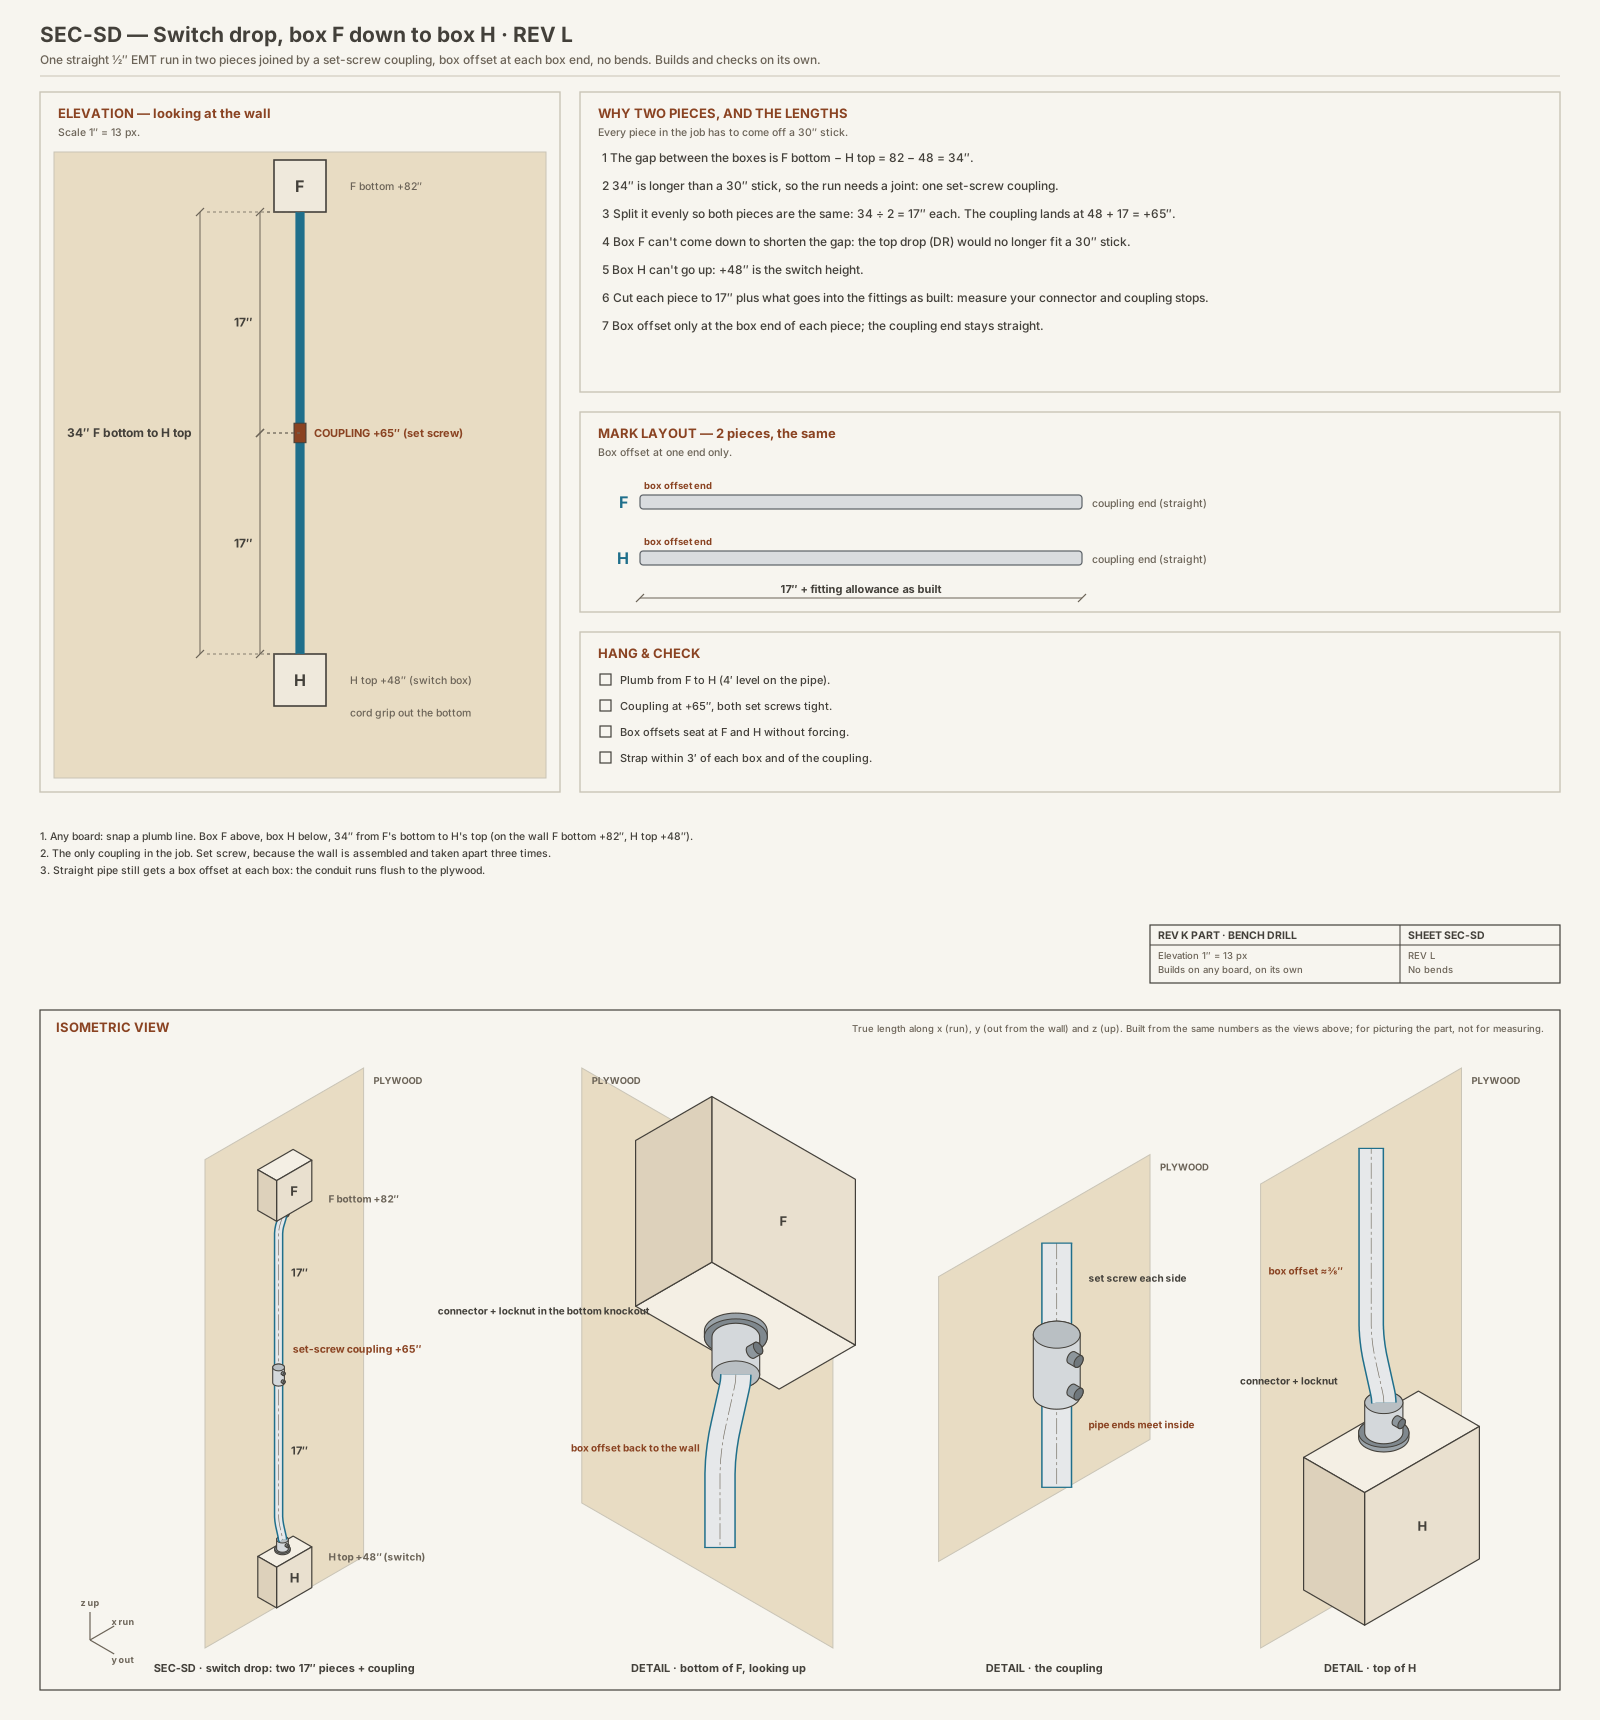
The method, step by step: any straight run with a coupling
Six steps for any straight run longer than one stick. Another job: a 52″ gap with 30″ stock.
- 1The gap
Box face to box face along the run.
Formulagap = top box bottom − bottom box topThis job82 − 48 = 34″Another job52″ (measured) - 2How many pieces
Every piece has to come off your stock length. Divide and round up.
Formulapieces = gap ÷ stock, rounded upThis job34 ÷ 30 → 2Another job52 ÷ 30 → 2 - 3Piece length
Split evenly so the pieces match and the coupling lands in the middle.
Formulapiece = gap ÷ pieces (+ fittings as built)This job34 ÷ 2 = 17″Another job52 ÷ 2 = 26″ - 4Coupling height
Measured up from the lower box.
Formulacoupling = lower box top + pieceThis job48 + 17 = +65″Another joblower top + 26 - 5Fitting allowance
Pipe goes into each connector and coupling up to the stop. Measure yours once and add it.
Formulacut = piece + connector stop + ½ couplingThis jobas builtAnother jobas built - 6Box offsets
Only at the box ends. The coupling end stays straight.
Formulaone box offset per pieceThis job2Another job2
What changes if…
| If this changes… | …these change | …these stay the same |
|---|---|---|
| Longer gap | pieces, lengths, coupling height | box offsets |
| Different fittings | cut allowance | piece length |
Your own job
Copy this onto your notebook page and work it before you cut.
| Step | Your job |
|---|---|
| 1 Gap | |
| 2 Pieces | |
| 3 Piece length | |
| 4 Coupling height | |
| 5 Allowance | |
| 6 Box offsets |
Step 4 · Cut and bend
- Each team bends one pipe in every rack, using its Part C steps. Tag every piece the moment it comes off the bender.
- Store the pieces flat on the rack. Don't stack the U-bends.
Step 5 · Lay out the boxes
- All three teams set box A together first: its centerline on the center seam, at 96" from the left edge. It's the datum for everything.
- Lay out every other box center-out from box A, then check the string edge to edge: it has to add up to 192".
Step 6 · Assemble three times
- Team 1 assembles the whole wall, then takes it apart. Team 2 assembles and takes it apart. Team 3 assembles.
- Strap each run within 3' of every box. Runs stay flush to the plywood between boxes.
Step 7 · The grade: three tape measurements
- Box A's centerline to the seam: should be zero.
- Box F to box G: should be 192".
- Box A to F against box A to G: should be equal within 1/8".
If all three are right, the geometry and the bending were right. If not, the wall tells you which half drifted and by how much, and you work out why. The full 100-point rubric is in the student brief: submittal 30, fabrication 25, installation 30, process 15.
Clips from Mel's videos
Each clip plays only the part of the video that matches the step.
Lab 10
Kicks
Goal: bend a kick (one bend that moves a run over) off a 90, by measurement and by angle; find a kick's shrink with trig; then bend parallel kicks that stay evenly spaced. Every number here is from Mel's own demonstrations.
You need: your charted bender (with your 30° center mark from Lab 2), 1/2" EMT, torpedo level, digital angle finder, tape or folding ruler, scientific calculator, pencil, hacksaw, reamer, safety glasses and gloves.
The numbers (also on your card)
- Kick: how far the run has to move over, measured bottom of pipe to bottom of target (or center to center; pick one and stick to it).
- Where the kick goes: from the back of the 90 to the center of the kick bend = kick × multiplier. Multipliers: 30° = 2, 45° = 1.414, 60° = 1.155.
- Bend on center: a kick goes on a center-of-bend mark (your charted 30° mark, or the notch for a 45), never the arrow. Mel: "If you use the arrow it's not going to come out right."
- Angle of a kick you measured: angle = tan⁻¹(kick ÷ distance from the back of the 90 to the kick's center). Mel's example: 7½ ÷ 20 = 0.375, tan⁻¹ = 20½°.
- Shrink of a kick: hypotenuse (back of 90 to kick center, measured after bending) − adjacent (the same span along the wall). Adjacent = cos(angle) × hypotenuse.
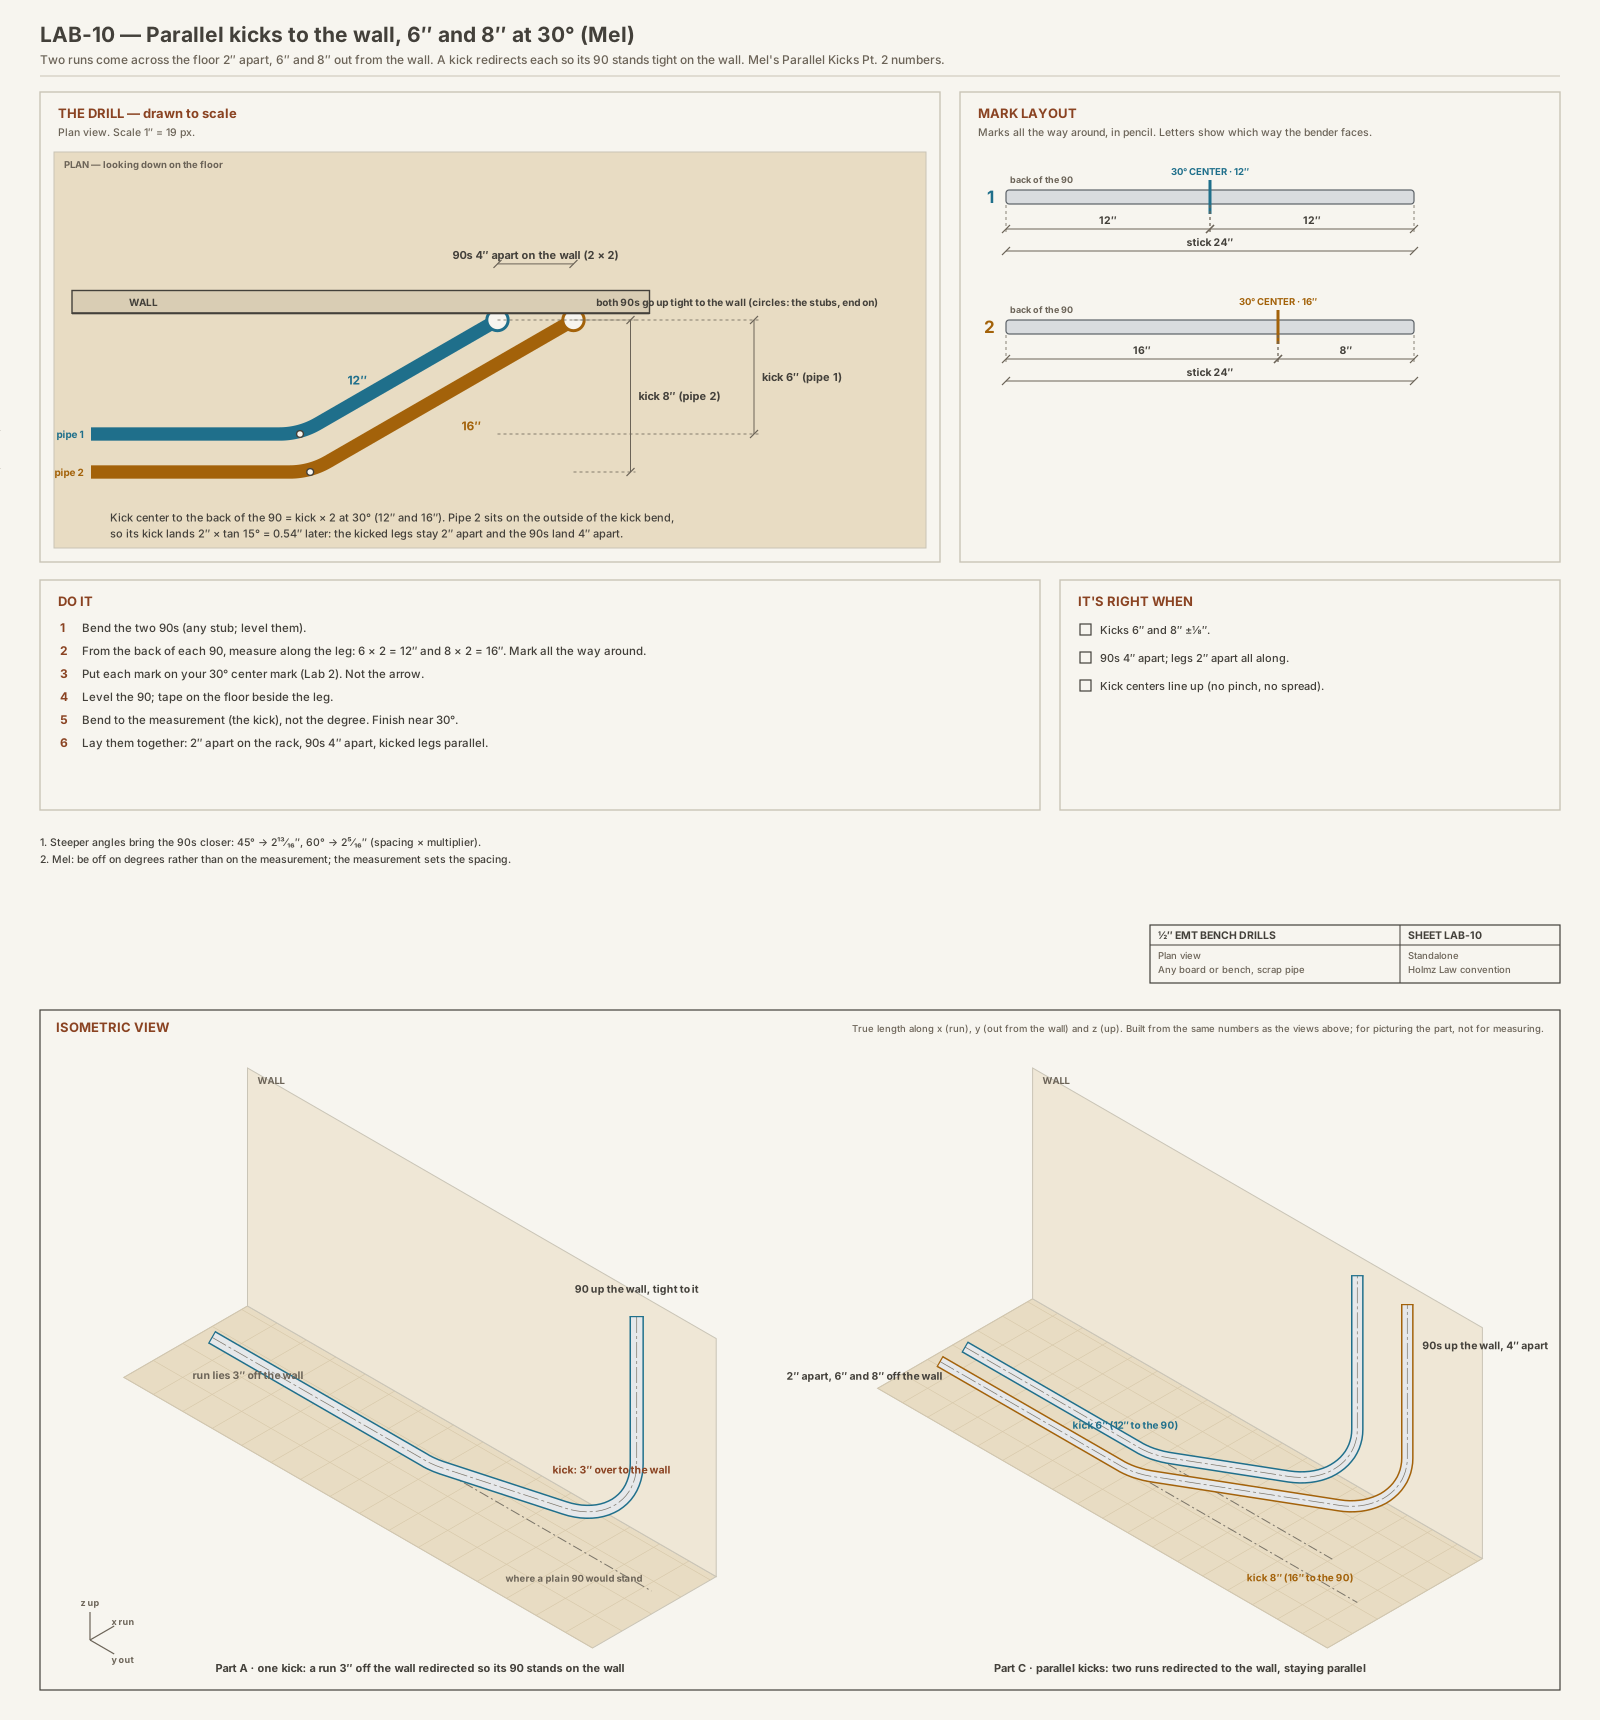
The method, step by step: any kick or set of parallel kicks
These 7 steps work for any kick off a 90, one pipe or a rack. Both columns are Mel's own numbers from his videos.
- 1The kick
How far the run has to move over. Measure it to the same reference at both ends.
Formulakick = measured offsetThis job6″ and 8″ (Mel, Parallel Kicks Pt. 2)Another job10″, 12″, 14″, 16″ (Mel, Pt. 1 diagram) - 2Where the kick bend goes
From the back of the 90 to the center of the kick. The multiplier is the offset multiplier for the angle.
Formuladistance = kick × multiplier (30° = 2, 45° = 1.414, 60° = 1.155)This job6 × 2 = 12″ · 8 × 2 = 16″Another job20″, 24″, 28″, 32″ at 30° - 3Bend on center
A kick is placed by its center, so the mark goes on a center-of-bend mark: your charted 30° mark, or the notch for 45°.
Formulamark on the 30° center mark, not the arrowThis jobboth on 30CAnother joball on 30C - 4Bend to the measurement
Level the 90, measure the floor to the bottom of the pipe, add the kick, and bend until the pipe reads that. The angle will come out near the target.
Formulaheight = floor reading + kickThis jobreading + 6″, reading + 8″Another jobreading + kick - 5Spacing where the 90s land
Runs 2″ apart on the rack land farther apart at the 90s. Steeper angles land closer.
Formula90s apart = rack spacing × multiplierThis job2 × 2 = 4″Another job2 × 2 = 4″ at 30° · 2 × 1.414 = 2¹³⁄₁₆″ at 45° · 2 × 1.155 = 2⁵⁄₁₆″ at 60° - 6Angle of a kick you bent by measurement
Mel's electric-bender example: a 7½″ kick, 20″ from the back of the 90 to the kick center.
Formulaangle = tan⁻¹(kick ÷ distance)This job7.5 ÷ 20 = 0.375 → 20.6°Another jobuse your own numbers - 7Shrink of a kick
Mel's live example: 3″ kick, hypotenuse measured after bending 11¼″.
Formulaangle = sin⁻¹(kick ÷ hyp) · adjacent = cos(angle) × hyp · shrink = hyp − adjacentThis job15.5° · 10.84″ · 0.41″ ≈ ⅜″Another jobhis classroom example 5″ in 10″: 30° · 8.66″ · 1.34″ ≈ 1⁵⁄₁₆″
What changes if…
| If this changes… | …these change | …these stay the same |
|---|---|---|
| Bigger kick | kick distance, height reading | spacing at the 90s |
| Steeper angle | kick distance, spacing at the 90s | kick |
| Rack spacing | each next kick, 90 spacing | the first kick |
Your own job
Copy this onto your notebook page and work it before you cut.
| Step | Your job |
|---|---|
| 1 Kick | |
| 2 Distance from the 90 | |
| 3 Center mark | |
| 4 Height reading | |
| 5 90 spacing | |
| 6 Angle (if measured) | |
| 7 Shrink |
Part A · A kick by measurement (Mel's measured method)
- Bend a 90 with any stub (12" shown on the sheet).
- Mark the kick point 12" from the back of the 90, all the way around.
- Put the mark on your center mark, not the arrow. Level the 90 so it stands plumb.
- Measure from the floor to the bottom of the pipe at the kick end. Add the kick you want (3").
- Bend until the pipe reads that height. Check it, and add a little if it's short; mark it so it can go back in the bender on the same spot.
Part B · The shrink of that kick (Mel's trig, his numbers)
- Lay it on a straightedge and measure from the back of the 90 to the center of the kick bend. Mel got 11¼" (not 12): a bend made by measurement doesn't sit on true center.
- Angle: 3 ÷ 11.25 = 0.2667; sin⁻¹ = 15.5° (Mel rounds to 15°; keep the decimal).
- Adjacent: cos 15.5° × 11.25 = 10.84".
- Shrink: 11.25 − 10.84 = 0.41", 3/8" to the nearest eighth (Mel works in eighths). His 22¾" piece now reaches 22⅜". Cut the other kicks in a run to match so the couplings line up.
Part C · Parallel kicks at a set angle (Mel's 6" and 8" at 30°)
Three things make kicks parallel: parallel at every point, equal spacing, and the kick centers lined up. Miss one and they aren't parallel.
- Kick 1 = 6": its center goes 6 × 2 = 12" from the back of the 90. Kick 2 = 8" (one 2" spacing more): 8 × 2 = 16".
- Mark both all the way around. Put each mark on your 30° center mark.
- Bend each to its measurement (the kick depth), not to the degree. It should finish close to 30°.
- Lay them together: 2" apart on the straight run, and the 90s land 2 × 2 = 4" apart (spacing × multiplier). Steeper angles bring the 90s closer: 45° gives 2 13/16", 60° gives 2 5/16".
It's right when your kick lands within 1/8" of the depth you wanted, your shrink calculation matches what the piece actually lost, and your parallel kicks stay 2" apart with their 90s 4" apart.
Sign-off: your instructor watches Part A and checks your Part B math and Part C set.
If it isn't right
- The kick lands short or past the target: it was bent on the arrow instead of a center mark.
- Parallel kicks spread or pinch: the kick distances didn't step by the spacing, or one was bent to the degree instead of the measurement.
- Shrink math disagrees with the pipe: you measured the hypotenuse before bending. Measure it after.
Clips from Mel's videos
Each clip plays only the part of the video that matches the step.
Lab 11
Gooseneck
Goal: take a run off the top of the framing and straight down, tight to a joist face where it can be strapped, where an LB or a plain 90 won't fit, with Mel's gooseneck (an over-bent 90 plus a 22½°). In the field: across the top of the ceiling joists and down into a wall through the top plate, or down into a 4" octagon ceiling box (2 1/8" deep) on the side of a joist, its face 1/8" below the 1/2" drywall (NEC 314.20 allows a drywall ceiling box to sit back no more than 1/4"). A gooseneck is 135° of bend (112½ + 22½); count it toward the 360° allowed between pull points. His numbers: a 9" drop, and a 4" drop in his coaching video.
You need: your charted bender, 1/2" EMT, torpedo level, a long straightedge (Mel uses a door frame), tape, pencil, safety glasses and gloves.
The numbers
- Drop: from the surface the pipe rests on (bottom of the pipe) to where the stub has to end: through the top plate, or the knockout. Mel: 9".
- Mark A = the drop, from the end. No deduct.
- Mark B = A + 3/8". Mel: "always" 3/8", it never changes.
- Mark C is found on a straightedge after the first two bends; it isn't measured in advance.
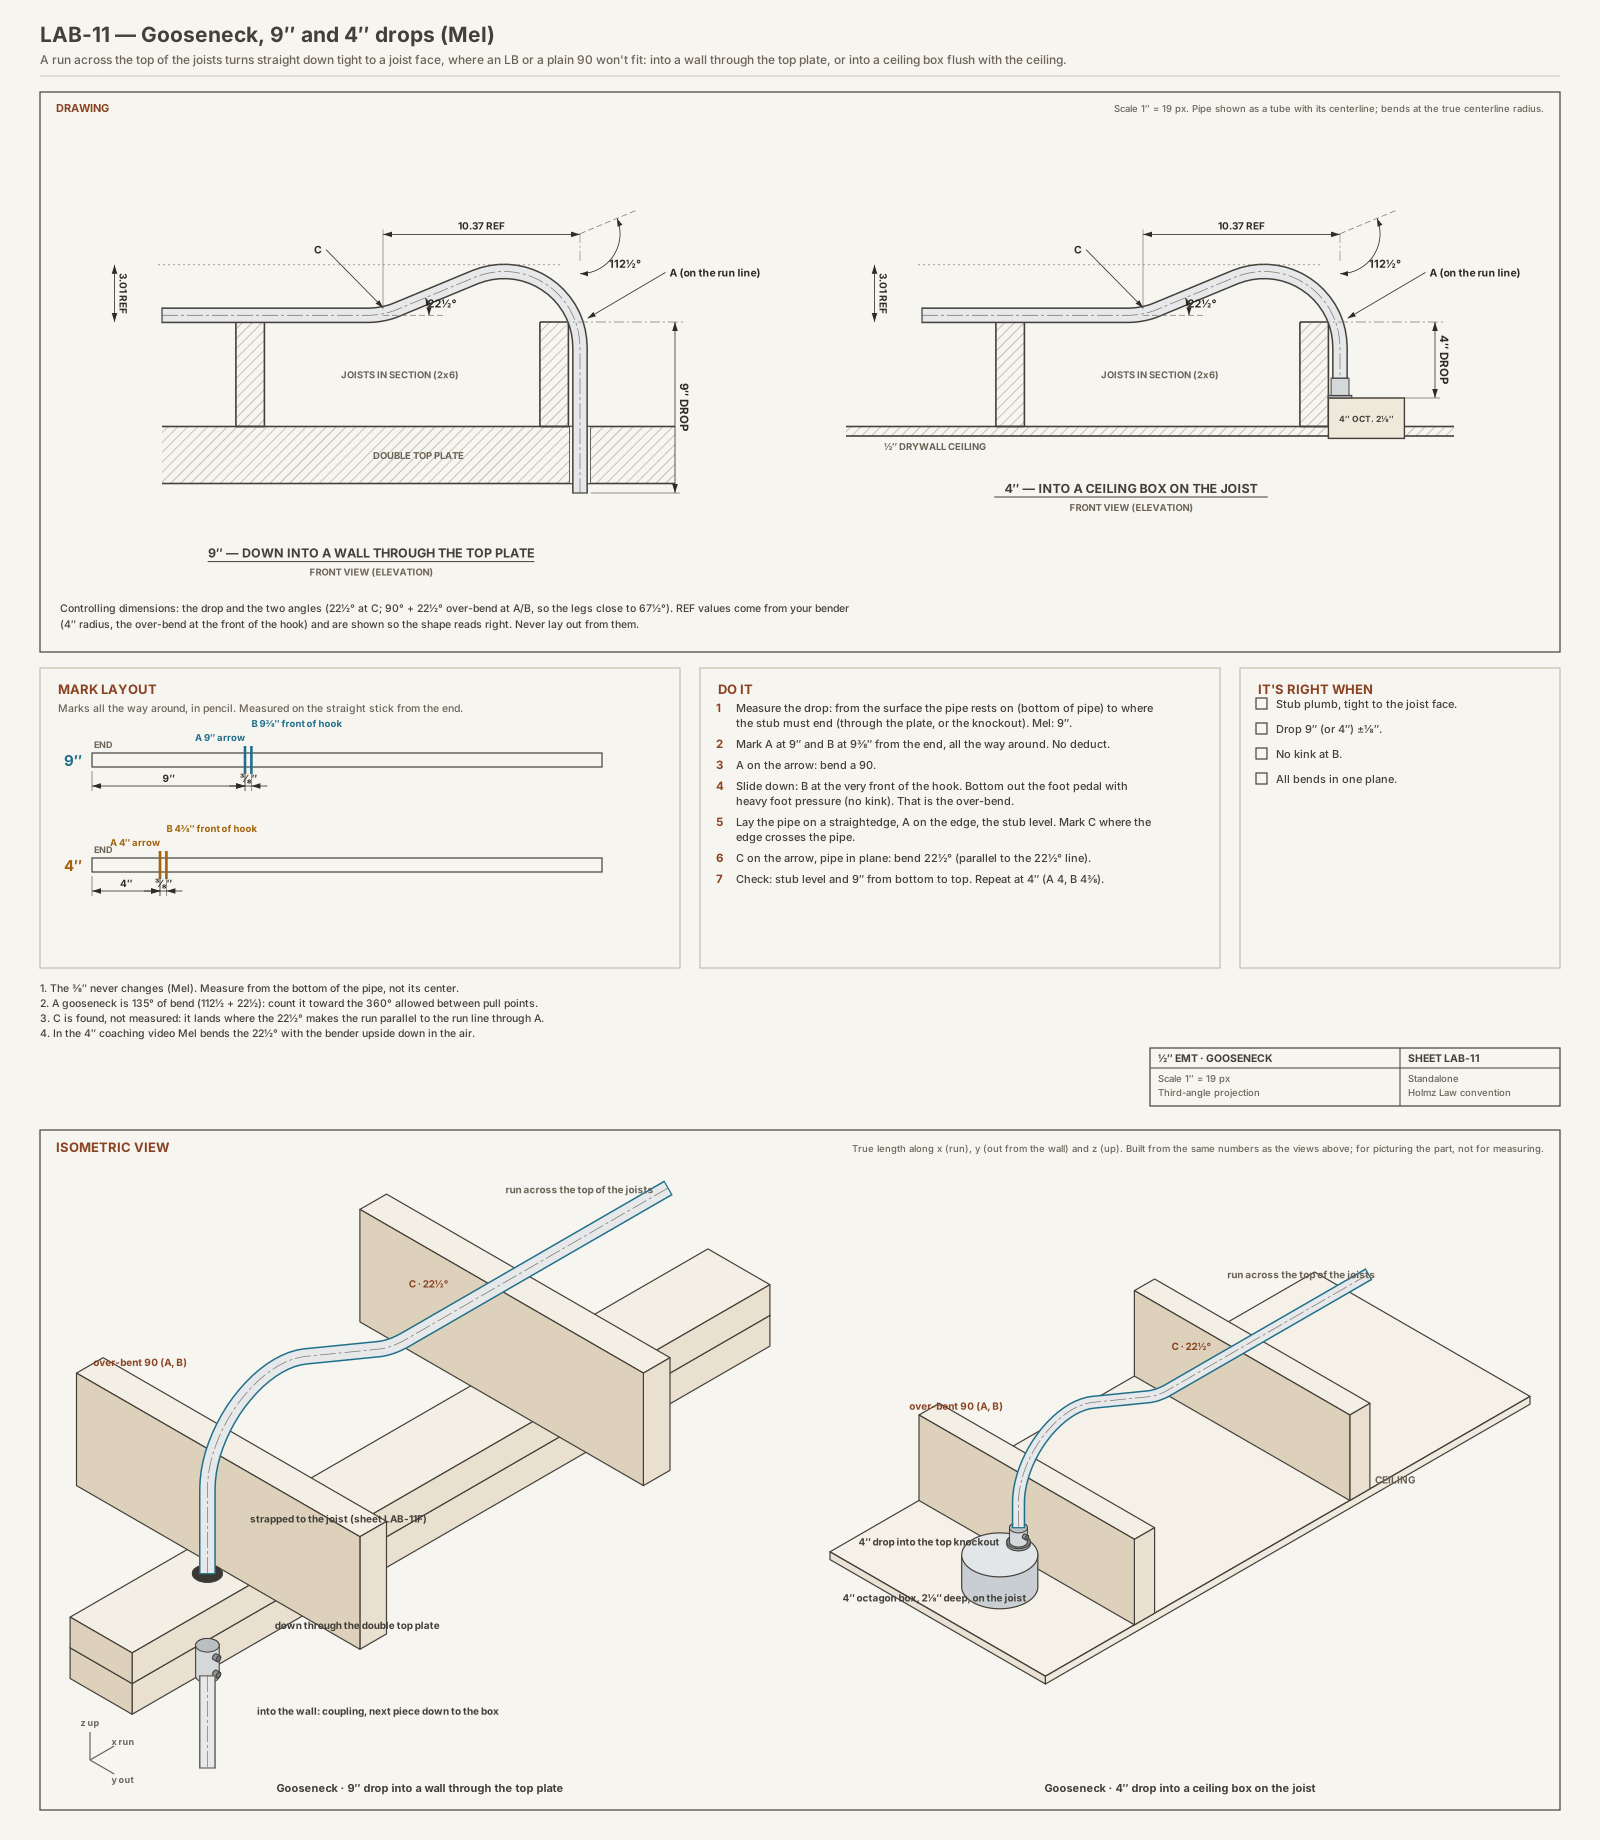
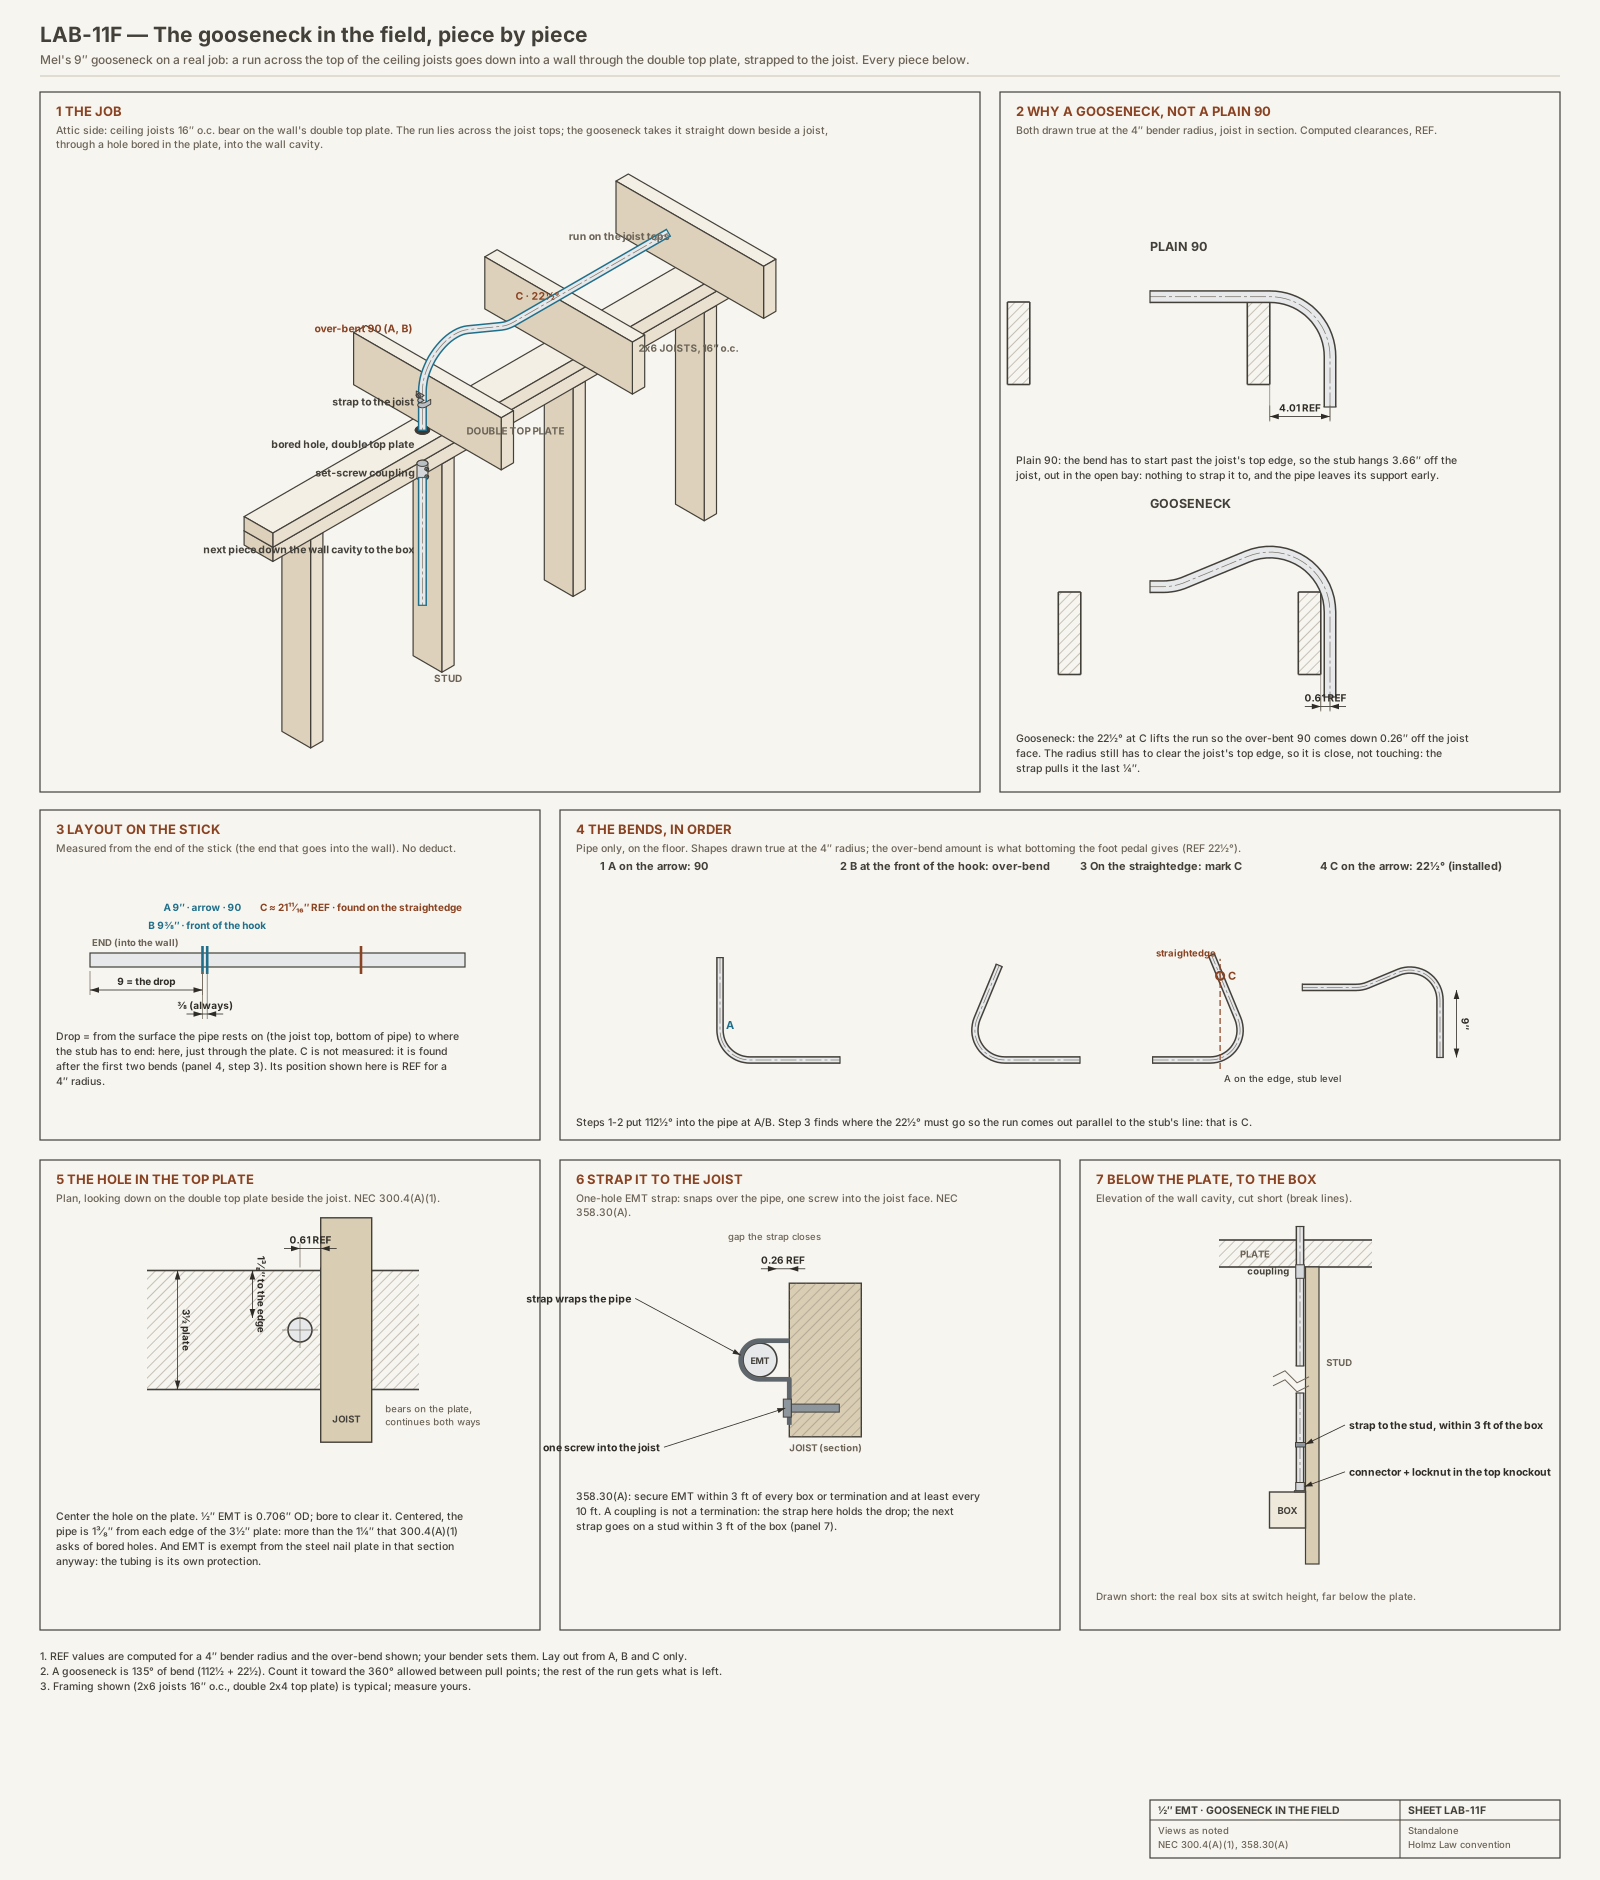
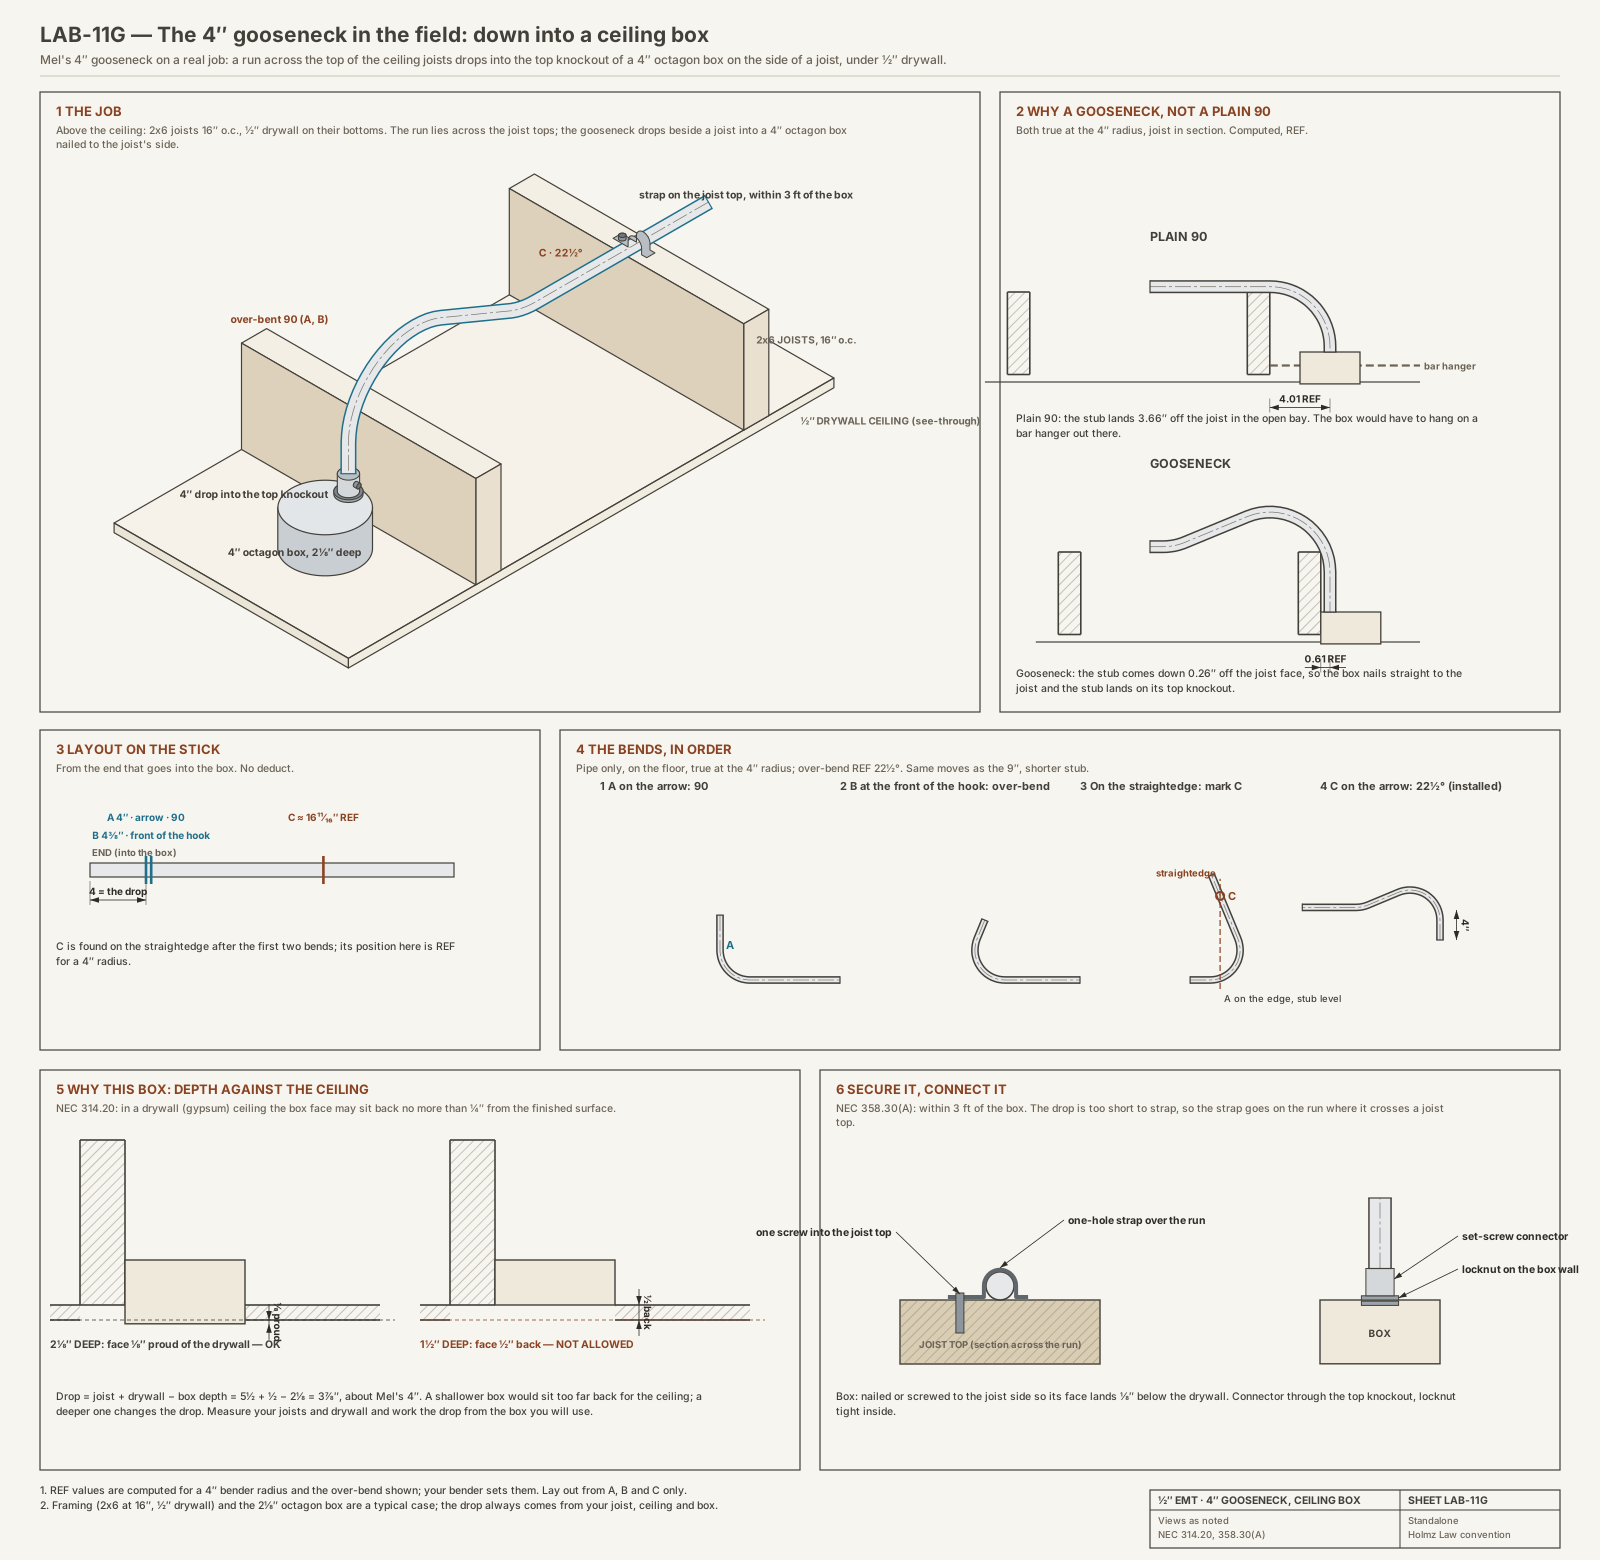
Steps (Mel's 9" gooseneck)
- Mark A at 9" and B at 9 3/8" from the end, all the way around.
- A on the arrow: bend a 90. No deduction.
- Slide down: B at the very front of the hook. Bottom out the foot pedal with heavy foot pressure (it keeps the pipe from kinking). That over-bends the 90.
- Lay the pipe on a straightedge with mark A on the edge, and level the 90 stub. Mark C where the edge crosses the angled pipe.
- C on the arrow, pipe kept in plane: bend 22½° (parallel to the 22½° line).
- Check: the end is level, and it measures 9" from bottom to top.
Try it again at Mel's 4" drop: A at 4", B at 4 3/8".
It's right when the stub is plumb and tight to the joist face, the drop is 9" (or 4") ±1/8", and there's no kink.
Sign-off: your instructor checks both.
Clips from Mel's videos
Each clip plays only the part of the video that matches the step.
Lab 12
Saddle variants: 15-30-15 and the half method
Goal: two of Mel's saddles that use fewer degrees than the standard 22½-45-22½: the 15-30-15 for wide, low obstacles, and the half method (11-22½-11) for a small conduit. All numbers are his.
You need: your charted bender with a 15° mark (Lab 2), 1/2" EMT, digital angle finder, tape, pencil, a 3"-deep obstacle and a 1" conduit to saddle over, safety glasses and gloves.
Part A · 15-30-15 push-through (Mel, Fast & Easy 3-Point Saddle Pt. 2)
- Spacing: 4 × the rise, each side of the center mark. (In his charted-marks video he uses 3.8; this drill follows Pt. 2.)
- Center adjustment: 1/8" per inch of rise, added in the direction you measured. Never subtracted.
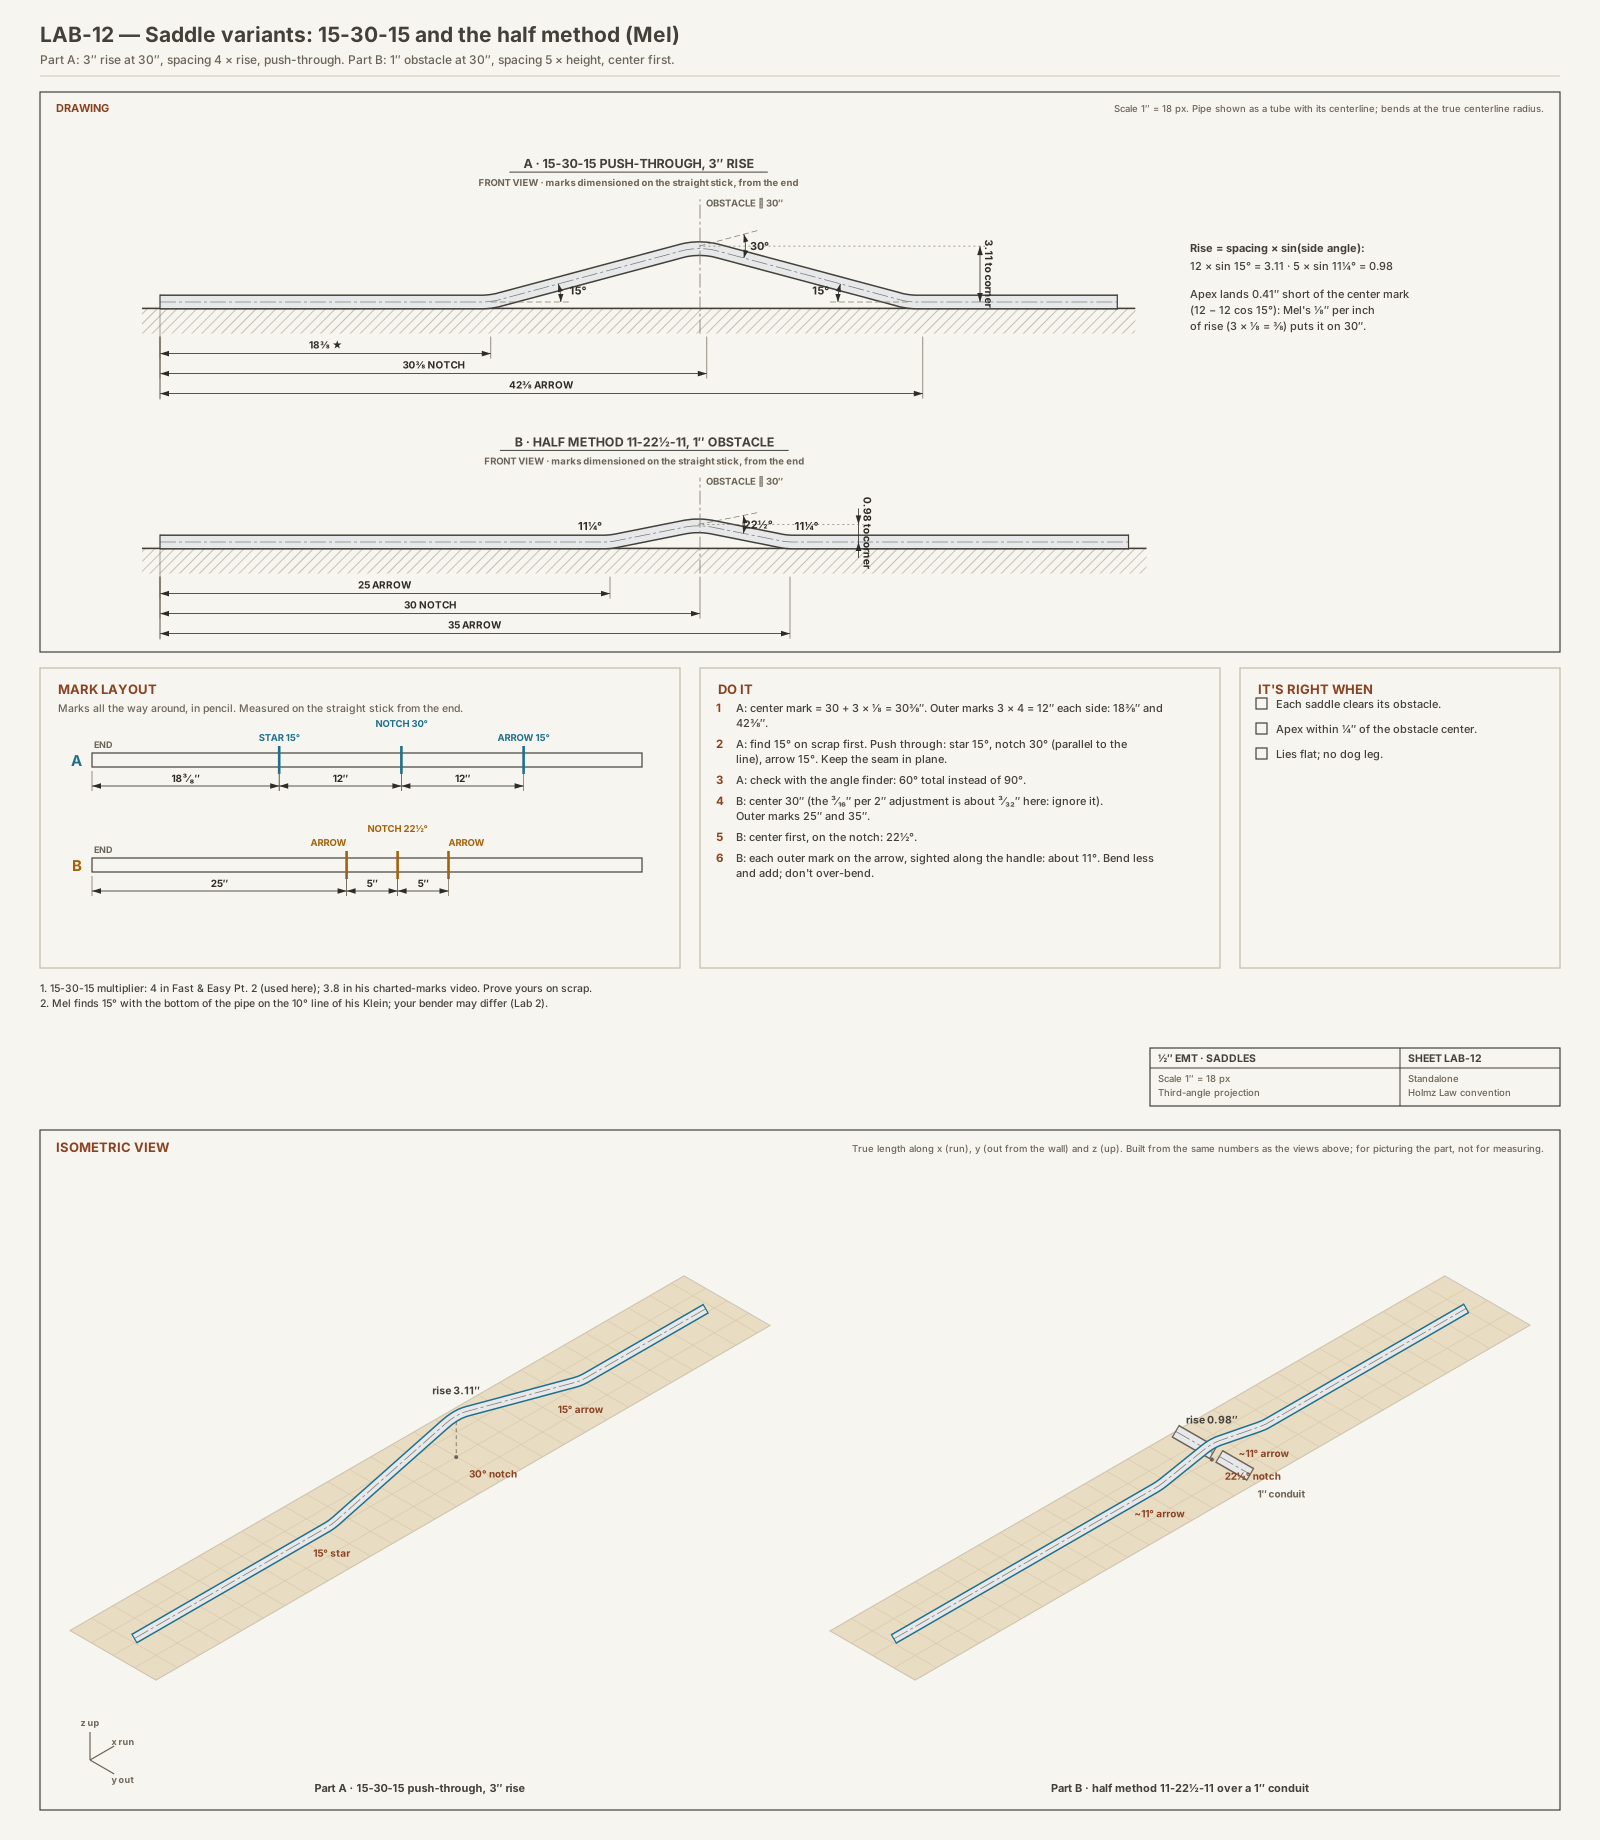
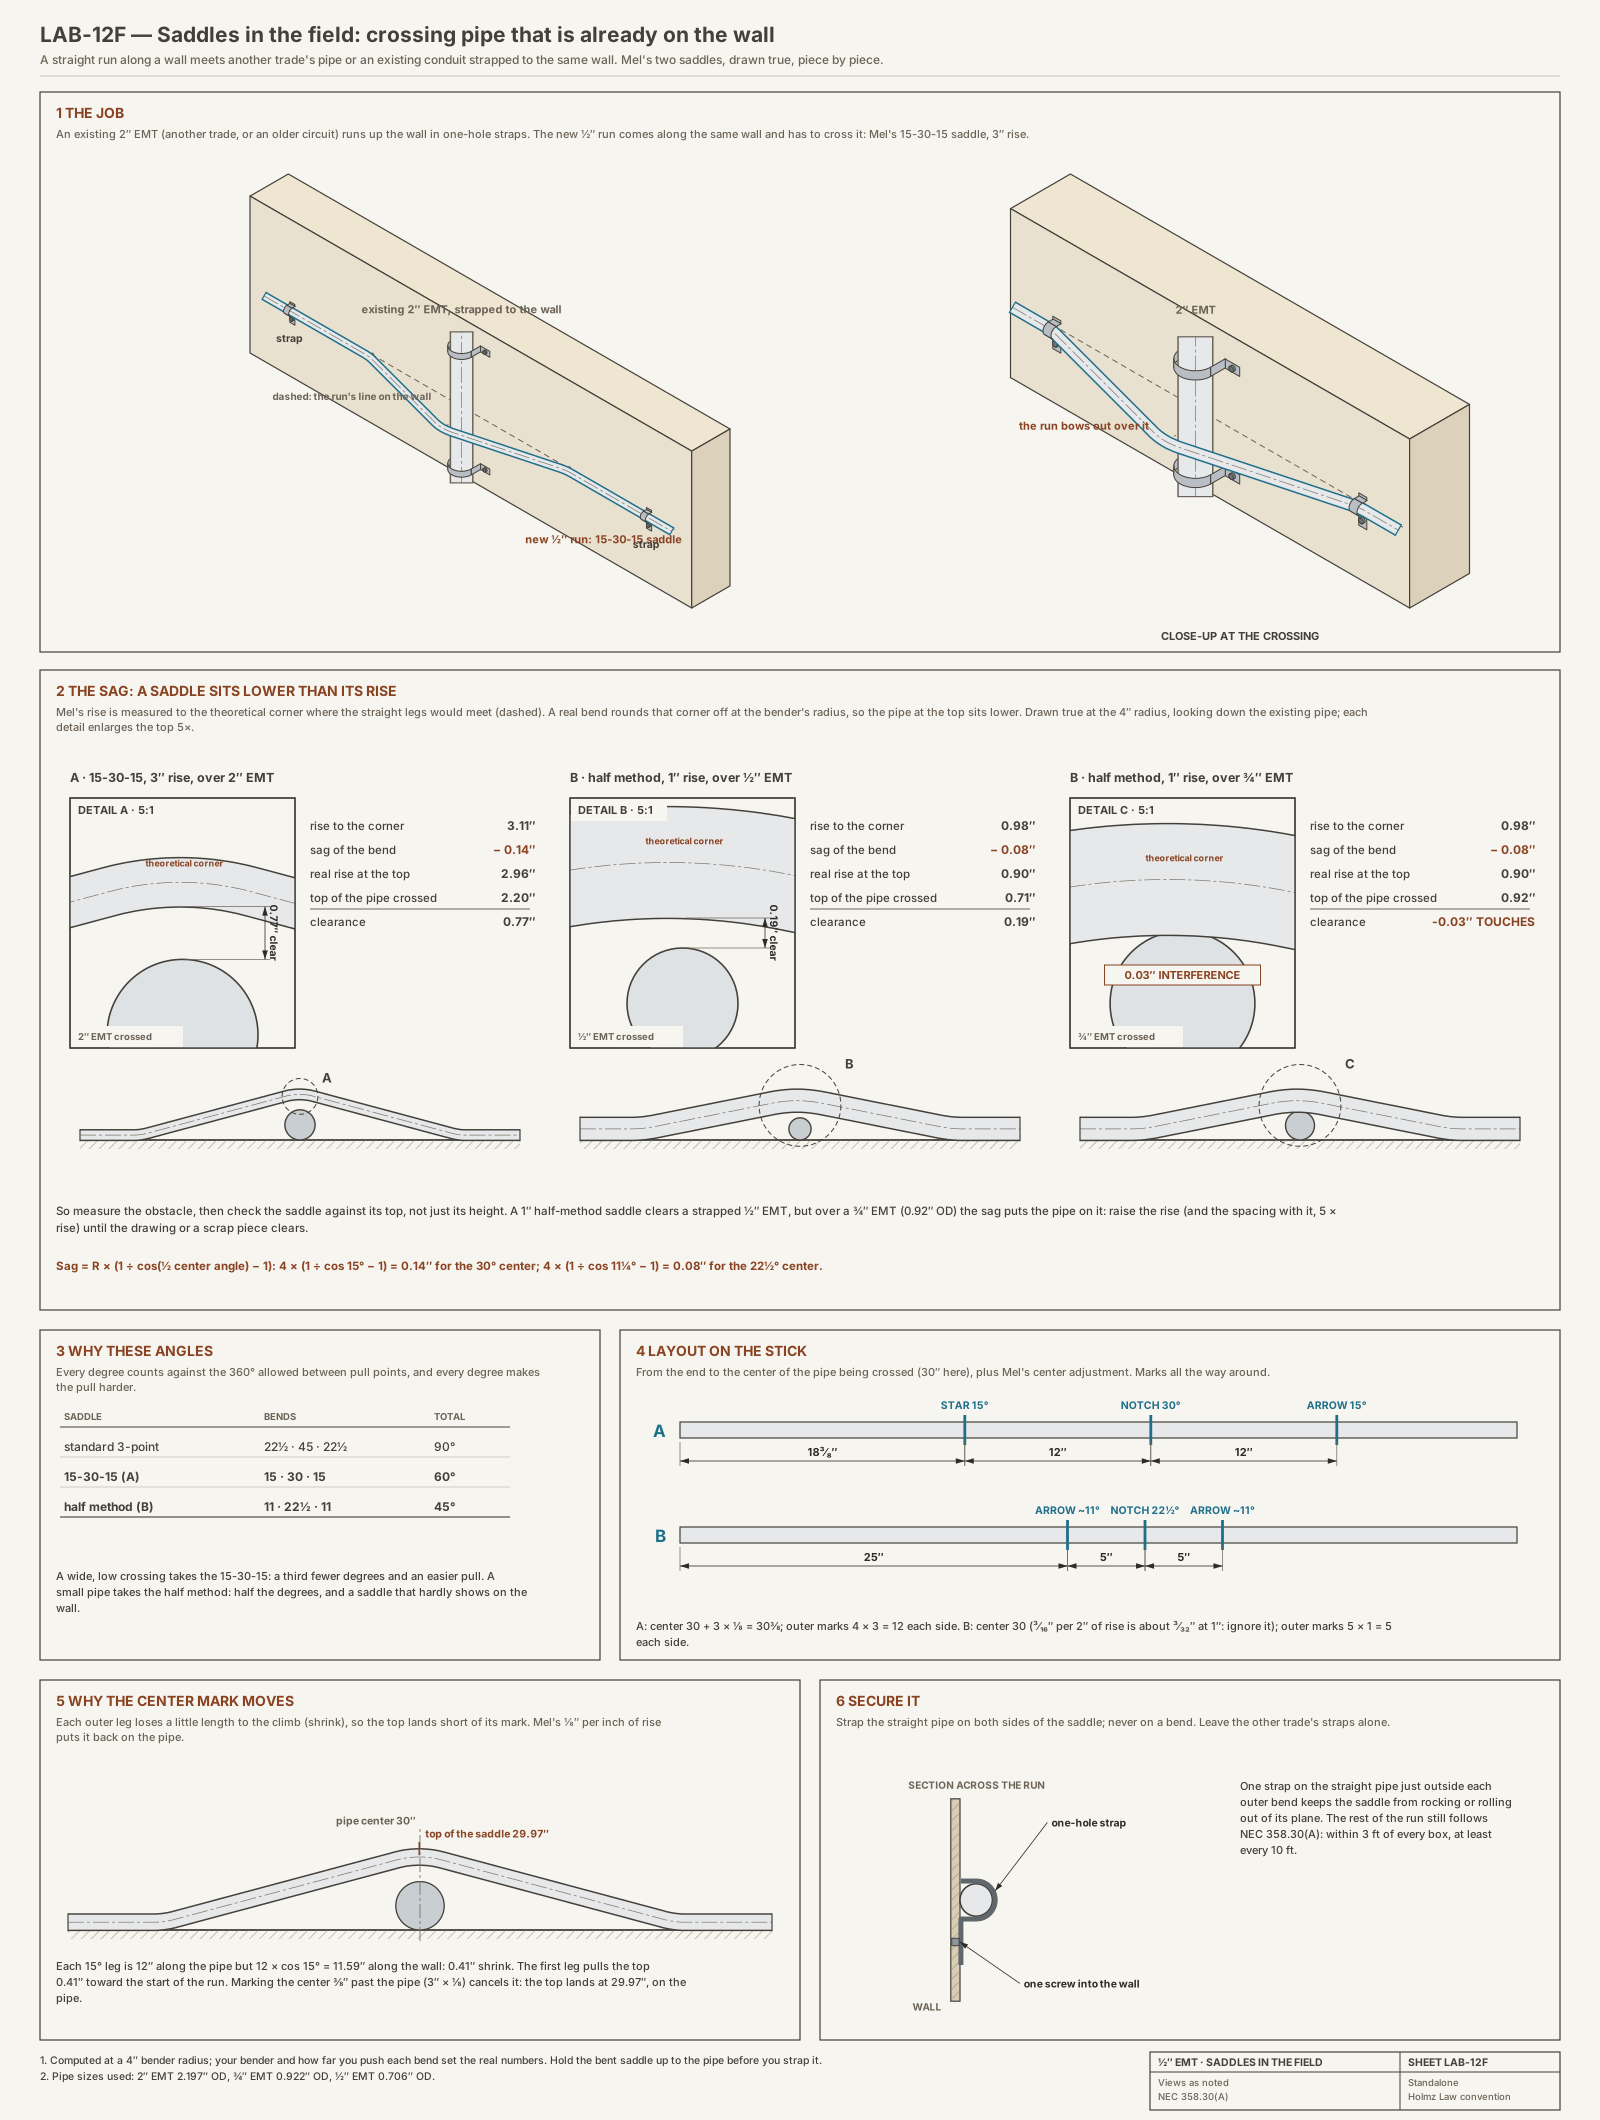
- Rise 3", obstacle center 30" from the end. Center mark = 30 + 3 × 1/8 = 30 3/8".
- Outer marks 3 × 4 = 12" each side: 18 3/8" and 42 3/8".
- Find 15° on your bender on scrap first (Mel's Klein: the bottom of the pipe on the 10° line gave about 15°).
- Push-through, without taking the pipe out: one outer mark on the star, 15°; the center on the notch, 30° (parallel to the line); the last mark on the arrow, 15°. Use the seam to keep it in plane.
- Check with the angle finder and on the floor. Total degrees: 60° instead of 90°, so easier pulls.
Part B · Half method, 11-22½-11 (Mel, 3 Point Saddle - Small Obstruction)
- Spacing: 5 × the obstacle height, each side.
- Center adjustment: 3/16" per 2" of rise. For a 1" obstacle it's practically nothing.
- 1" obstacle centered 30" from the end. Center mark 30"; outer marks 5" each side: 25" and 35".
- Center first, on the notch: 22½°.
- Each outer mark on the arrow, lined up by sighting along the handle: about 11° (a nudge past the 10° mark).
- Bend a little less and add, rather than over-bend and take out. Total degrees: 45°. In the field (sheet LAB-12F): drawn true, the 1" half-method saddle clears a strapped 1/2" EMT by about 0.19" but touches a 3/4" EMT, because the center bend sags the pipe; raise the rise for 3/4" pipe.
It's right when each saddle clears its obstacle, centers within 1/4", and lies flat.
Sign-off: your instructor checks both saddles.
Clips from Mel's videos
Each clip plays only the part of the video that matches the step.
Lab 13
Several bends on one stick (push-through)
Goal: lay out a whole stick before bending, then bend a 90, a 45° offset and a second 90 without turning the bender around. Mel's Multiple Bends, Push-Thru Bending Episode 1, with his numbers.
You need: your charted bender and its numbers (take-up, gain, and an offset constant you measured), 3/4" EMT as Mel uses (or redo the math for 1/2"), tape, pencil, level, safety glasses and gloves.
Mel's example and his bender's constants (3/4" EMT)
- First stub 12". Back of the first 90 to the edge of the obstruction 15". A 5" offset at 45°. Back of the first 90 to the front of the second 90: 30".
- Take-up 6". Gain 3 3/8". Offset constant (3/4", 45°) 6 1/4". 45° multiplier 1.414 (≈ 1.4). Shrink for 5" at 45°: 1 7/8".
- These constants are his bender's. Measure your own take-up and gain (Lab 2) and your own offset constant (Lab 8, Part B) before you trust the marks.
Layout
- A = 12 − 6 = 6" from the end (first 90, on the arrow).
- B = (15 + 6 − 3 3/8) − (6 1/4 + 5) = 17 5/8 − 11 1/4 = 6 3/8" past A.
- C = 5 × 1.4 = 7" past B.
- D (second 90) = 30 + 1 7/8 − 3 3/8 = 28 1/2" past A with Mel's numbers. For your stick, bend a 5" offset at 45° on scrap with your own bender, measure its shrink the way Lab 2, Part E, step 23 does, and use that in place of the book's 1 7/8: the book's 3/8" per inch assumes sharp corners, and at Mel's radius it leaves the second 90 about 1/4" long.
- Write each letter on the side of its mark where the bender goes.
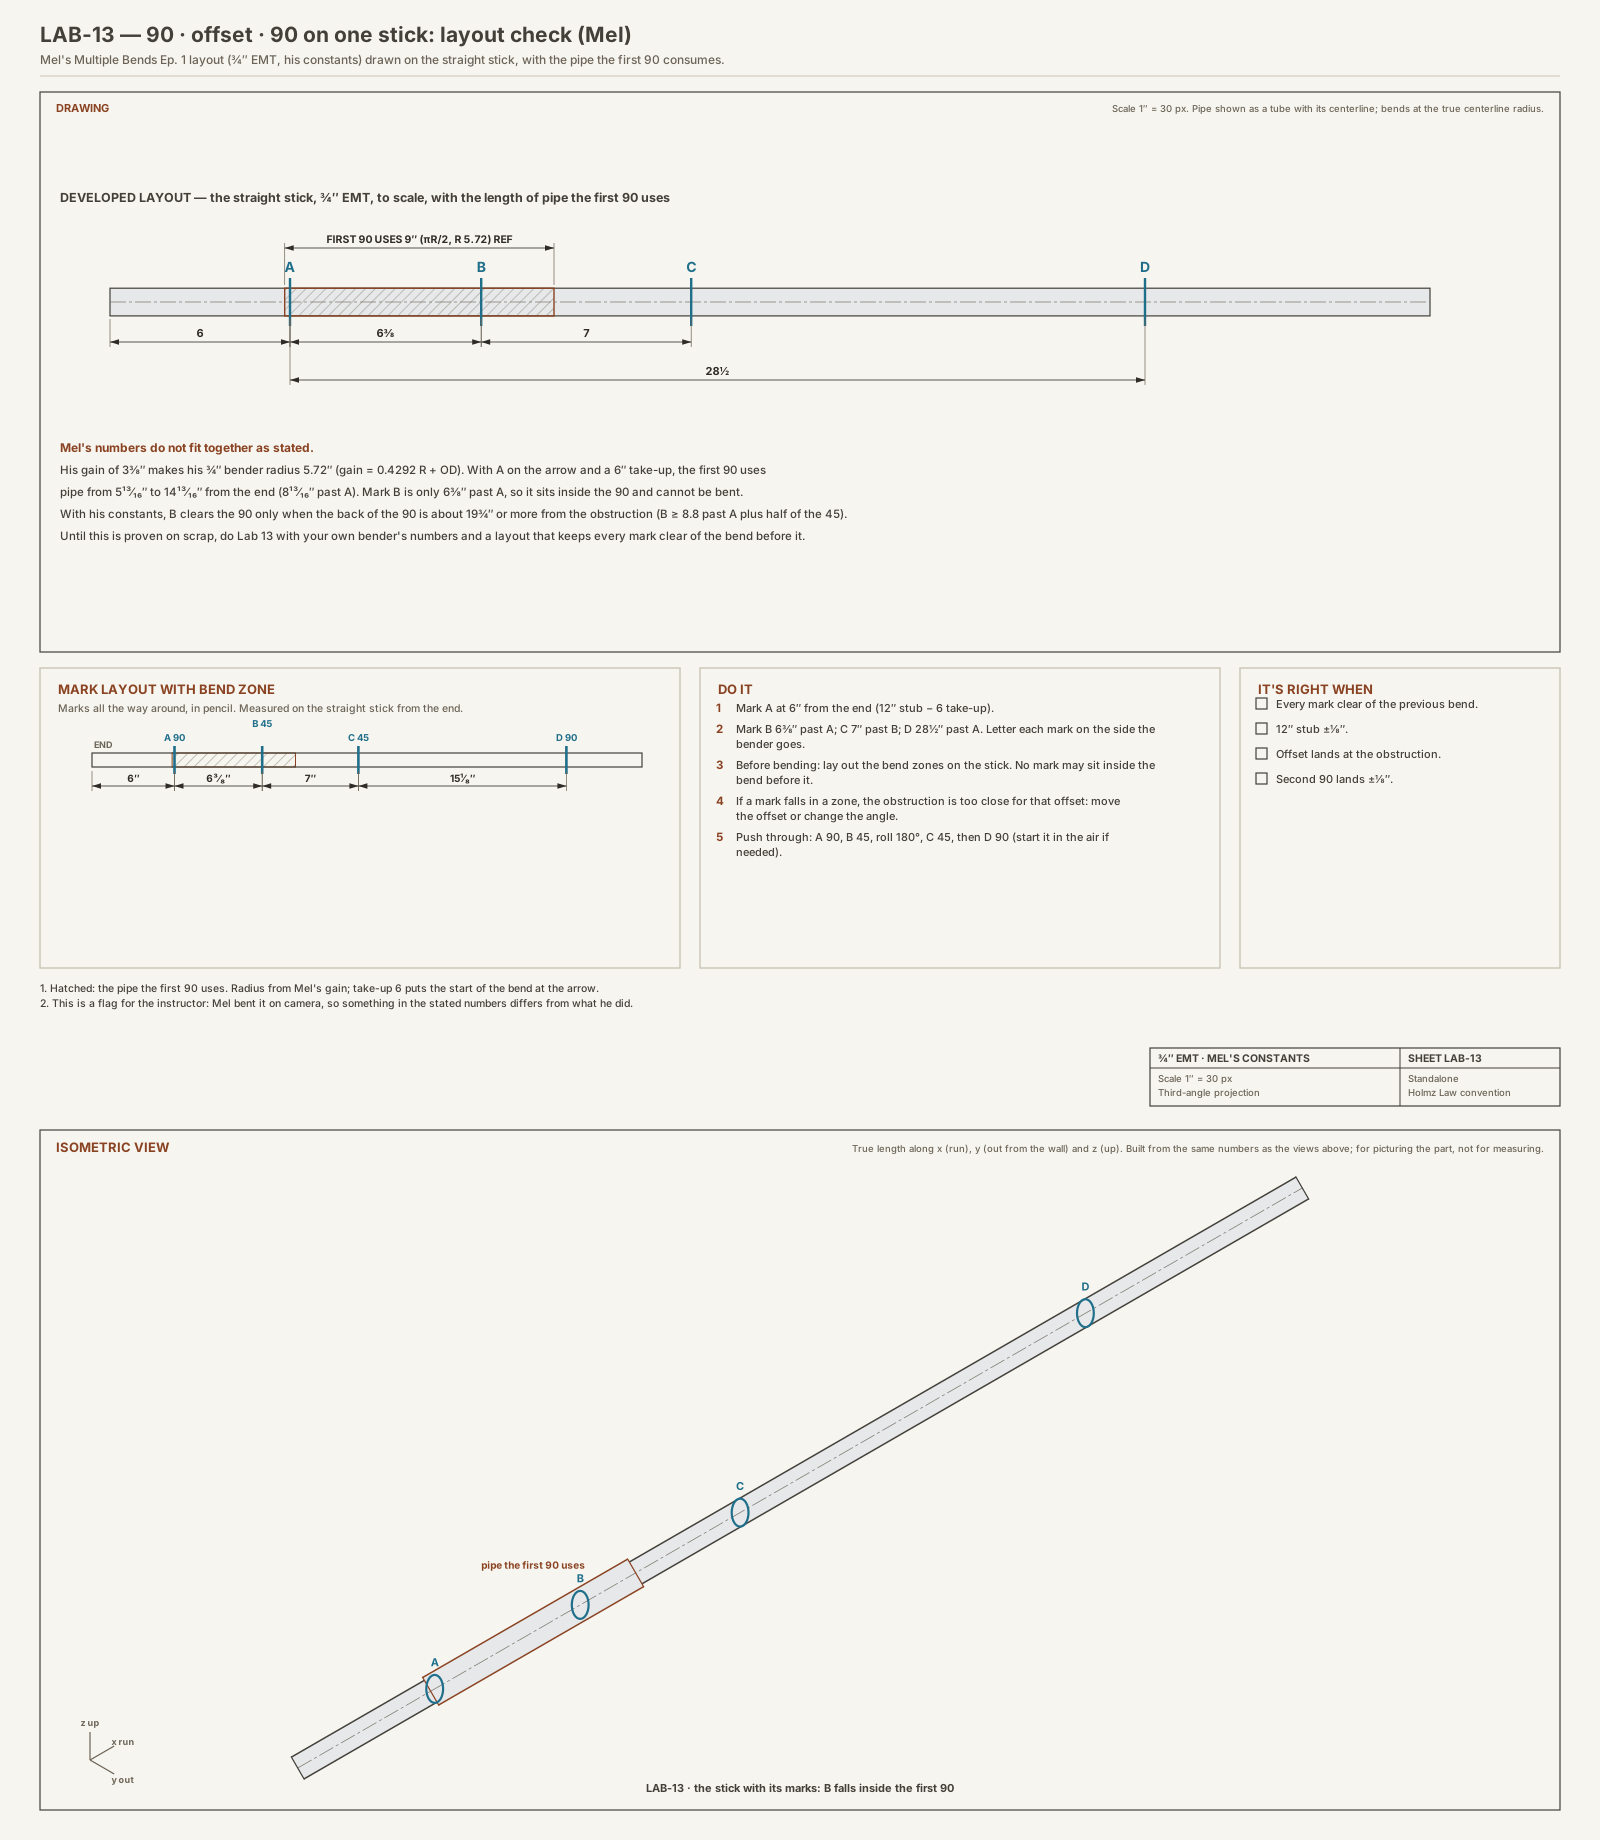
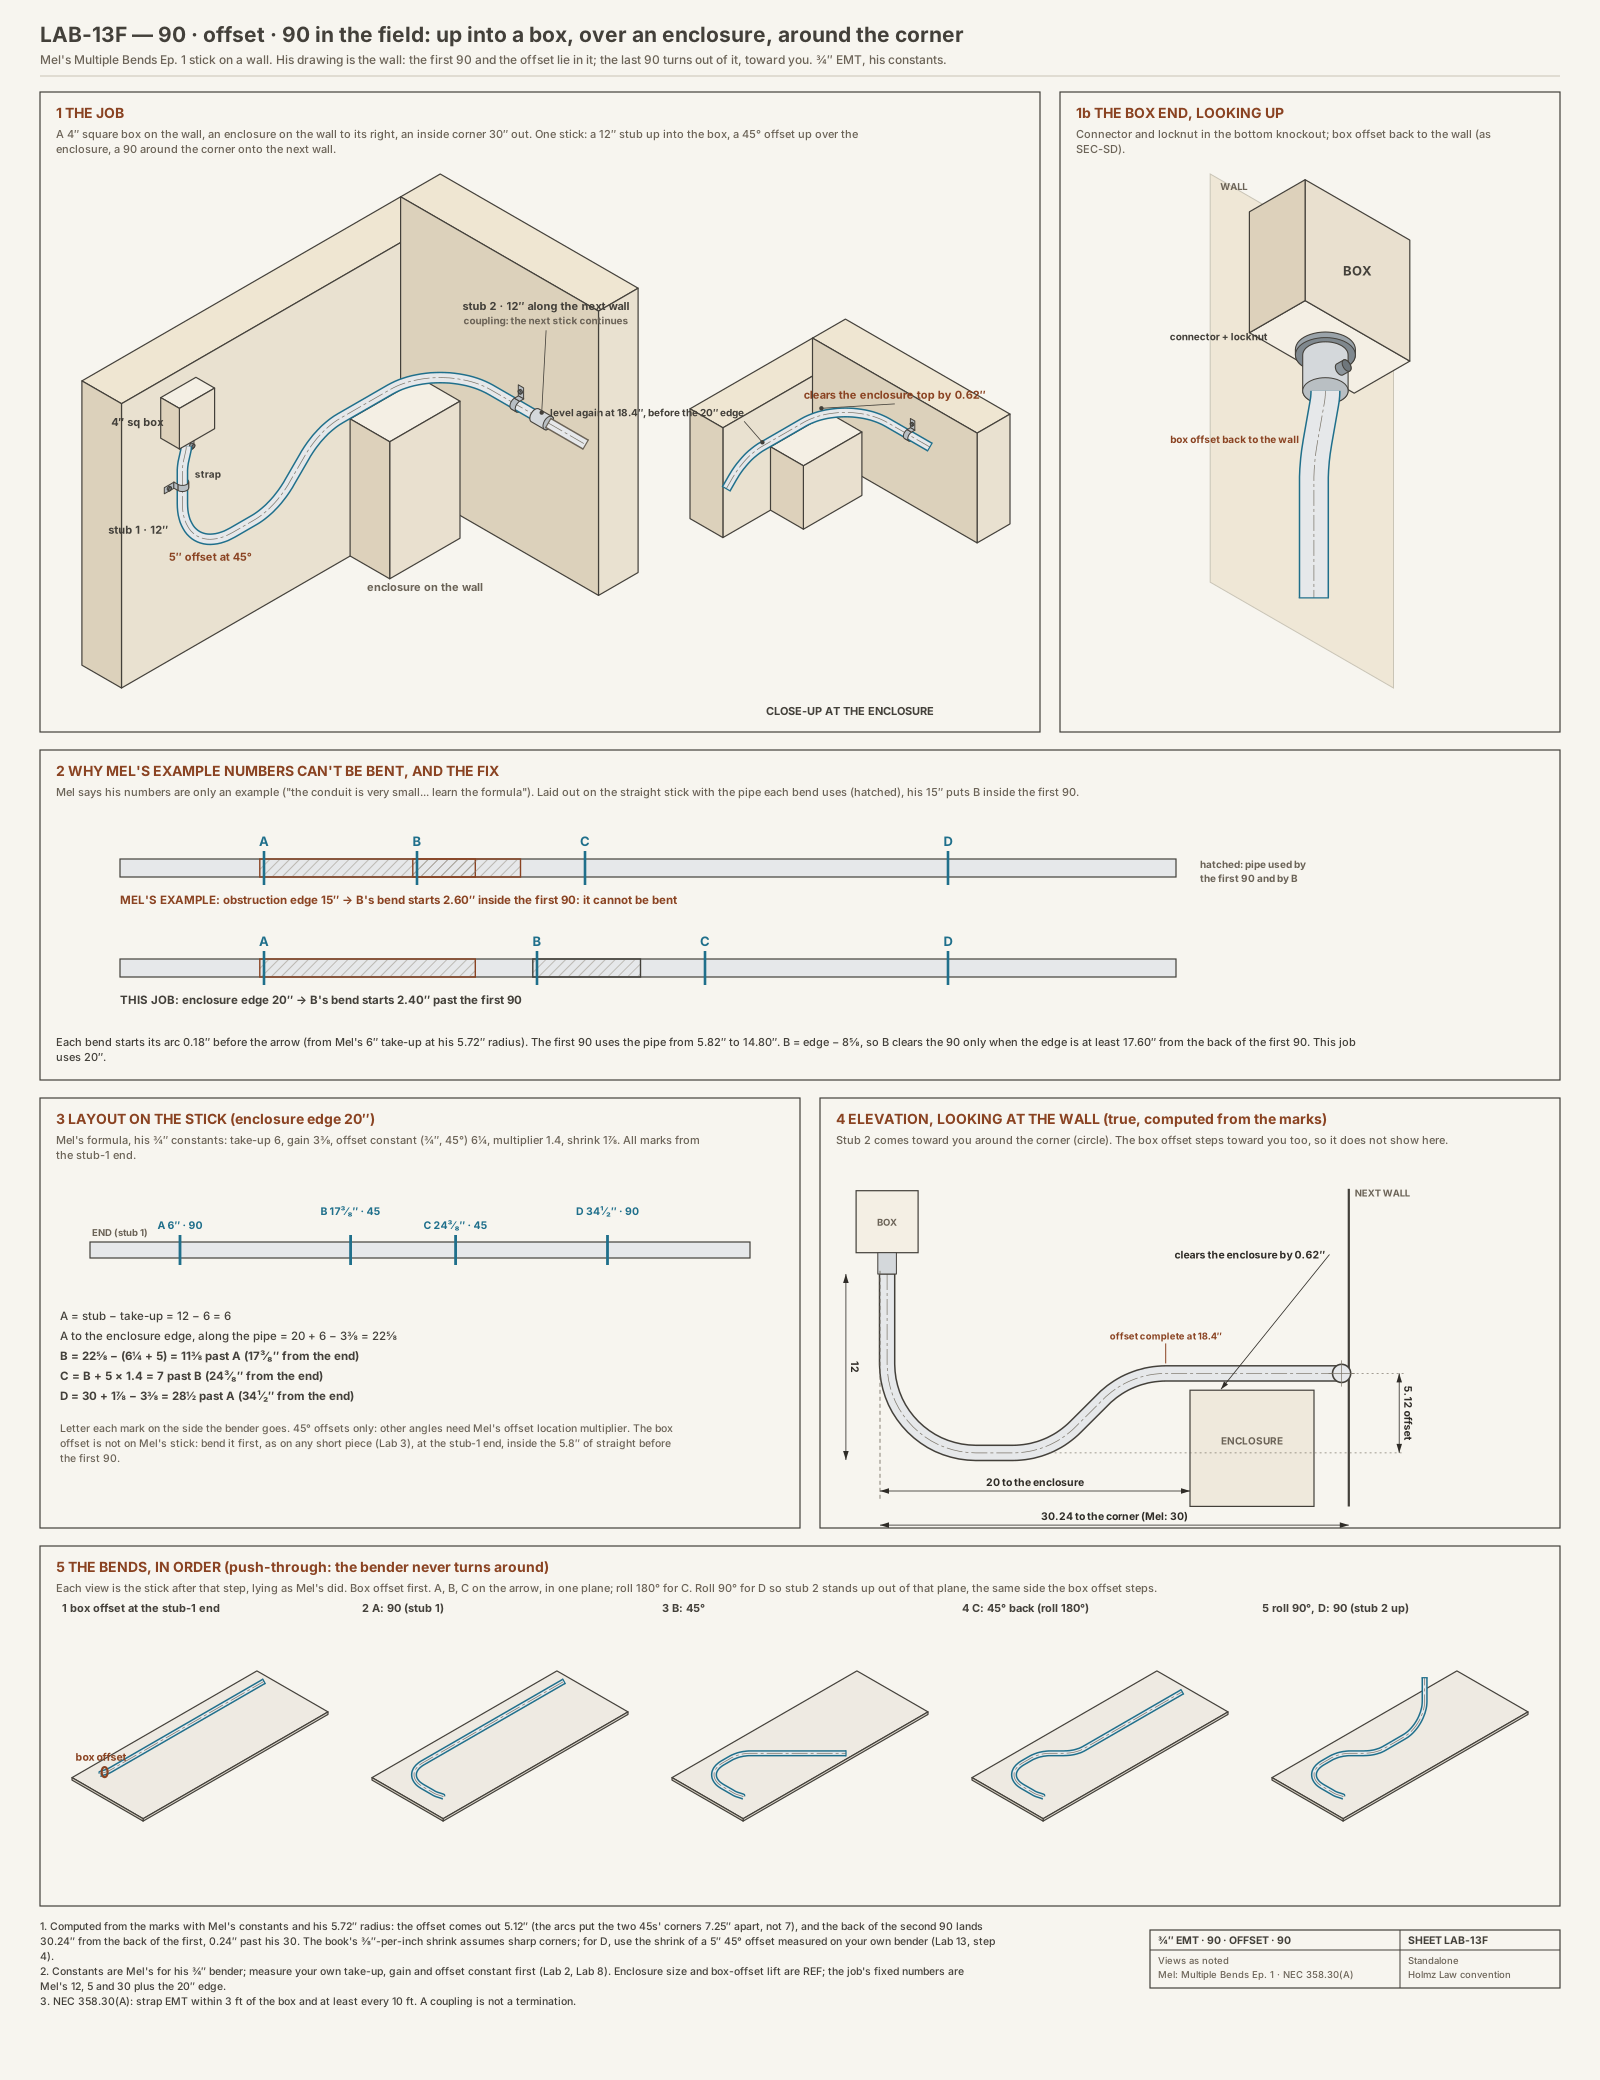
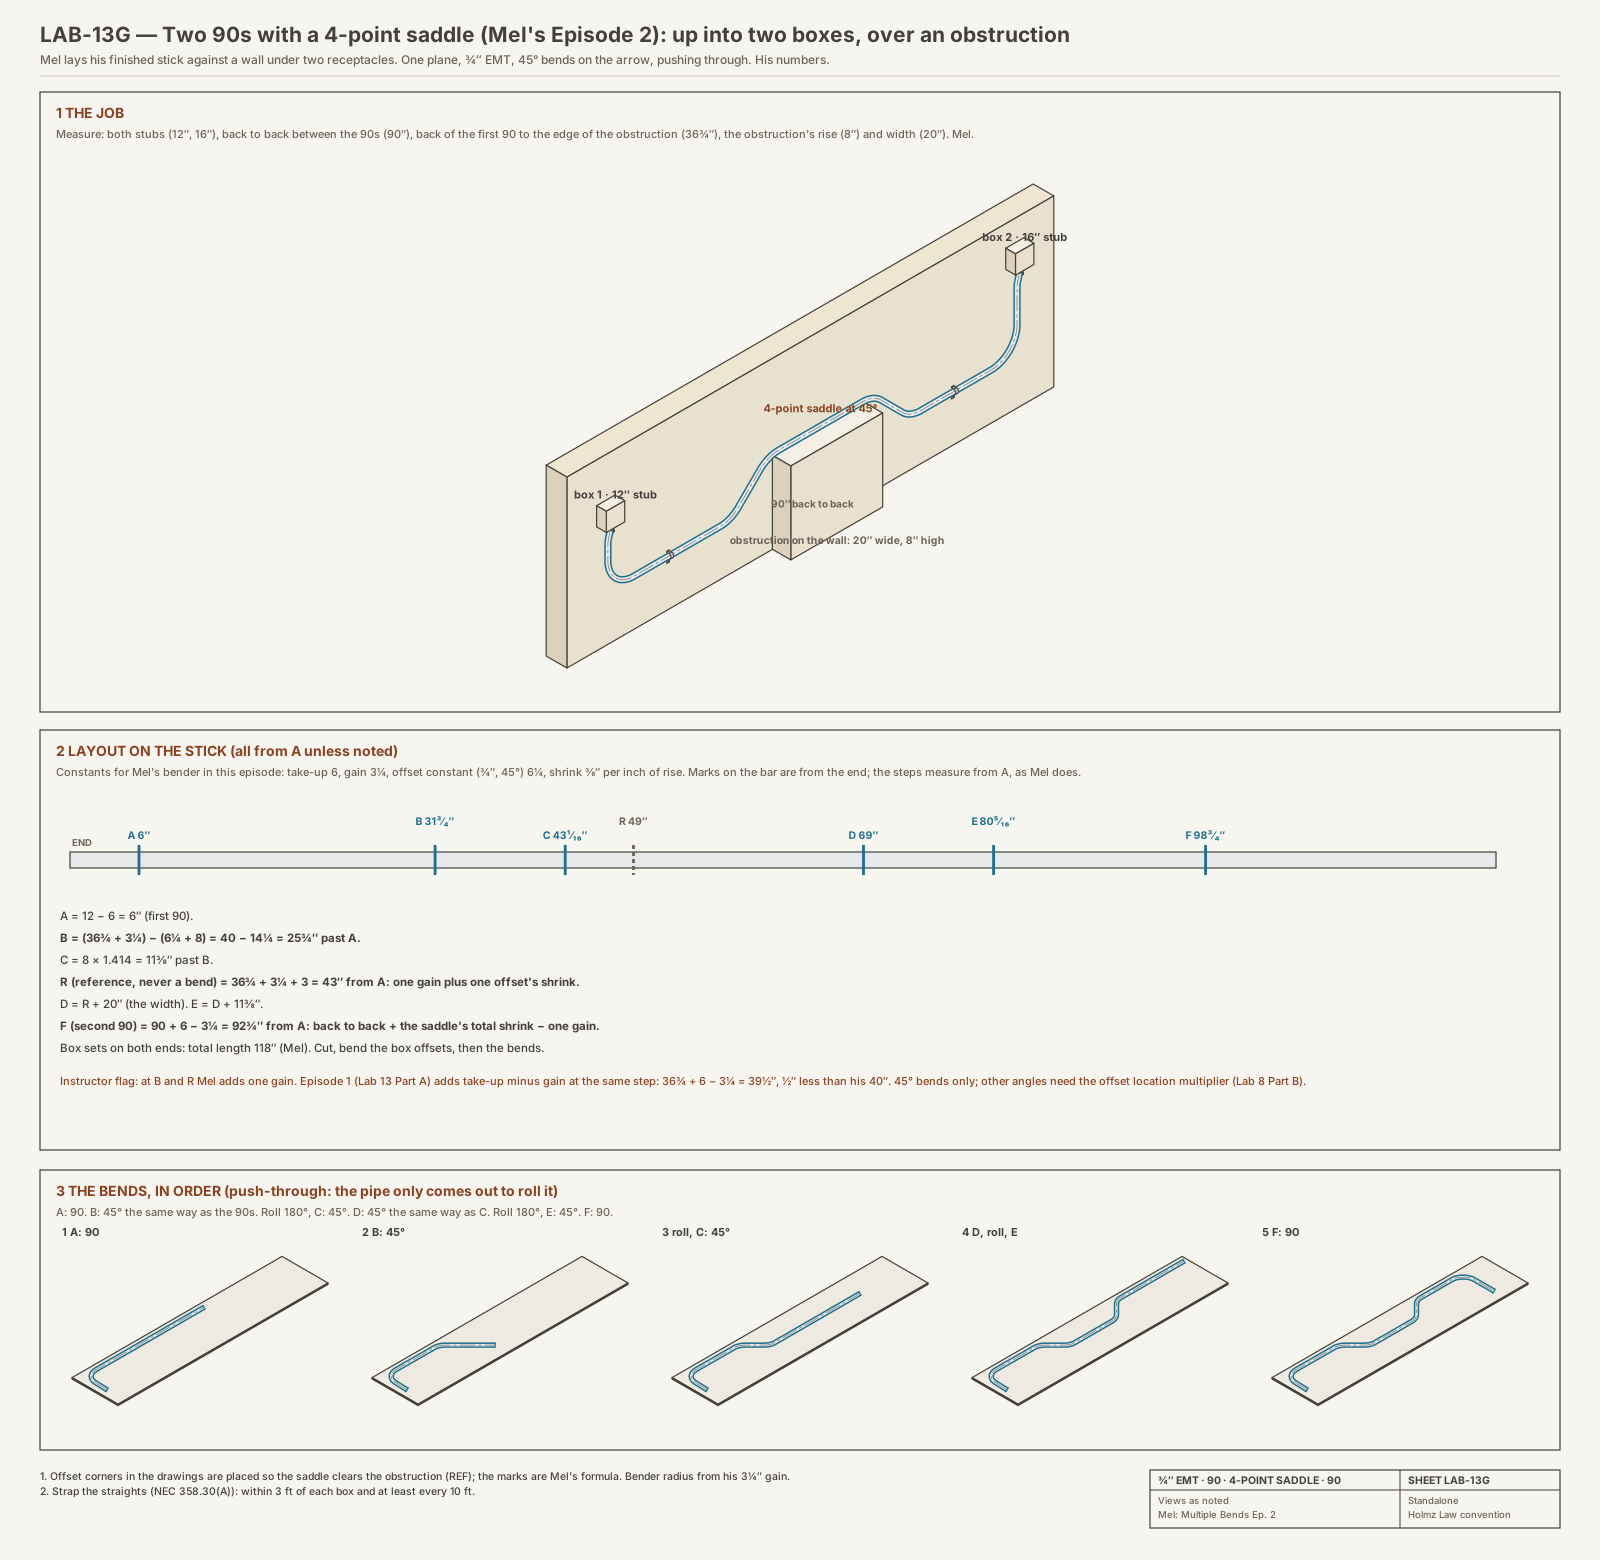
Bend
- On a real job, bend the box offset at the stub end first (Lab 3). Then A (90), B and C (45s; roll 180° for C so it doesn't dog), all on the arrow, pushing through. Roll the pipe 90° before D: in Mel's drawing the last 90 turns out of the plane of the others, toward you ("facing towards the screen", 39:03).
- The last 90 may need starting in the air and finishing on the floor.
This simple version works only for 45° offsets; other angles need Mel's offset location multiplier (Lab 8, Part B). His Episode 2 (90, 4-point saddle, 90) is Part B below.
Check before you bend (instructor flag): drawn to scale on sheet LAB-13, Mel's numbers don't fit together as stated. His 3 3/8" gain makes his 3/4" bender radius about 5.72", so with A on the arrow the first 90 uses the pipe from about 5 13/16" to 14 13/16" from the end. Mark B, only 6 3/8" past A, lands inside that bend. With his constants, B clears the 90 only when the back of the 90 is about 17 5/8" or more from the obstruction. Mel says in the video that these numbers are only an example ("the conduit is very small... learn the formula"). Sheet LAB-13F puts his stick on a wall: stub 1 up into a box, the 5" offset over an enclosure whose edge is 20" from the back of the first 90, and the last 90 around an inside corner. His formula and constants are kept; only the edge moves to 20": A 6, B 17 3/8, C 24 3/8, D 34 1/2 from the end. Computed at his radius, the offset comes out 5 1/8" and the back of the second 90 lands about 30 1/4" from the back of the first.
Part B · Two 90s with a 4-point saddle (Mel's Episode 2)
Mel's job: a 12" stub up into one box, a 16" stub up into another, and between them a 4-point saddle over an obstruction 8" high and 20" wide. All in one plane, all 45° bends on the arrow, pushing through. 3/4" EMT, his bender for this episode: take-up 6", gain 3 1/4", offset constant (3/4", 45°) 6 1/4", shrink 3/8" per inch of rise (3" per offset, 6" for the saddle).
Measure in the field: both stubs, the back-to-back between the two 90s (Mel's 90"), the back of the first 90 to the edge of the obstruction (36 3/4"), and the obstruction's rise (8") and width (20").
- A = 12 − 6 = 6" from the end (first 90).
- B = (36 3/4 + 3 1/4) − (6 1/4 + 8) = 40 − 14 1/4 = 25 3/4" past A. Mel adds one gain to the edge measurement, then takes off the offset constant plus the rise.
- C = 8 × 1.414 = 11 3/8" past B, the spacing of a regular 45° offset.
- R, a reference mark only (never bend on it) = 36 3/4 + 3 1/4 + 3 = 43" from A: one gain plus the shrink of one offset puts the edge of the obstruction on the stick.
- D = R + 20" (the obstruction's width).
- E = 11 3/8" past D.
- F (second 90) = 90 + 6 − 3 1/4 = 92 3/4" from A: back to back, plus the saddle's total shrink, less one gain.
- Bend A (90), then B (45°, the same way as the 90s), roll 180° for C, D the same way as C, roll 180° for E, then F (90). The pipe only comes out of the bender to roll it. Keep every mark on the line so nothing dogs.
- The last 90 may fight you (Mel hit his ceiling and turned the bender around to finish it). That's the field too.
- Box offsets on both ends: work out the total length first (Mel's: 118"), cut, bend the box offsets, then the bends.
This layout works only for 45° bends; other angles need the offset location multiplier (Lab 8, Part B). Instructor flag: at B and R Mel adds one gain; in Episode 1 the same step adds take-up minus gain. With his Episode 2 constants that is 36 3/4 + 6 − 3 1/4 = 39 1/2", 1/2" less than his 40". Sheet LAB-13G puts the job on a wall.
It's right when the 12" stub, the offset at the obstruction, and the second 90 all land within 1/8".
Sign-off: your instructor checks the finished stick.
Clips from Mel's videos
Each clip plays only the part of the video that matches the step.
Lab 14
Rolling offsets
Goal: an offset that moves up and over at the same time, then three side by side. Mel's numbers.
You need: your charted bender, 1/2" EMT, a laser or straightedge, scientific calculator, tape, pencil, safety glasses and gloves.
The numbers
- Two measurements instead of one: the rise and the side move, to the same reference.
- True offset (the diagonal) = √(rise² + side²). Then it's an ordinary offset.
- No calculator: lay out the rise and the side at a right angle on cardboard and tape across the diagonal.
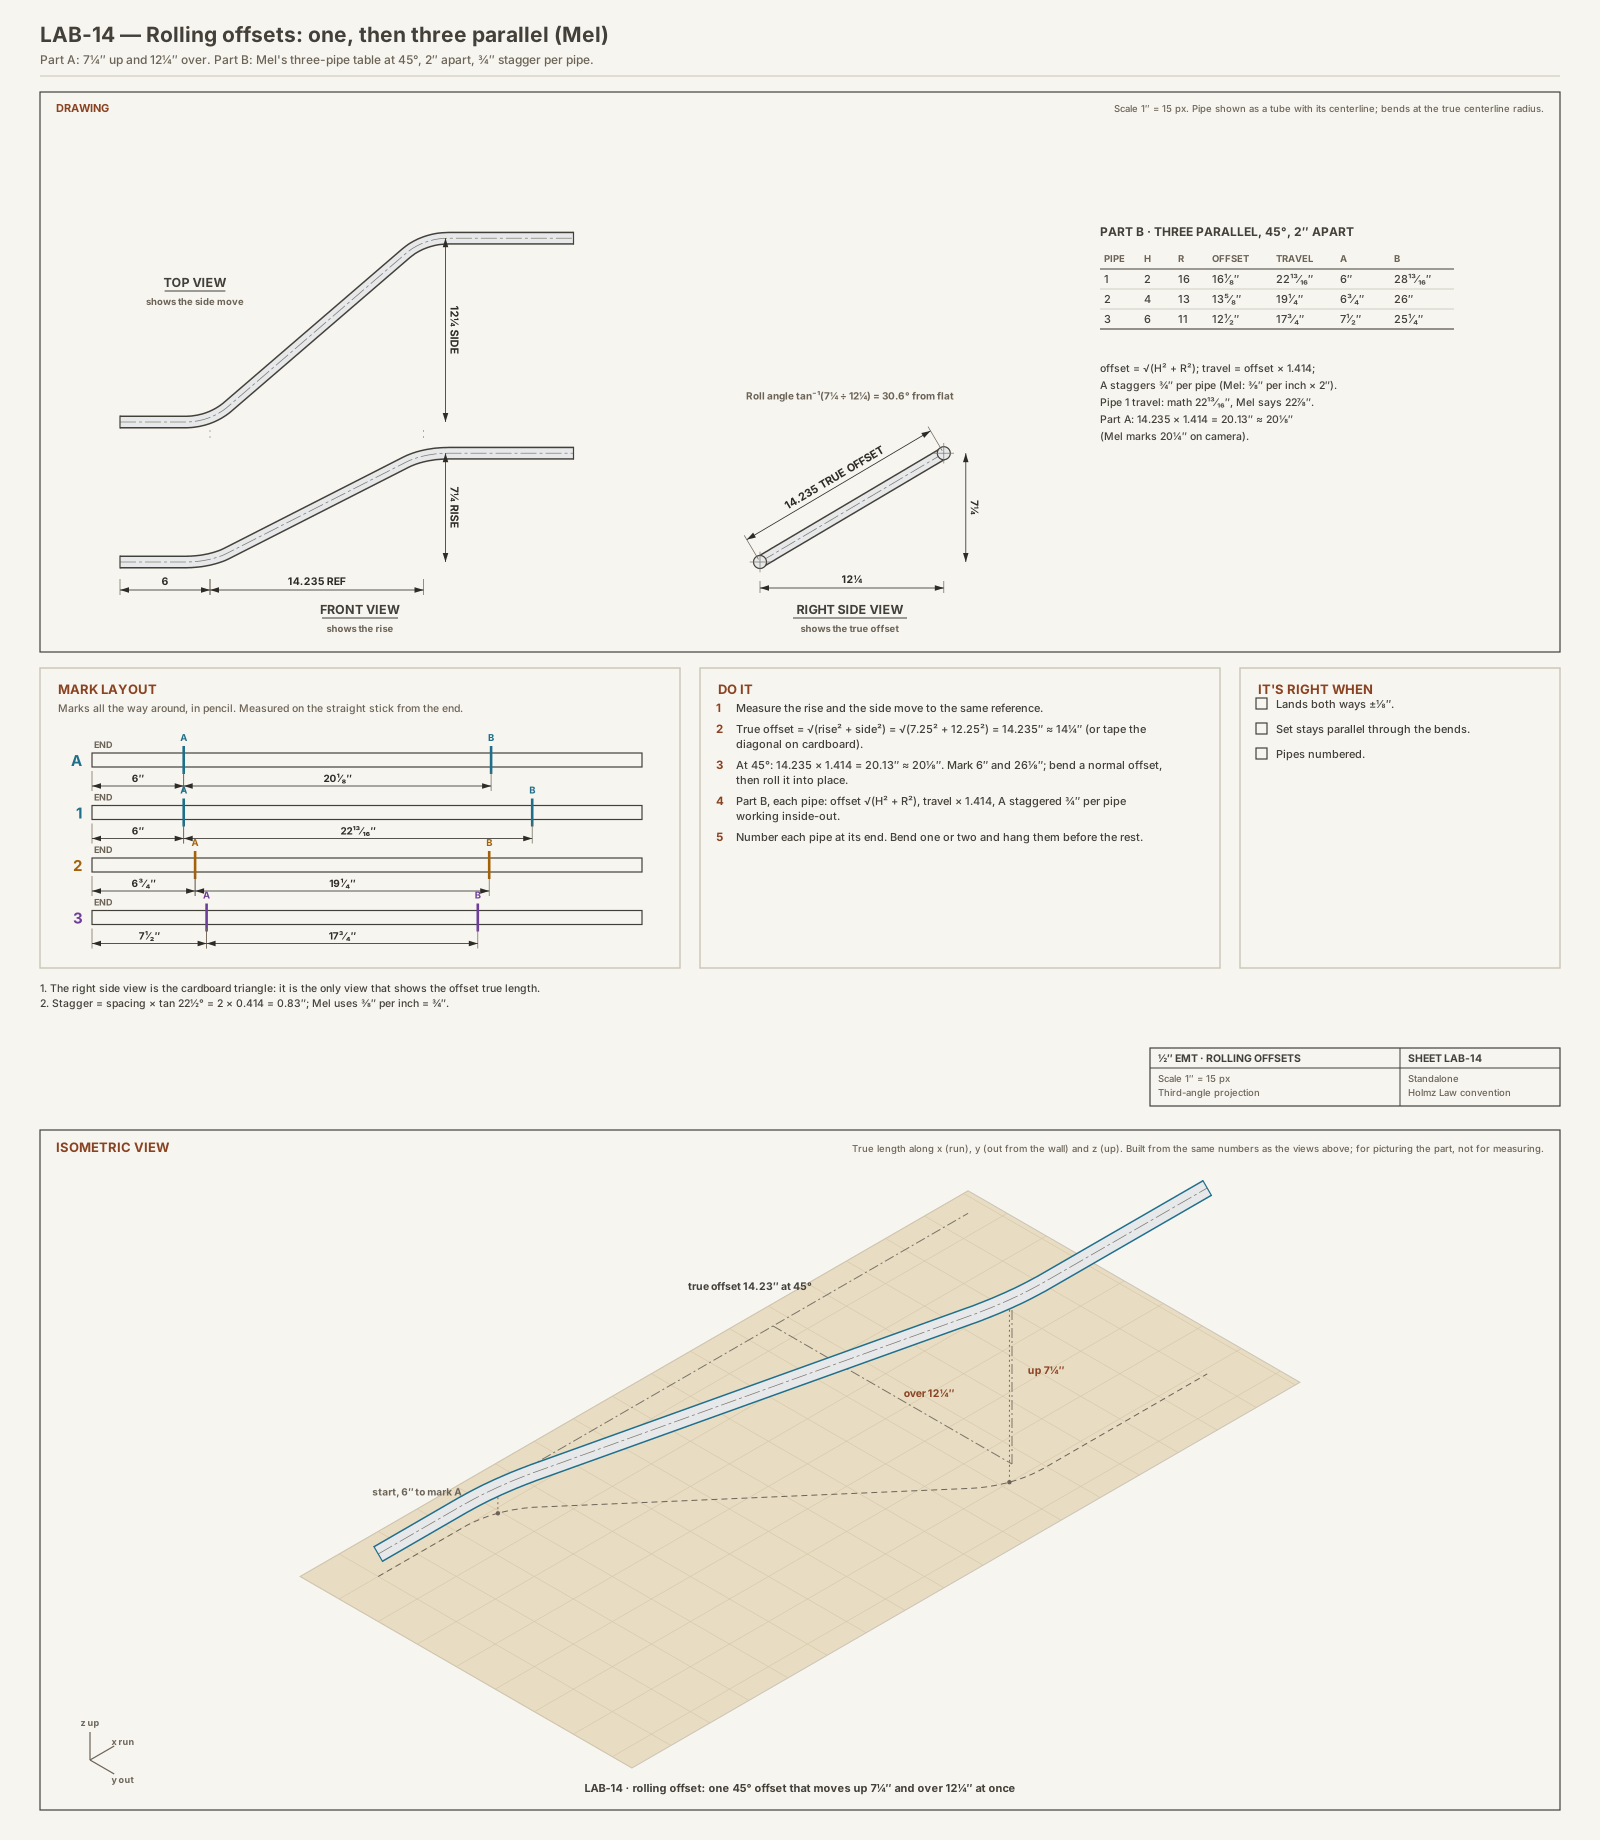
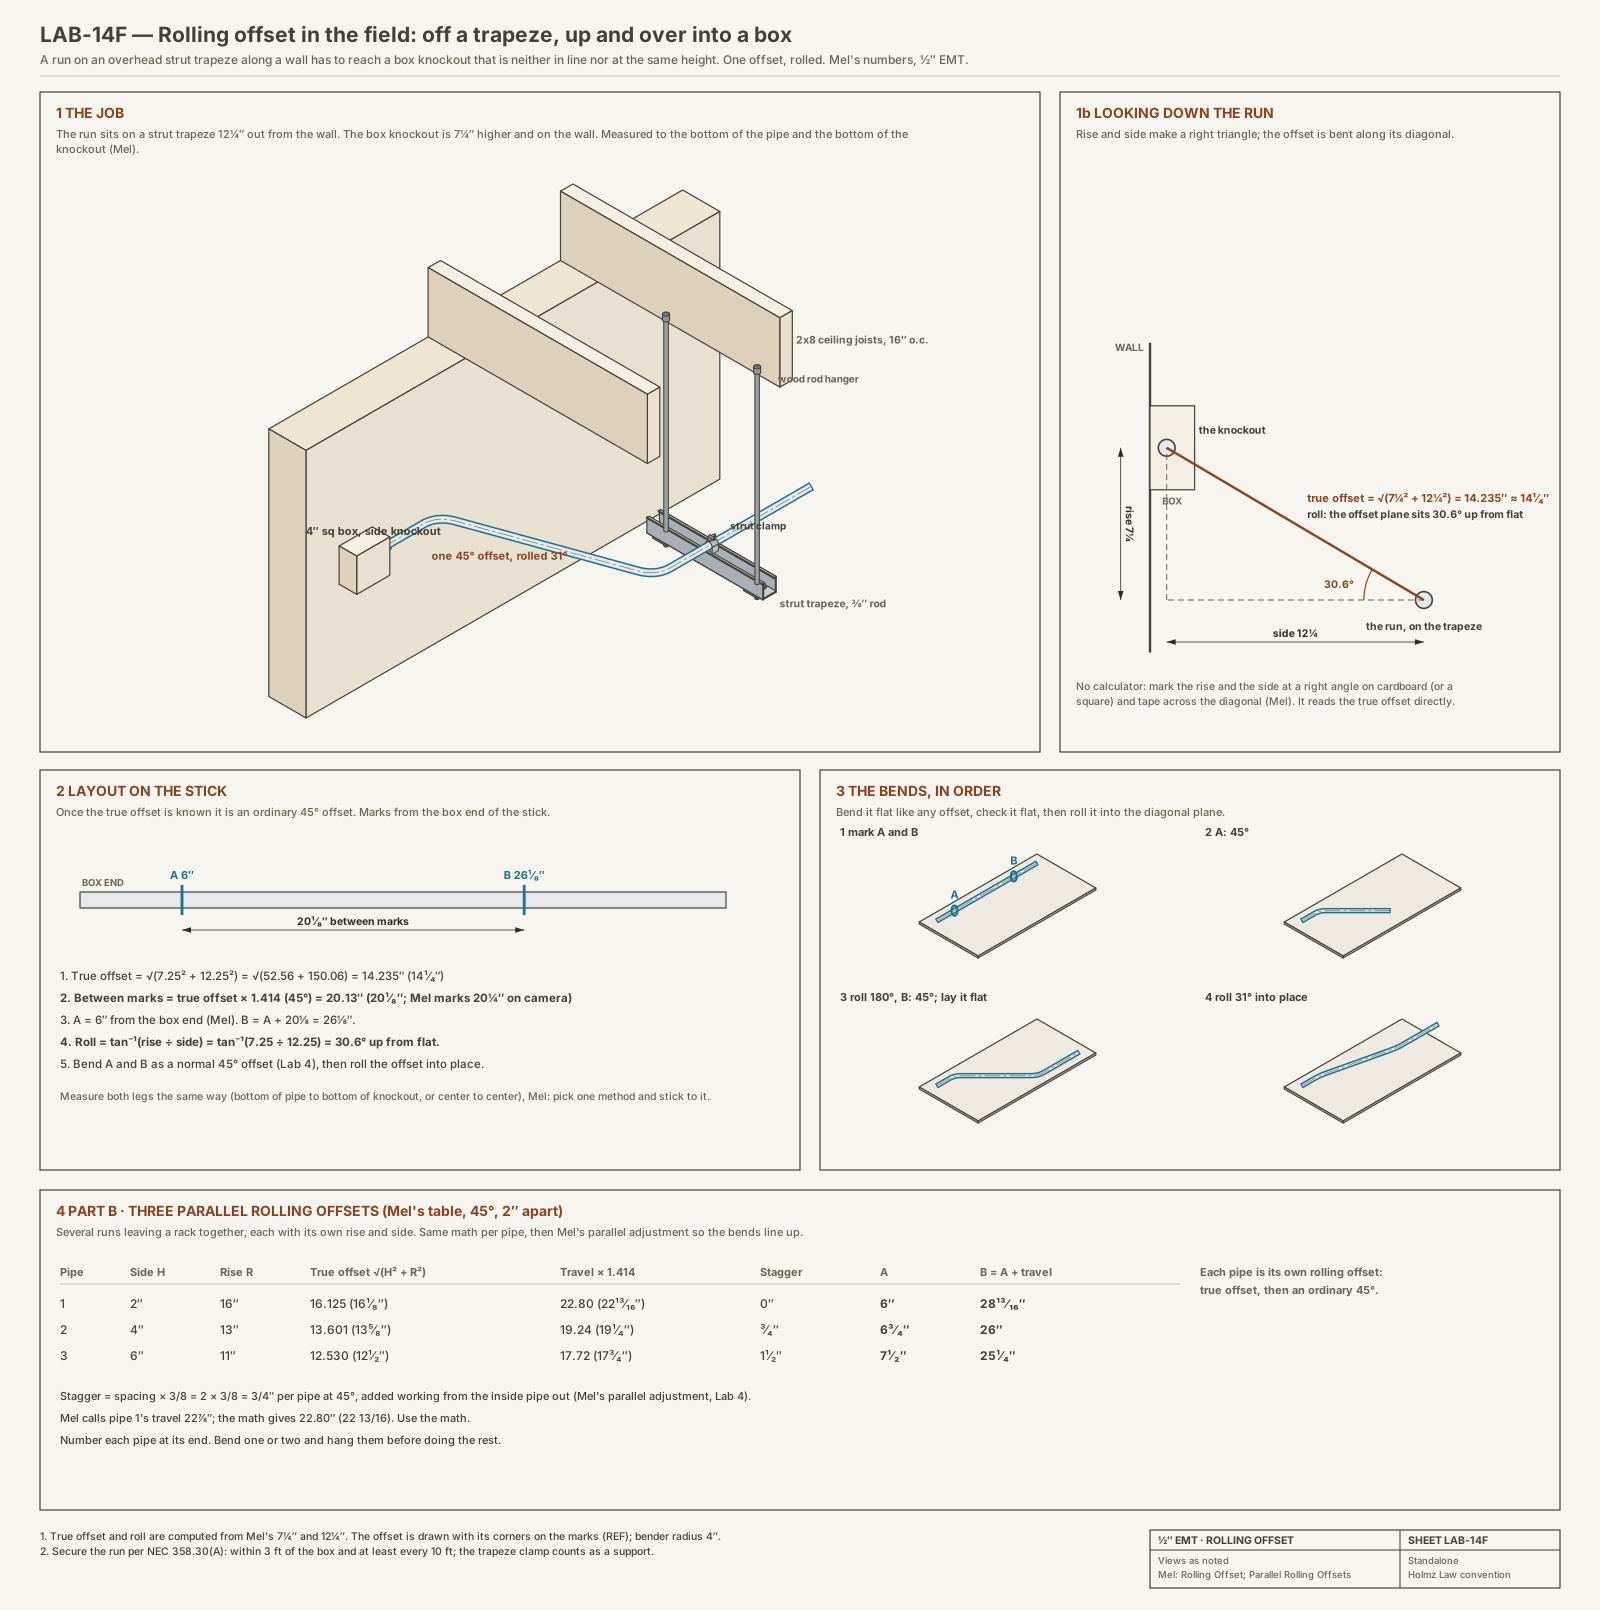
Part A · One rolling offset (Mel's 7 1/4" and 12 1/4")
- √(7.25² + 12.25²) = 14.235" ≈ 14 1/4".
- At 45°: 14.235 × 1.414 = 20.13" ≈ 20 1/8" between marks (Mel marks 20 1/4" on camera; the math says 20 1/8").
- First mark 6" from the end, second 20 1/8" past it. Bend a normal 45° offset, then roll it into place.
Part B · Three parallel rolling offsets (Mel's table, 45°, 2" apart)
- Each pipe: offset = √(H² + R²); travel = offset × 1.414. Stagger = 2 × 3/8 = 3/4" per pipe, added working inside-out.
- Pipe 1: H 2, R 16 → 16 1/8 → travel 22.80 (22 13/16; Mel says 22 7/8). A 6, B 28 13/16.
- Pipe 2: H 4, R 13 → 13 5/8 → 19 1/4. A 6 3/4, B 26.
- Pipe 3: H 6, R 11 → 12 1/2 → 17 3/4. A 7 1/2, B 25 1/4.
- Number each pipe at its end. Bend one or two and hang them before doing the rest.
It's right when each lands in both directions within 1/8" and the set stays parallel.
Sign-off: your instructor checks Part A and the Part B table.
Clips from Mel's videos
Each clip plays only the part of the video that matches the step.
Lab 15
Corner offset
Goal: carry a run around an outside or inside corner with two offsets, rotated 90° to each other. Mel's 6" and 8" example at 30°.
Steps
- Offset 1 = from the conduit to the edge of the corner (6"). Offset 2 = from the edge to where it lands on the other wall (8").
- Mark A at 6" from the end; B 6 × 2 = 12" past A.
- Leave a gap of at least 6" (Mel's minimum, or it looks "funky"), then mark C; D 8 × 2 = 16" past C.
- Bend A and B as a normal 30° offset.
- At C, roll the pipe 90° so the first offset lies flat on the floor. Which way you roll decides inside or outside corner. Bend C, then D.
- Use the same angle for all four bends; it looks better.
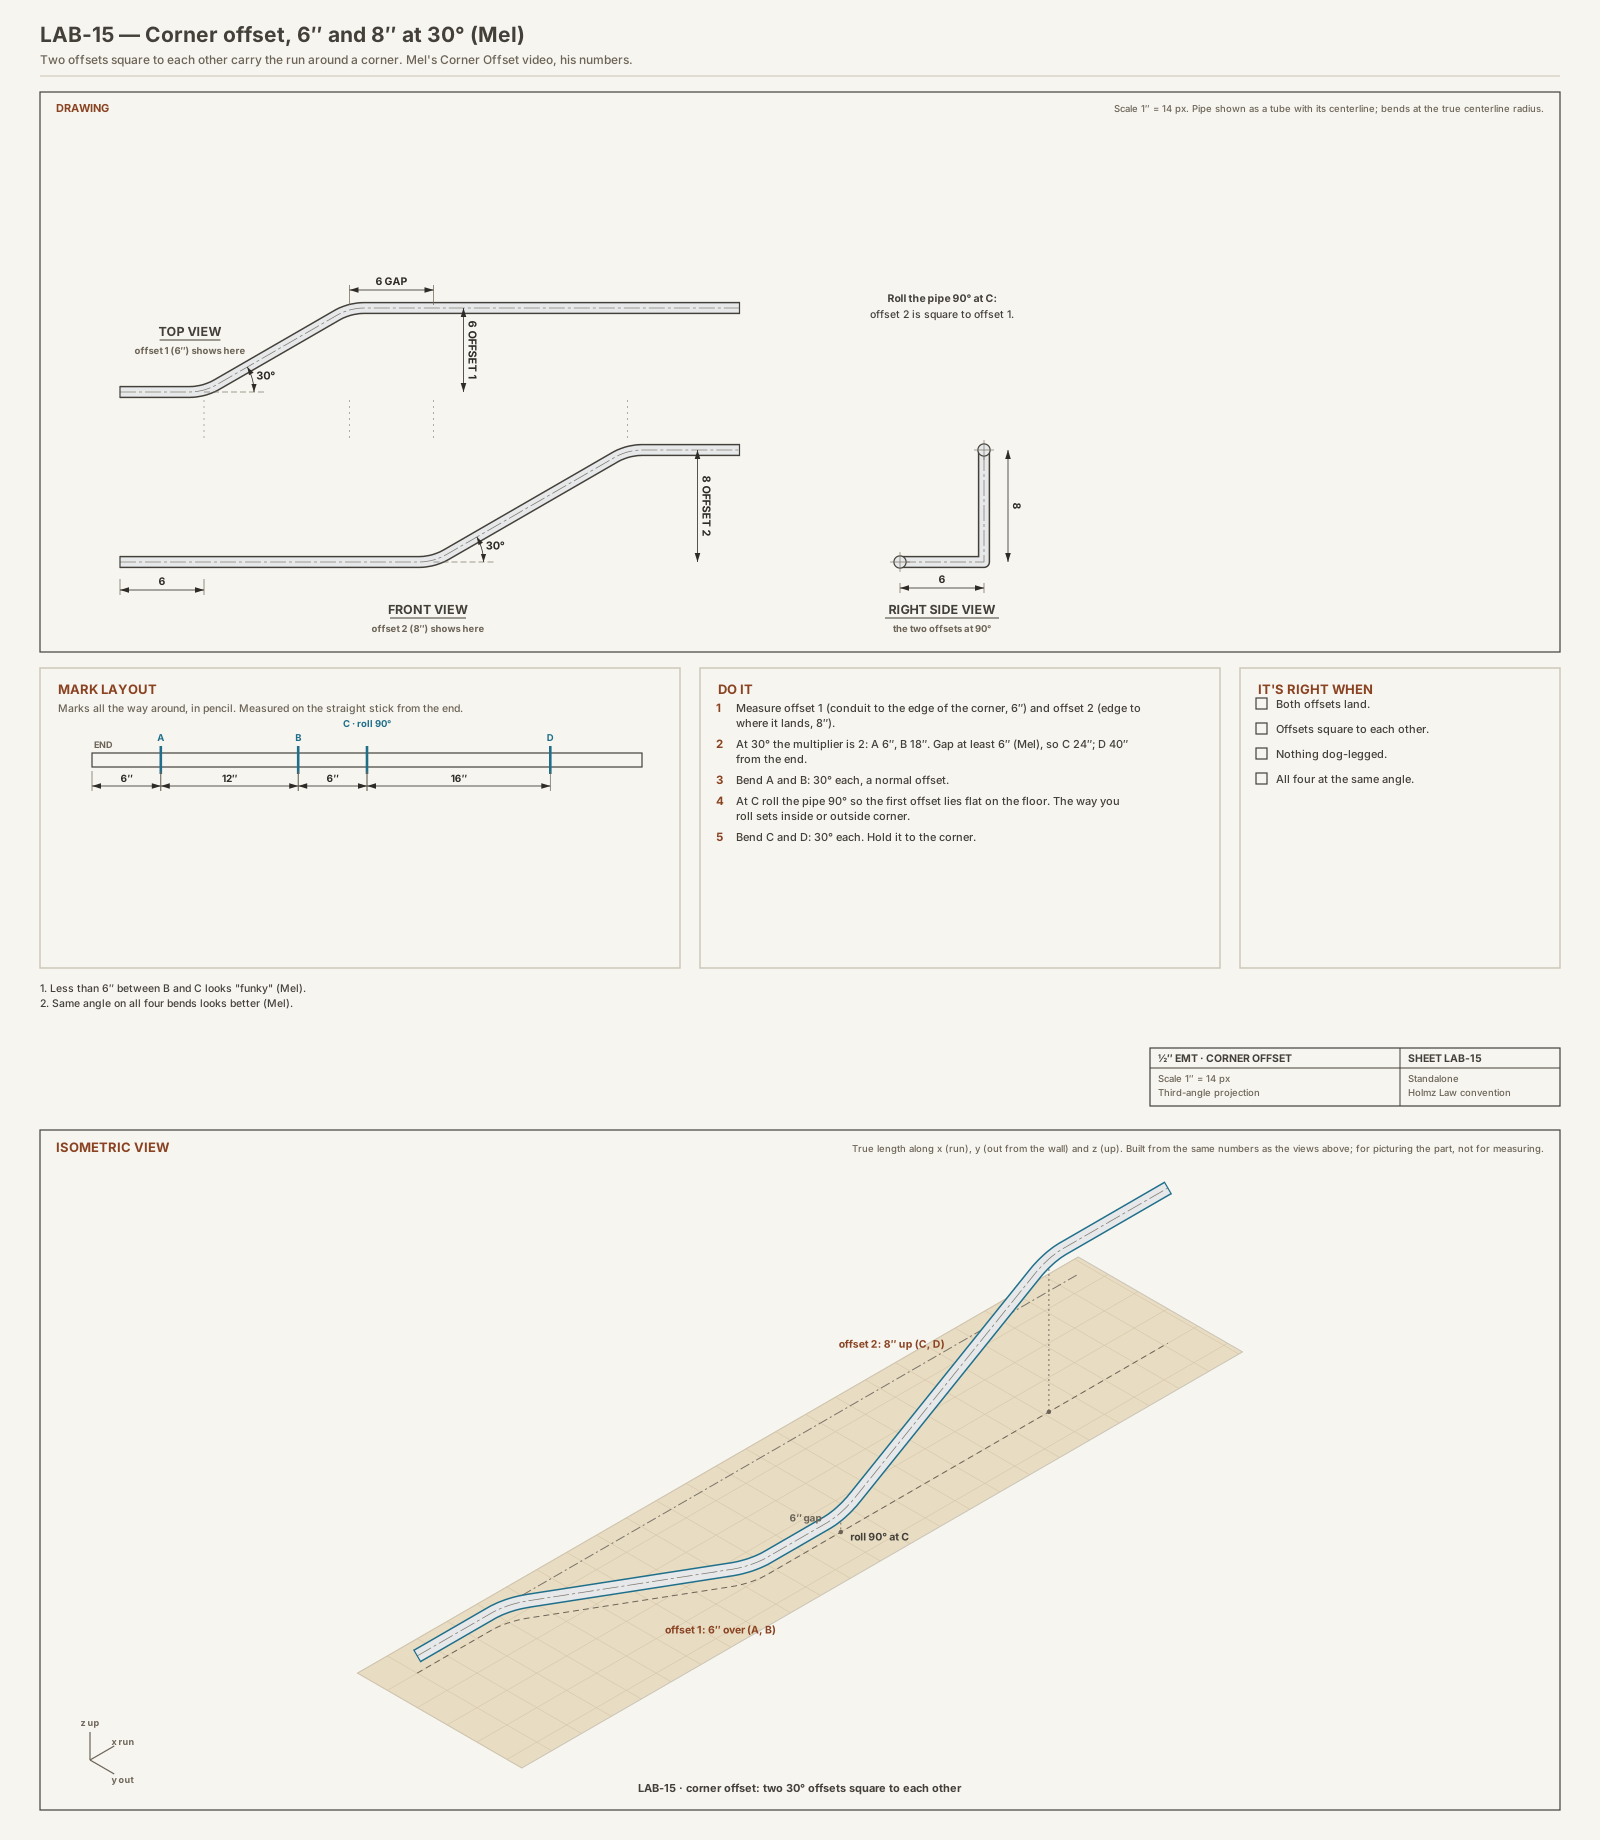
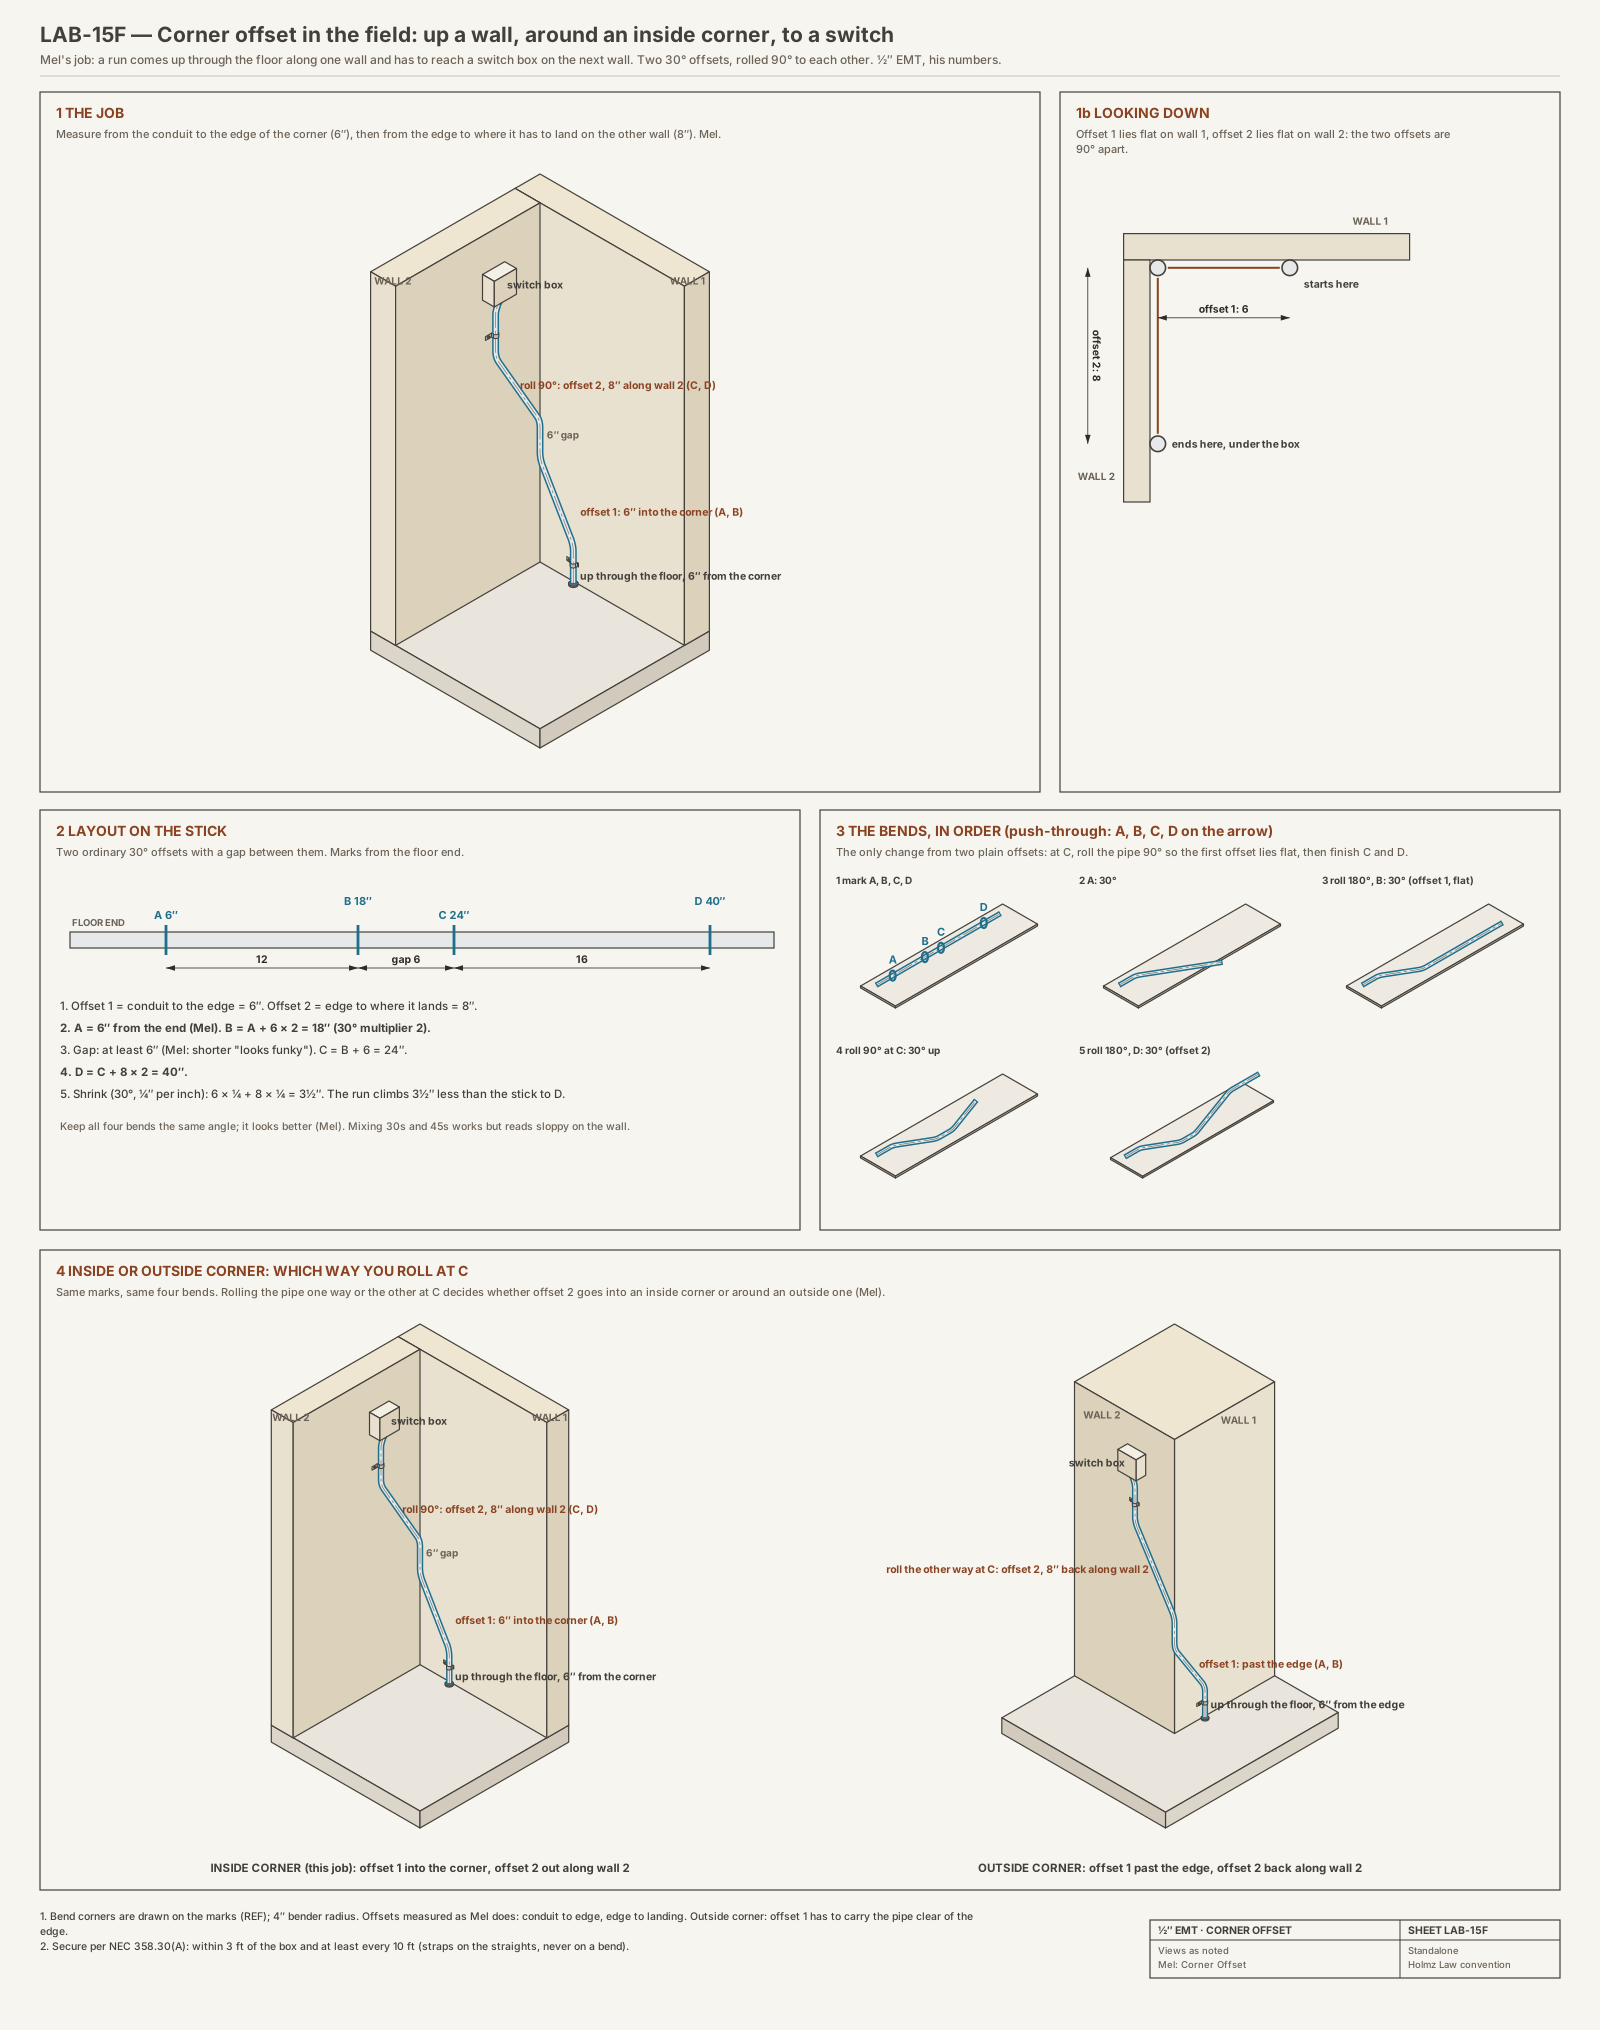
It's right when both offsets land, all bends are clean, and nothing is dog-legged.
Clips from Mel's videos
Each clip plays only the part of the video that matches the step.
Lab 16
Compound 90s
Goal: a 90 made from two 45s that wraps around an obstacle in a corner. Mel's formulas and numbers.
The numbers
- Spacing between the two 45s: round obstacle = 2.4 × diameter; square set diagonally = 3 × one side (in Pt. 3 Mel says ×3 also works with the square flat in the corner; Pt. 2 says diagonal); rectangle = (short + long) × 1.4.
- First mark A = (start of the conduit to the wall past the obstacle) − spacing ÷ 1.4. B = A + spacing. Add any gap between the obstacle and the wall to its size.
- Both bends on the notch. Bend B until a level on the first bend reads 90°.
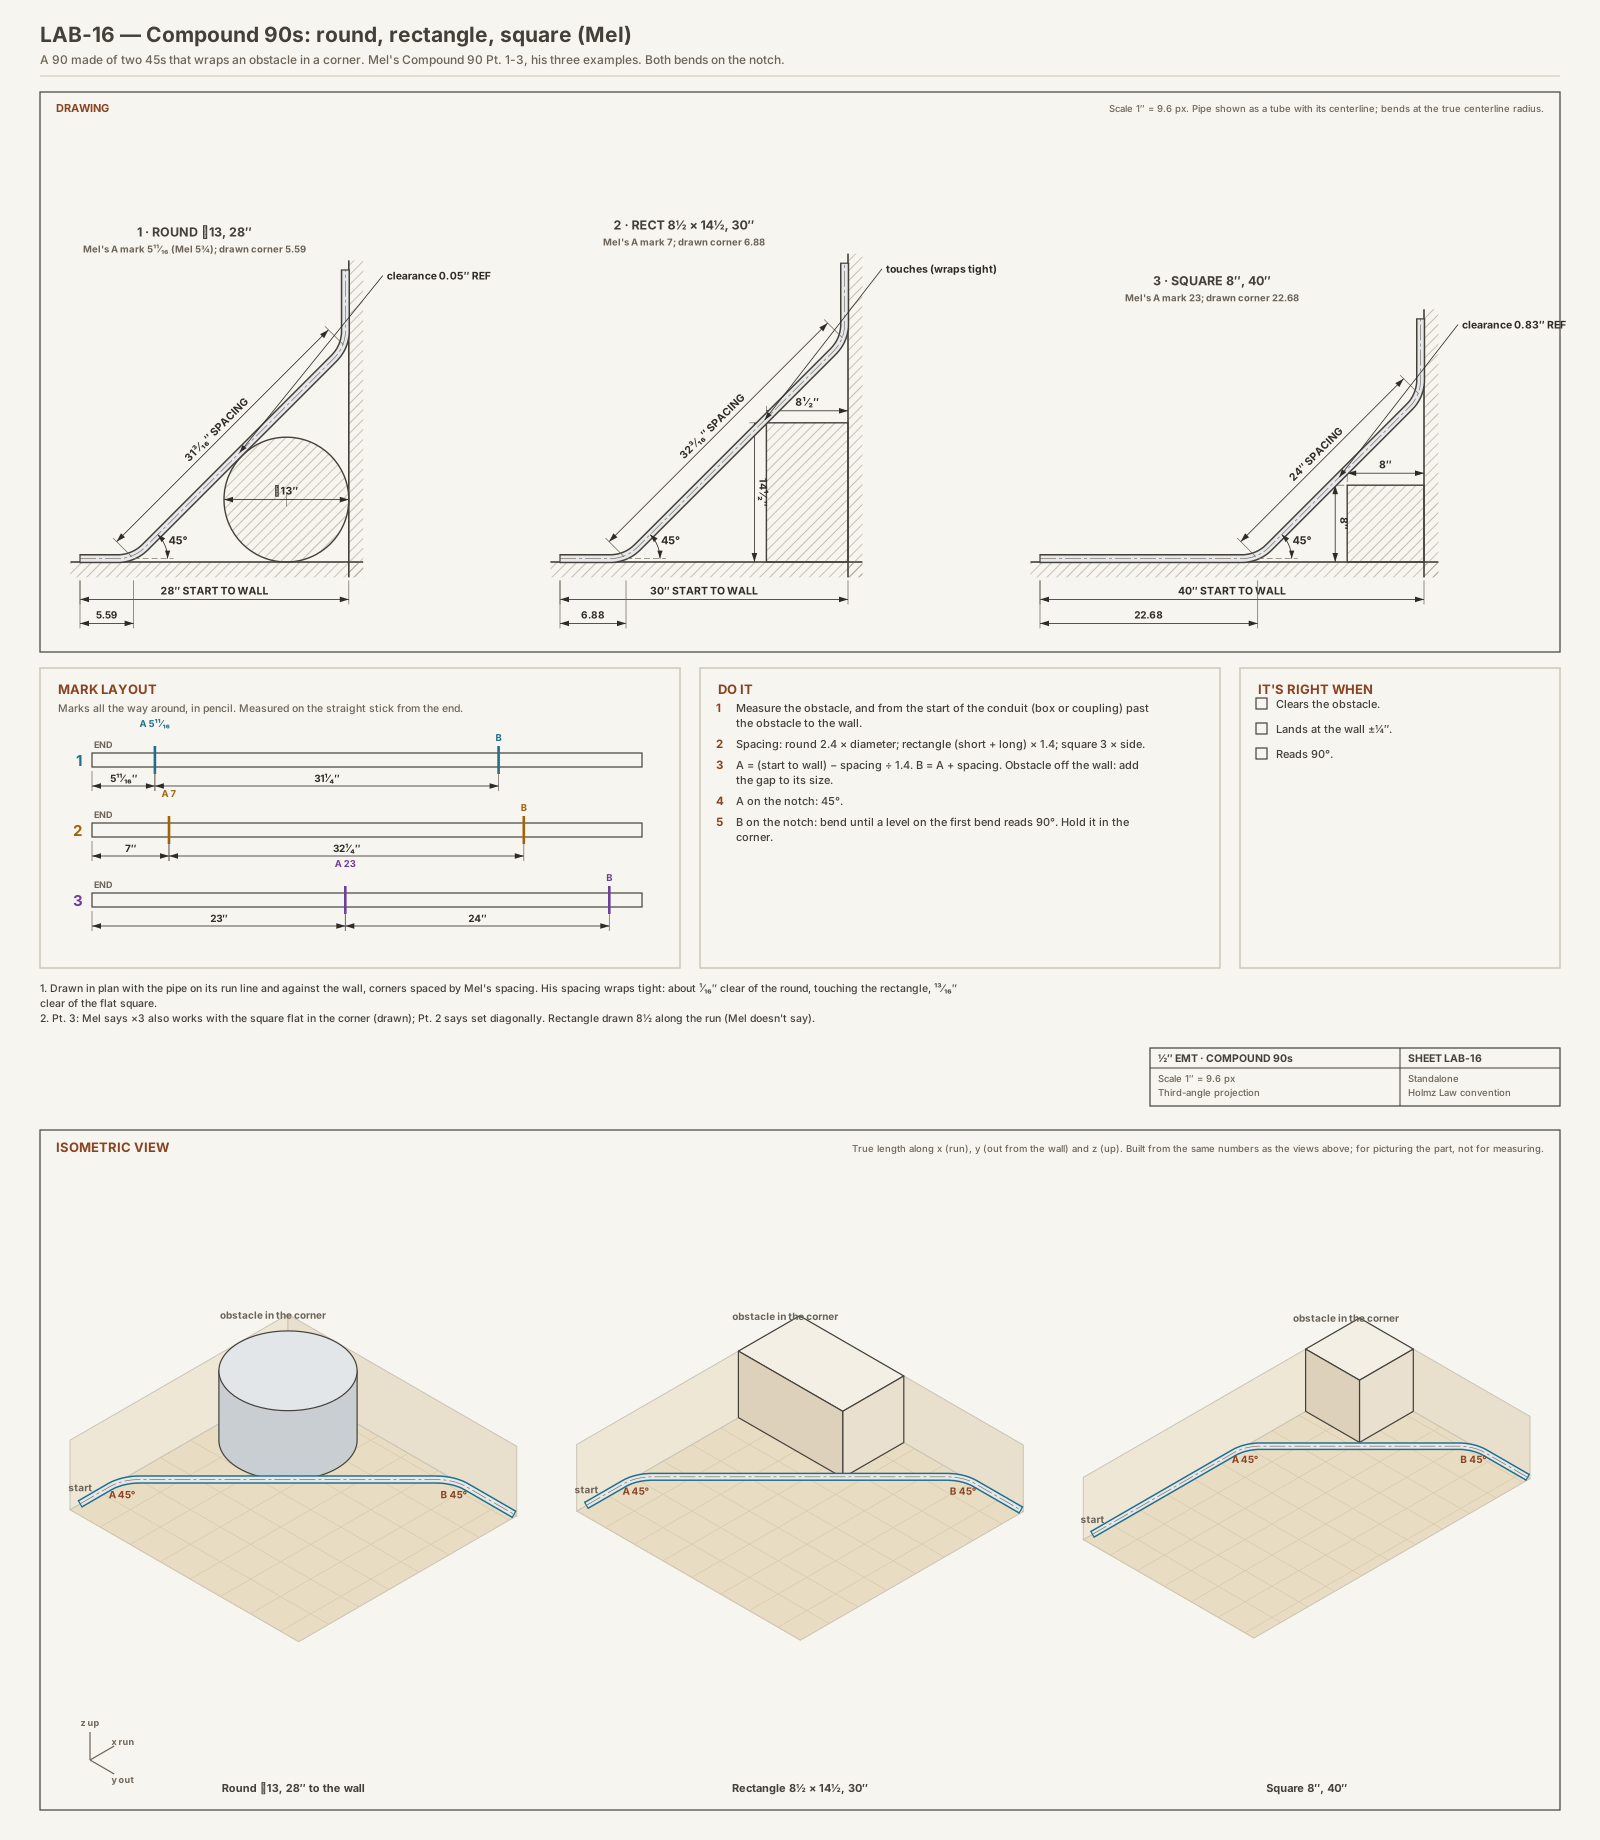
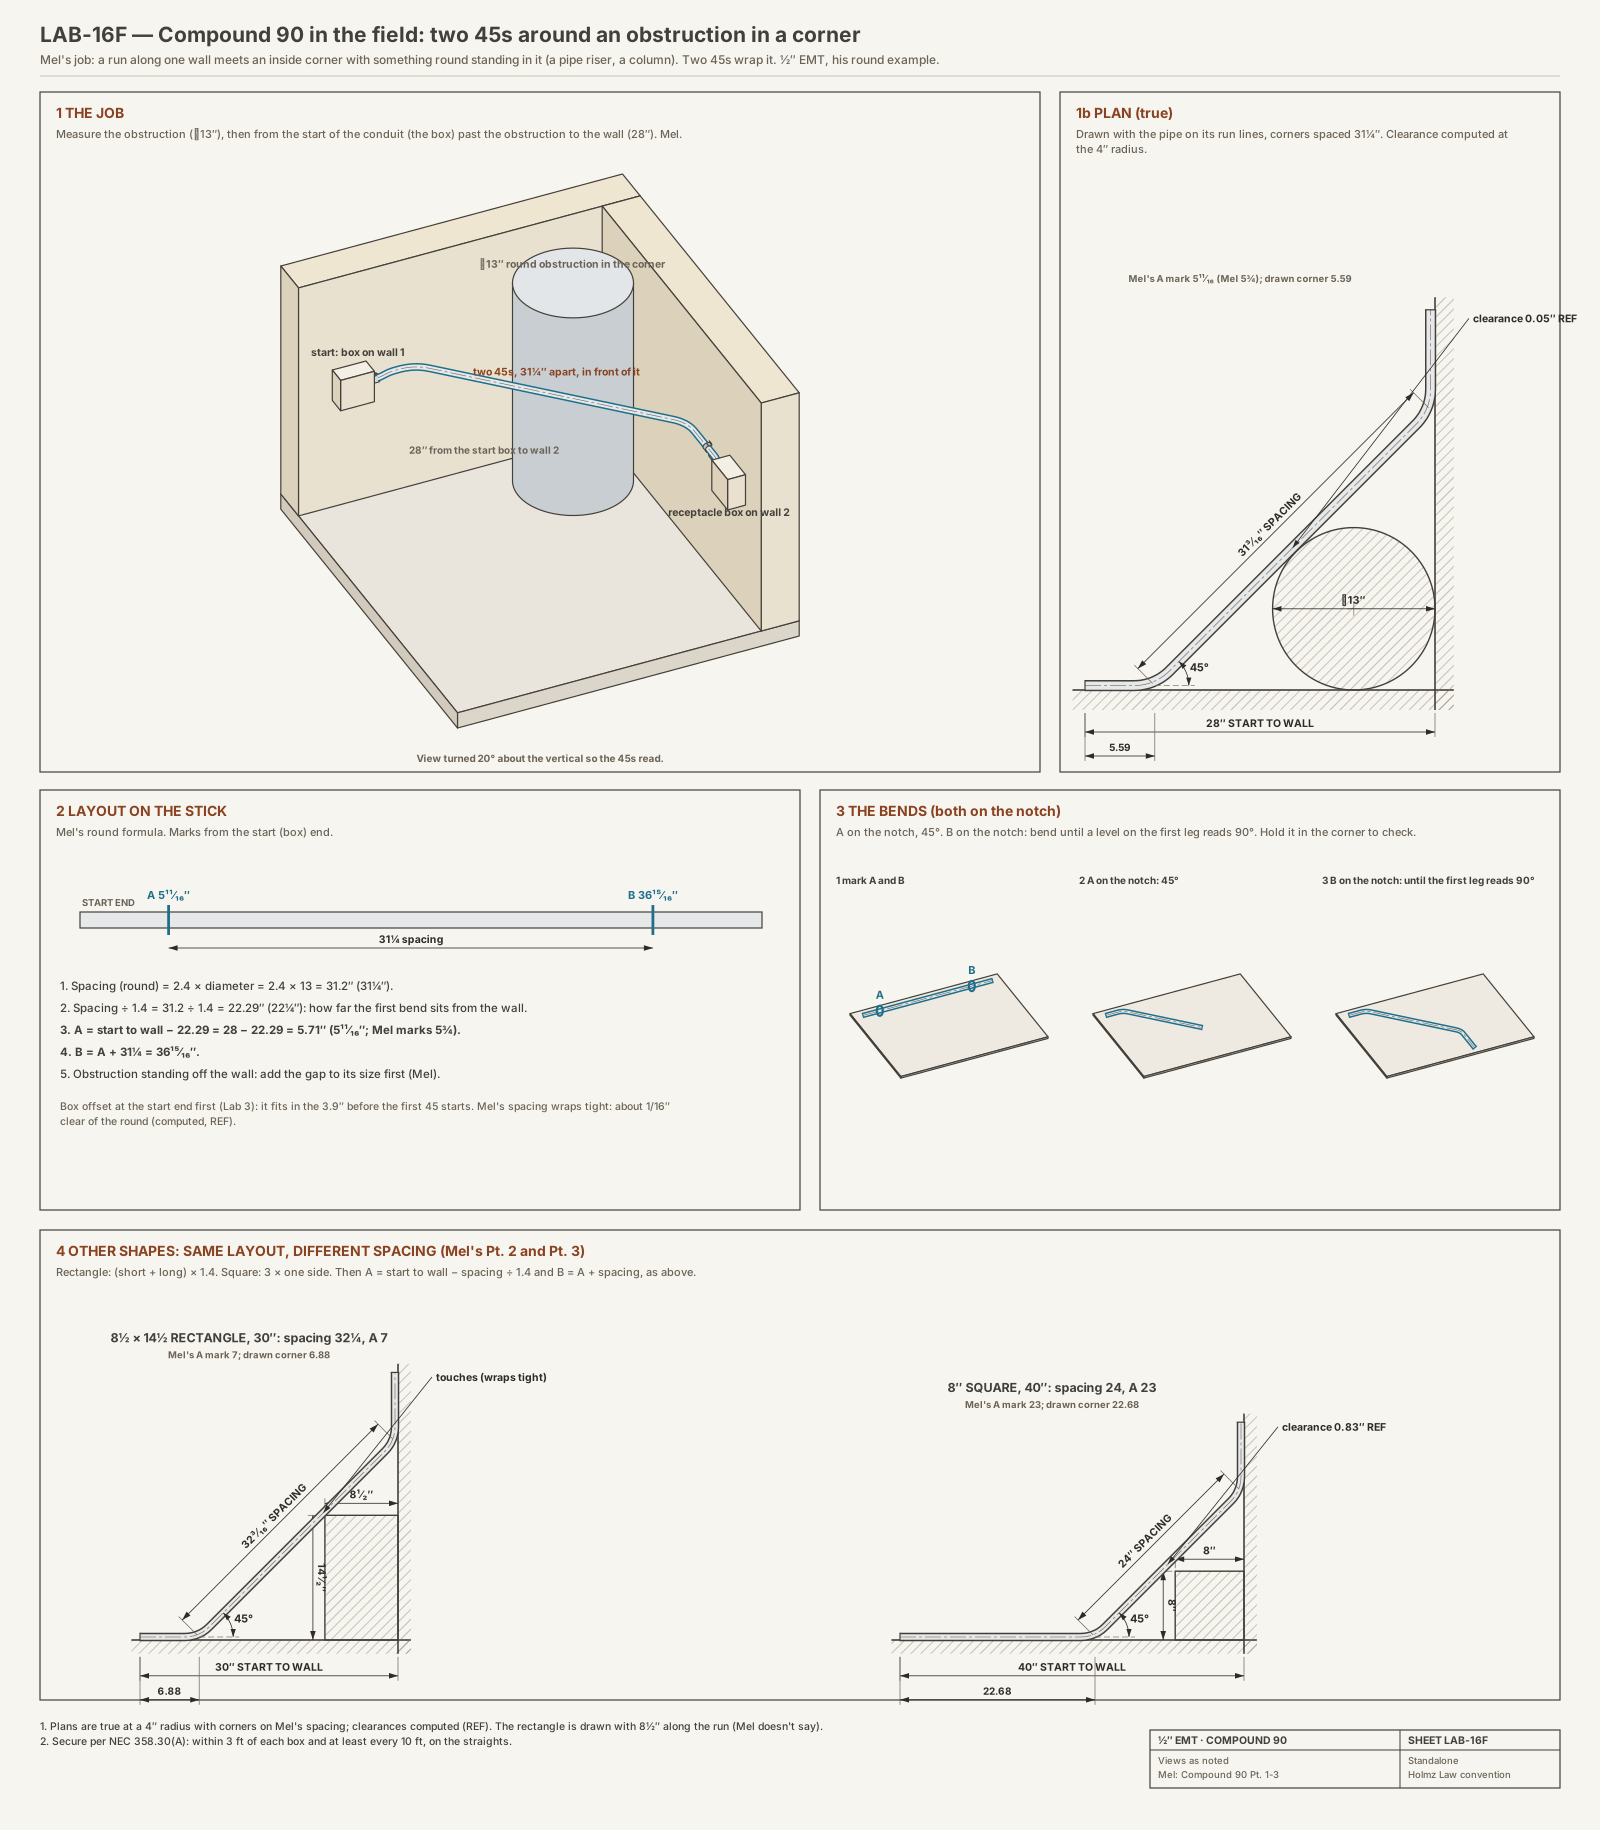
Mel's three examples
- Round, 13" diameter, 28" to the wall: spacing 31.2 (31 1/4); 31.2 ÷ 1.4 = 22.29; A = 5.71" (5 11/16; Mel marks 5 3/4); B = A + 31 1/4.
- Rectangle 8 1/2 × 14 1/2, 30" to the wall: spacing 23 × 1.4 = 32.2 (32 1/4); A = 30 − 23 = 7"; B = A + 32 1/4.
- Square 8", 40" to the wall: spacing 24; 24 ÷ 1.414 = 16.97 (17); A = 23"; B = A + 24.
It's right when the 90 clears the obstacle and lands at the wall within 1/4".
Clips from Mel's videos
Each clip plays only the part of the video that matches the step.
Lab 17
Segment and concentric bends
Goal: a large-radius 90 bent in small shots, a segment offset, and a concentric rack. Mel's numbers.
The numbers
- Developed length of a 90 = radius × 1.57. Of any angle = radius × degrees × 0.0175.
- Shot spacing = developed length ÷ number of shots. Degrees per shot = 90 ÷ shots.
- Start mark for a set stub = stub − (centerline radius + 1/2 OD). That's Mel's segment video; his concentric video uses radius + the full OD as the take-up. The start mark is a reference, not a bend.
- Concentric rack: each next radius = previous radius + spacing.
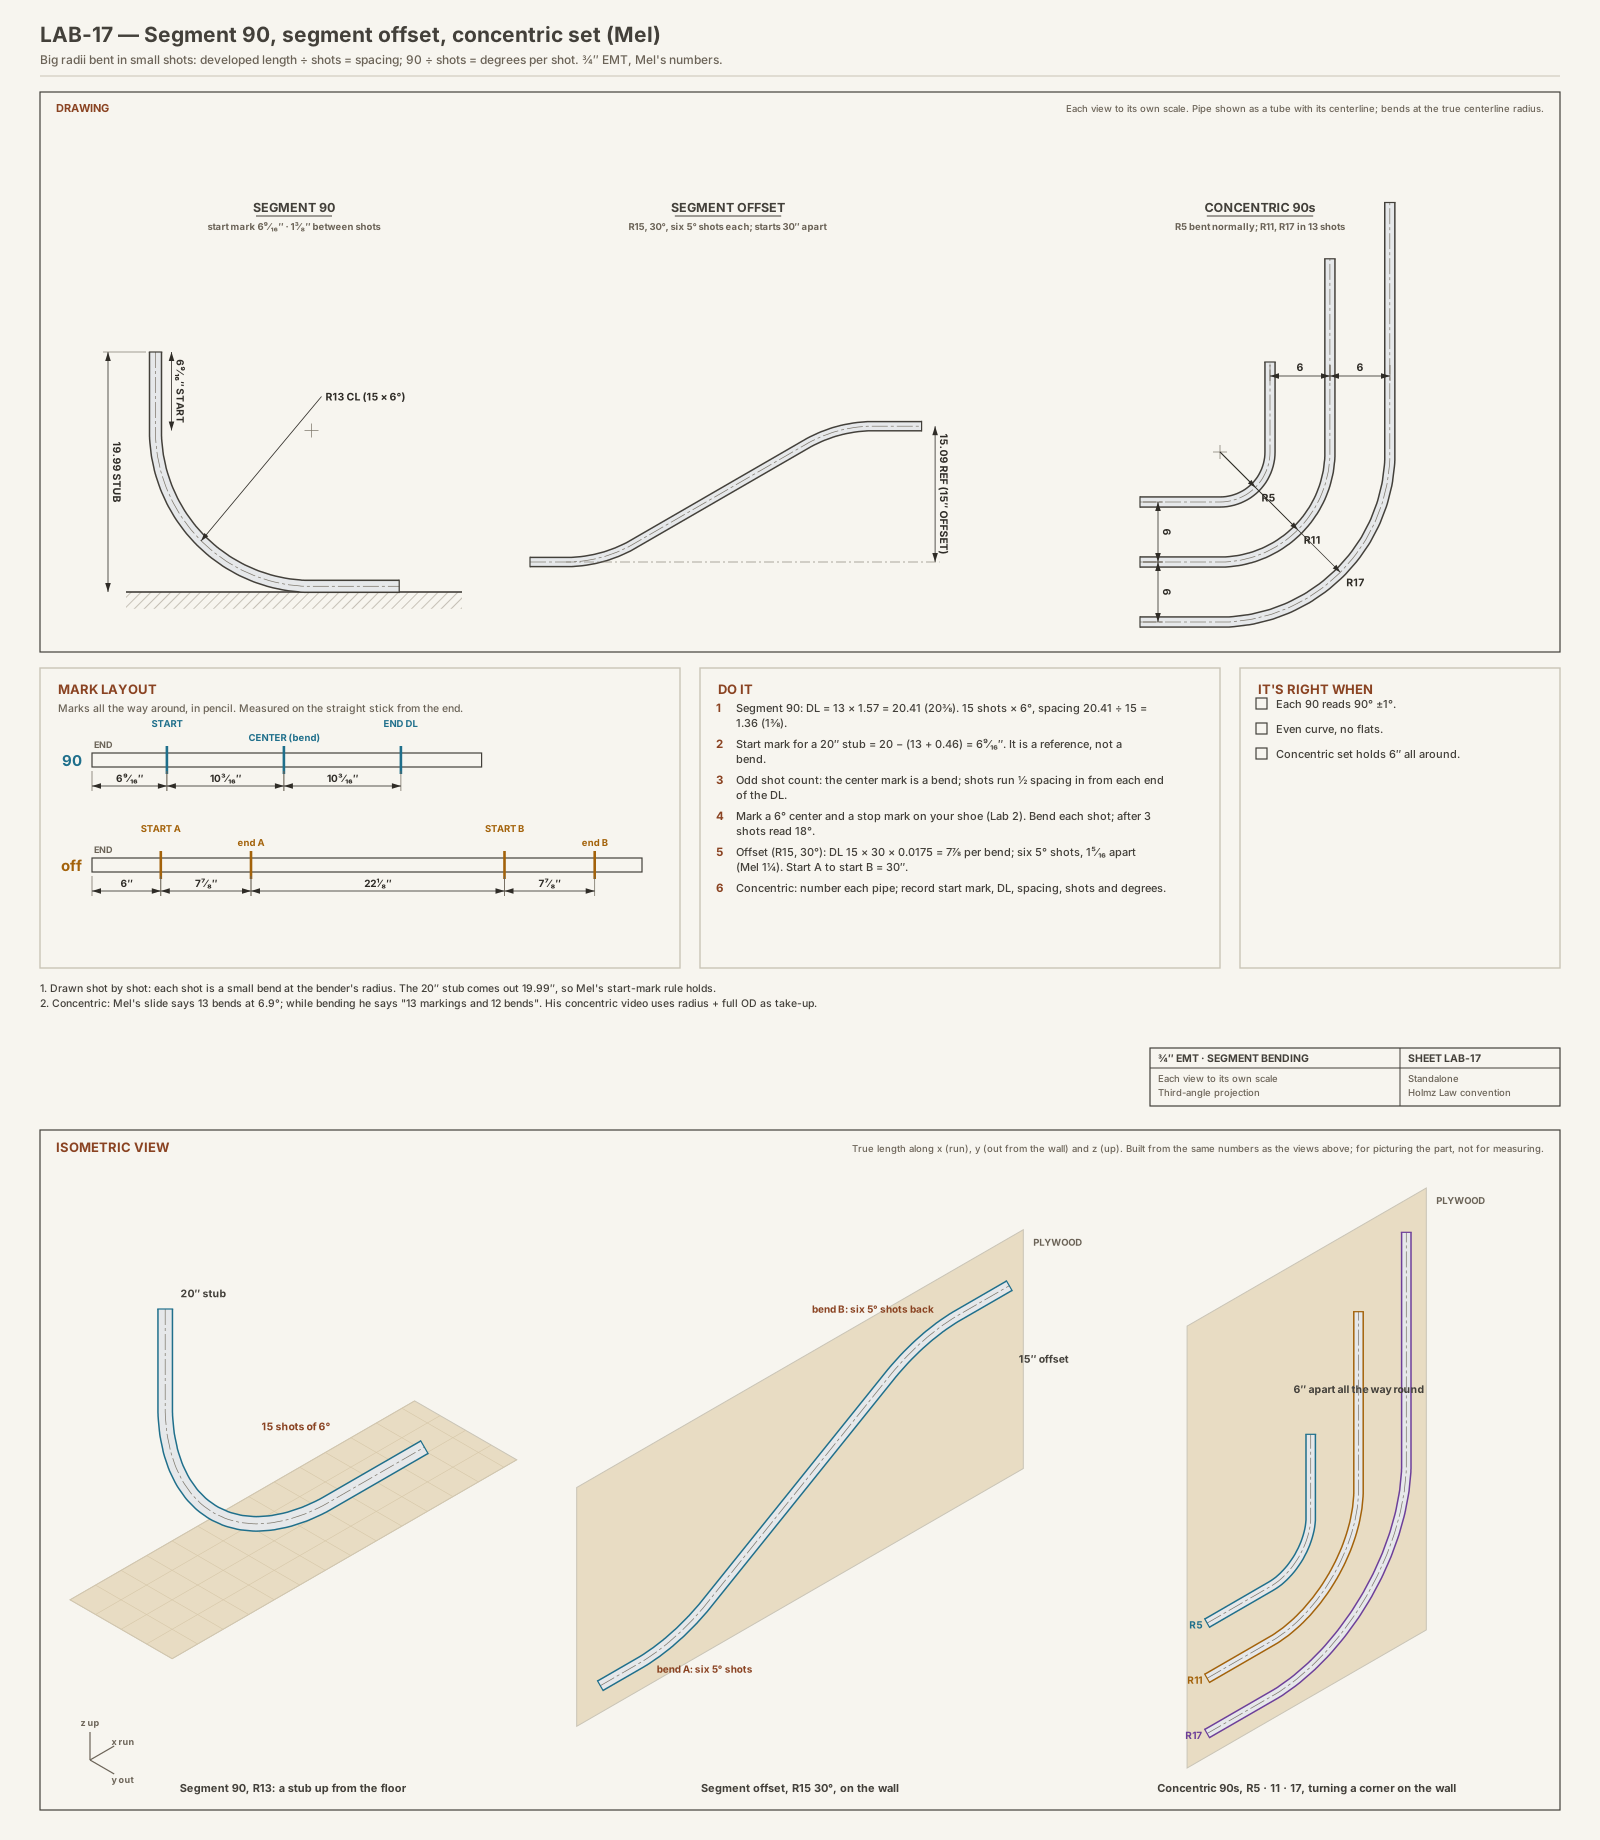
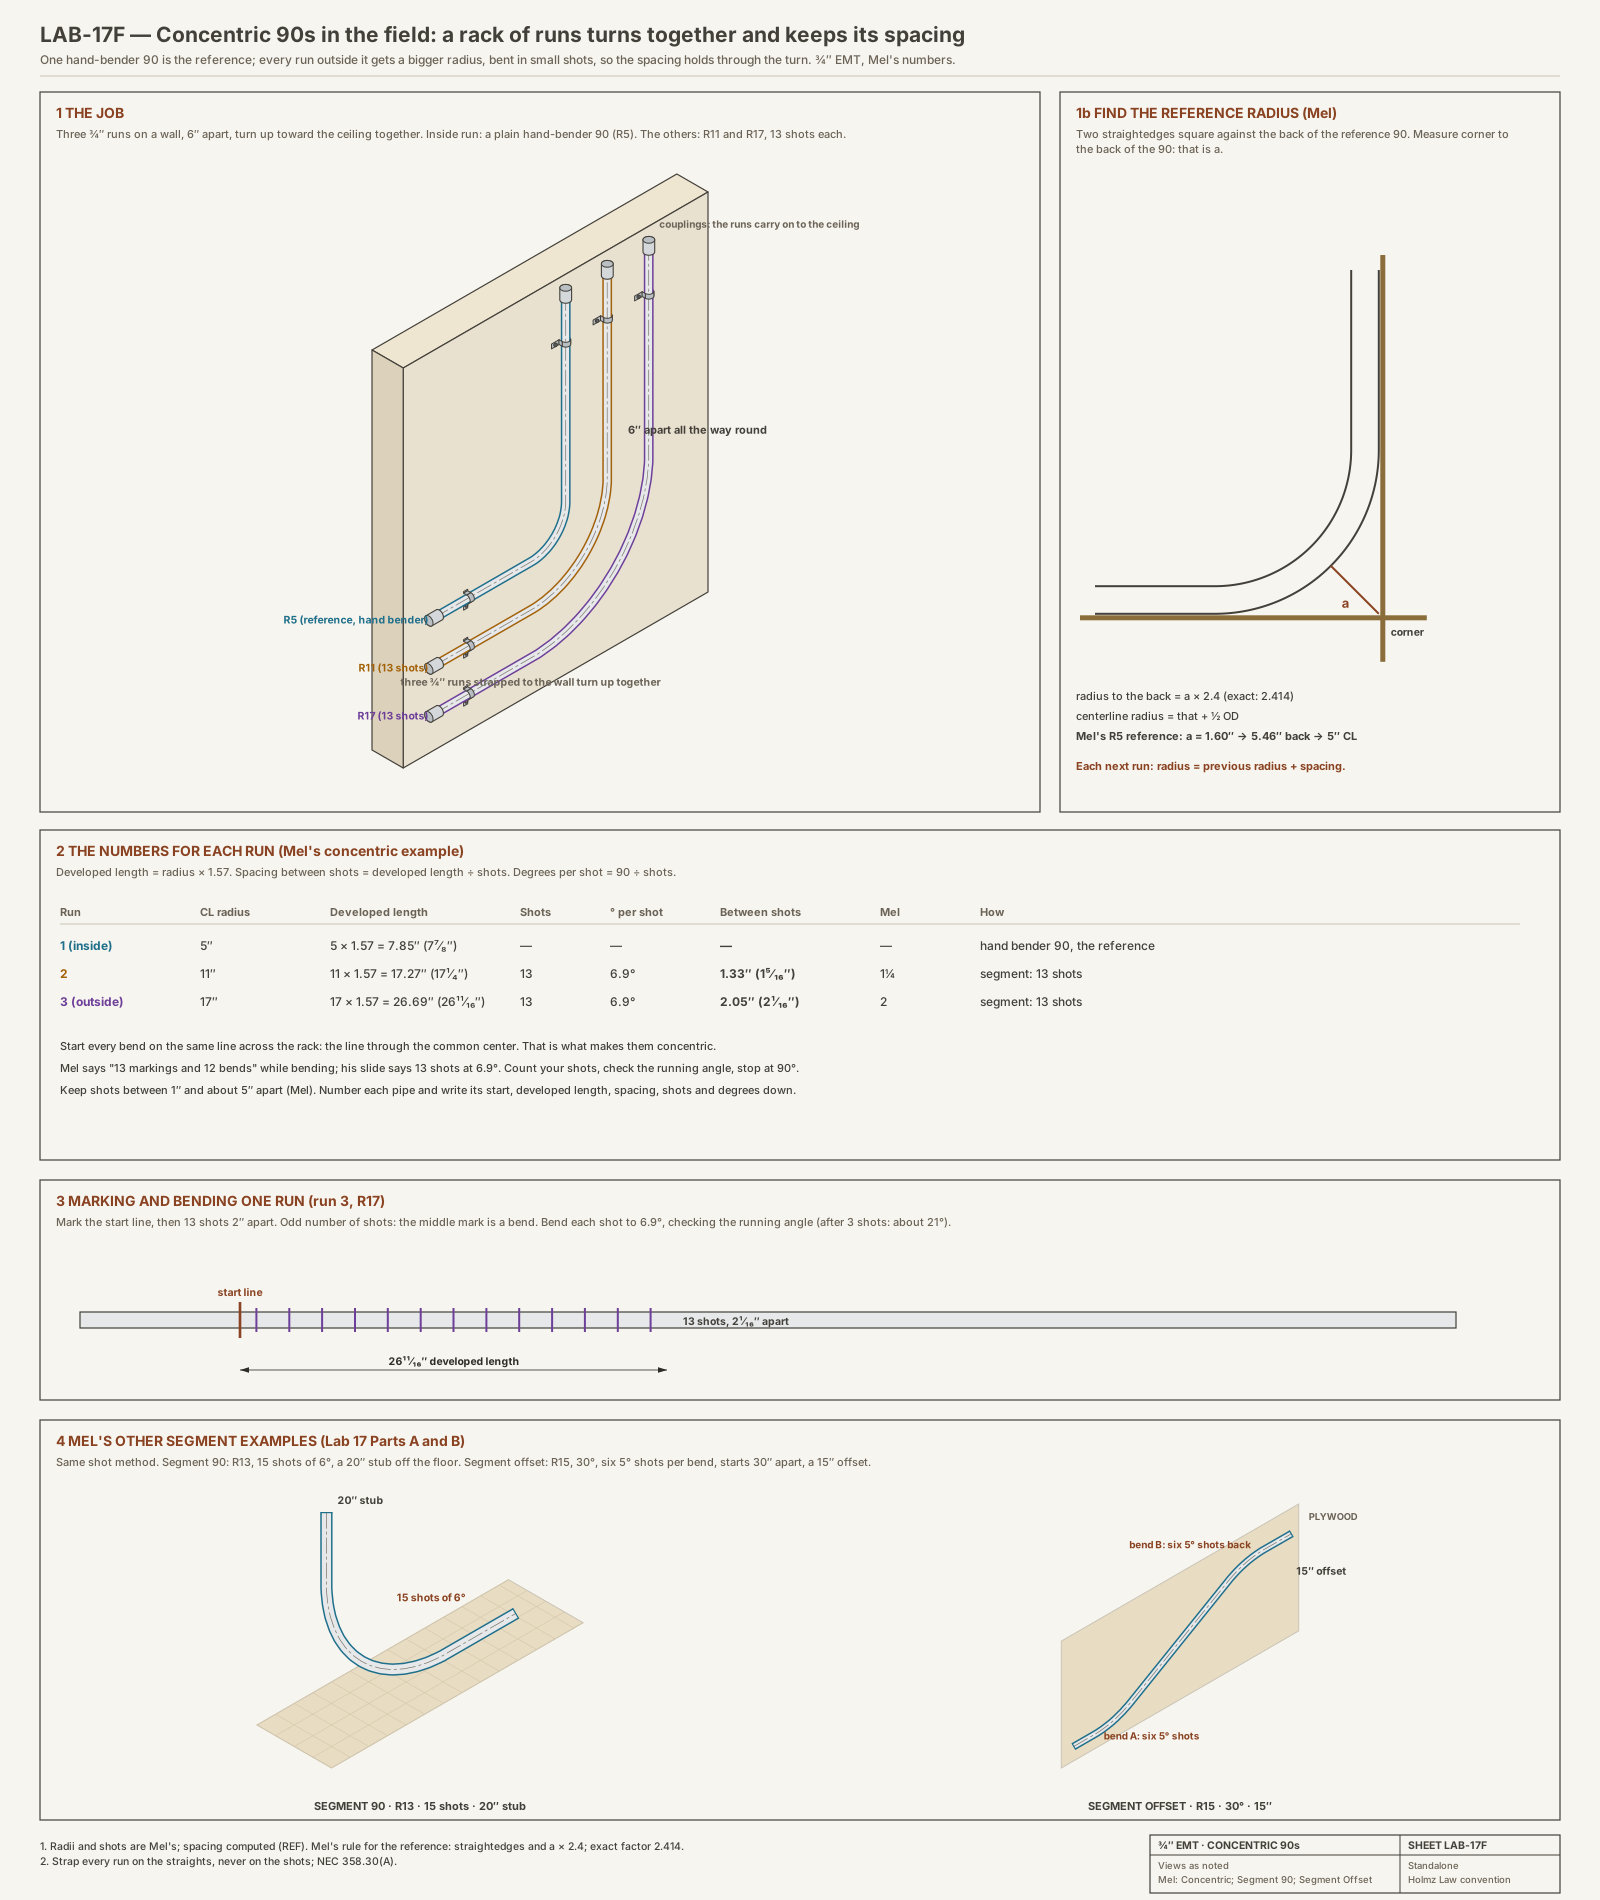
Part A · Segment 90 (Mel: 13" radius, 15 shots)
- DL = 13 × 1.57 = 20.41 (20 3/8). 15 shots × 6°; spacing 20.41 ÷ 15 = 1.36 (1 3/8).
- For a 20" stub on 3/4" EMT: start mark = 20 − (13 + 0.46) = 6 9/16.
- Odd number of shots: the center mark is a bend. Mark a 6° center and a stop mark on your shoe (Lab 2), bend each shot, check the running angle (after 3 shots: 18°).
Part B · Segment offset (Mel: 15" radius, 30°, 15" offset)
- DL per bend = 15 × 30 × 0.0175 = 7 7/8. Six shots of 5°; spacing 1.31 (1 5/16; Mel uses 1 1/4).
- Start of bend A to start of bend B = 15 × 2 = 30".
Part C · Concentric 90s (Mel: 5, 11, 17" radii, 6" apart)
- DL 11 × 1.57 = 17.27 (17 1/4); 17 × 1.57 = 26.69 (26 3/4). Thirteen shots at 6.9° (Mel's slide). While bending he says "13 markings and 12 bends"; the two don't agree, so count your shots, check the running angle, and stop at 90°.
- Spacing: 17.27 ÷ 13 = 1.33 (1 5/16; Mel uses 1 1/4); 26.69 ÷ 13 = 2.05 (2).
- Number each pipe and record start mark, DL, spacing, shots and degrees for each.
It's right when each 90 reads 90° ±1° with an even curve, and the concentric set holds its spacing all the way around.
Clips from Mel's videos
Each clip plays only the part of the video that matches the step.
Lab 18
Field calculations
Goal: three of Mel's everyday calculations.
Part A · Match an existing offset's angle (Mel's 13 3/4" and 18 1/2")
- Measure the existing offset's rise (13 3/4") and center to center between its bends (18 1/2"; find odd centers with two straightedges).
- Angle = sin⁻¹(rise ÷ center to center) = sin⁻¹(0.743) = 48°.
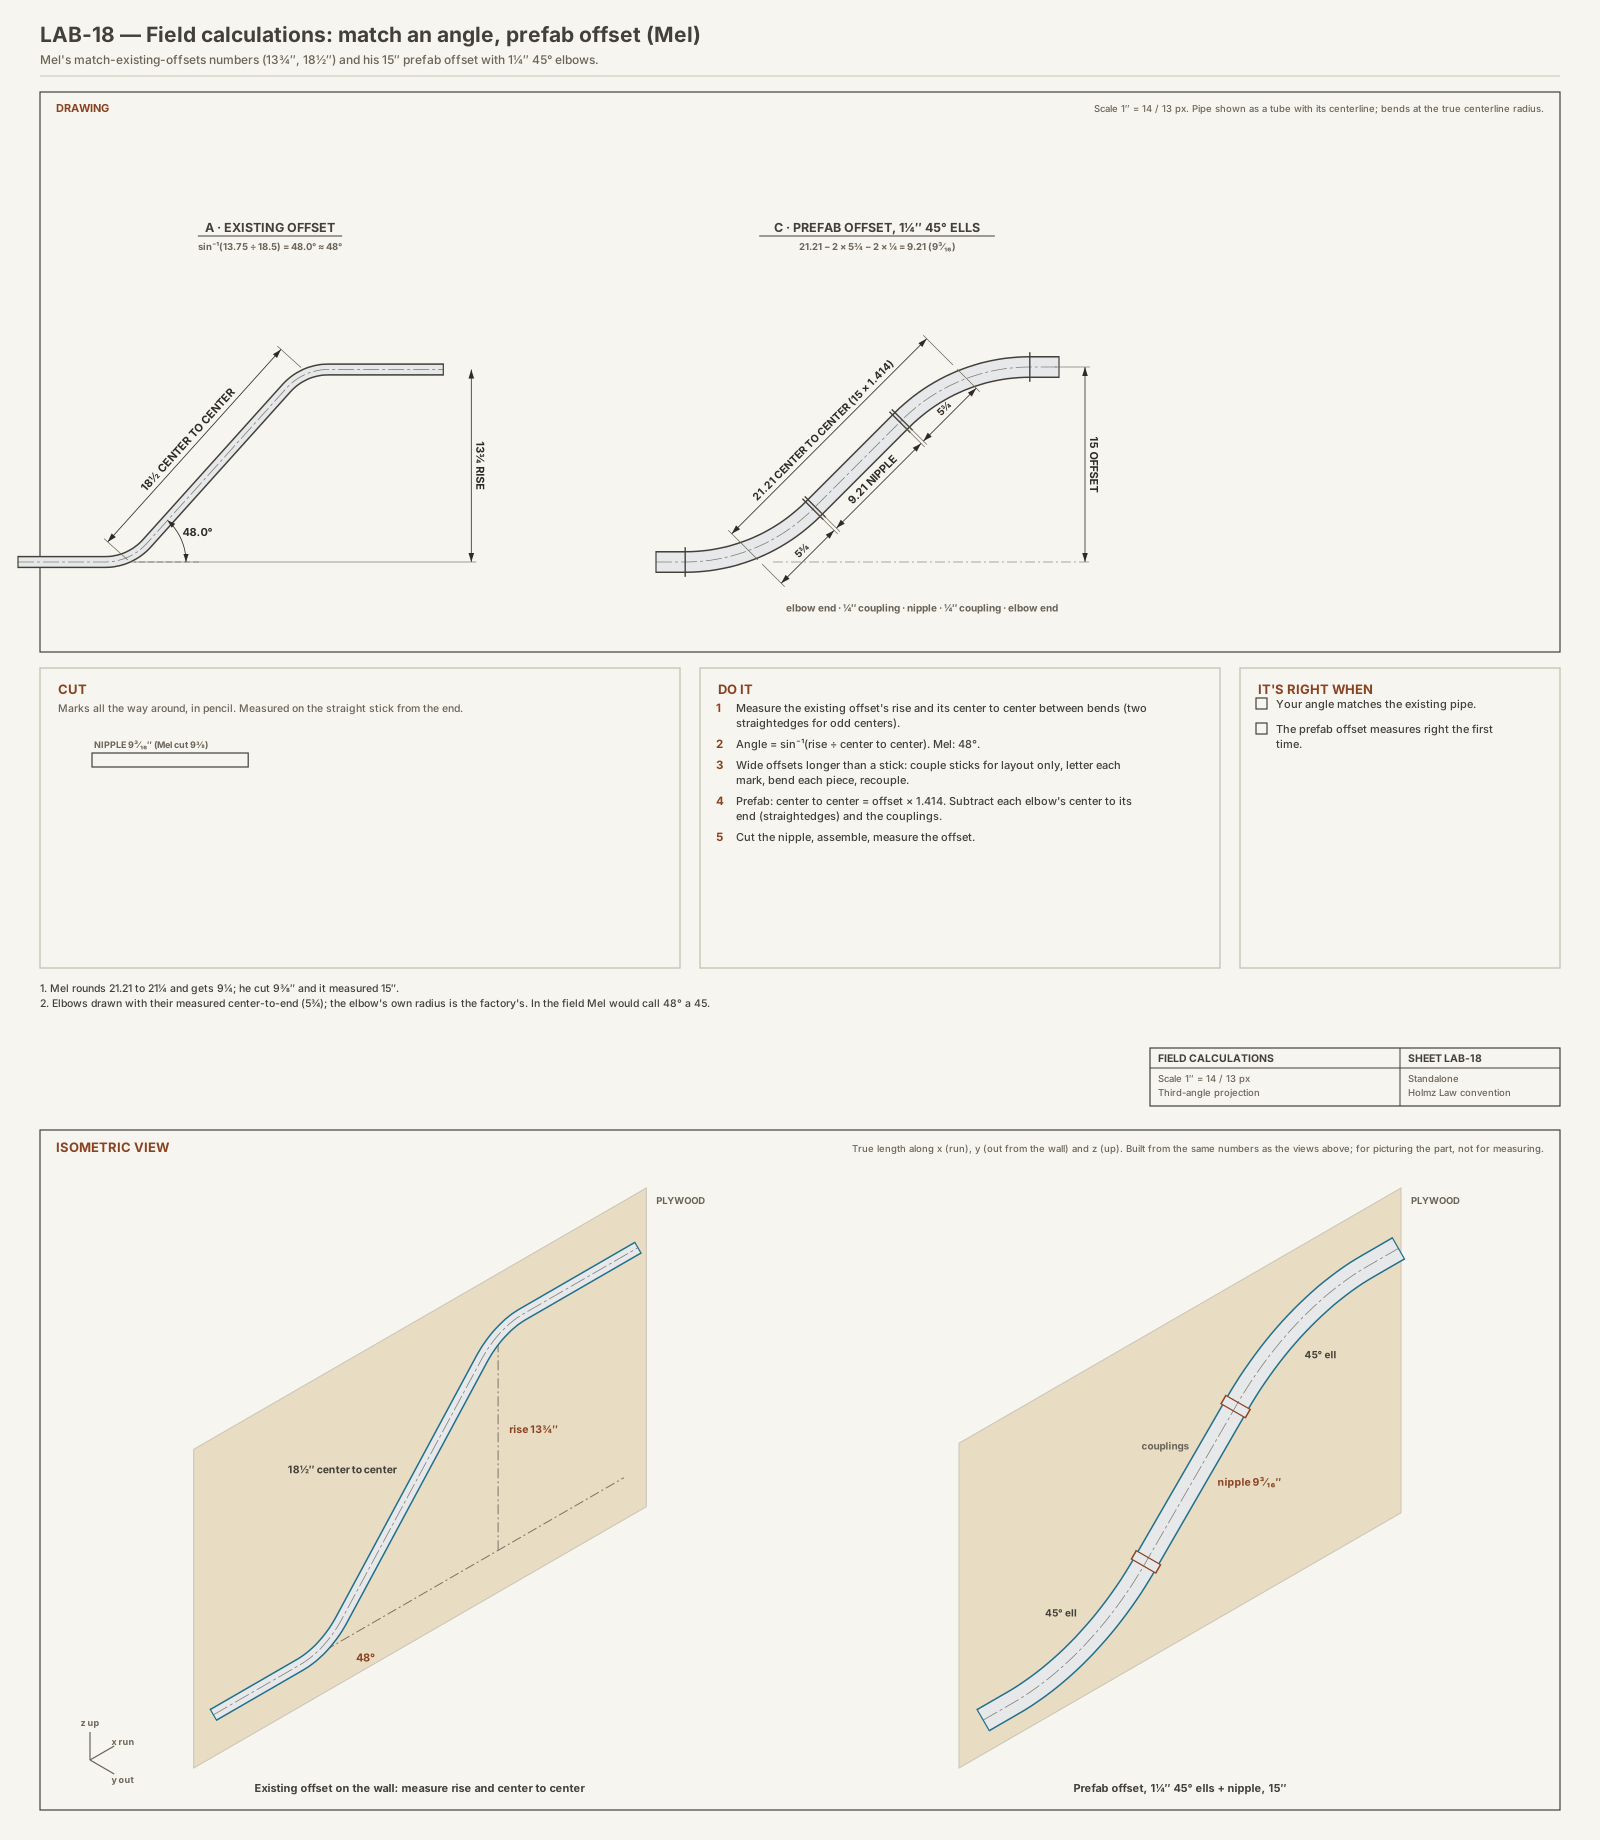
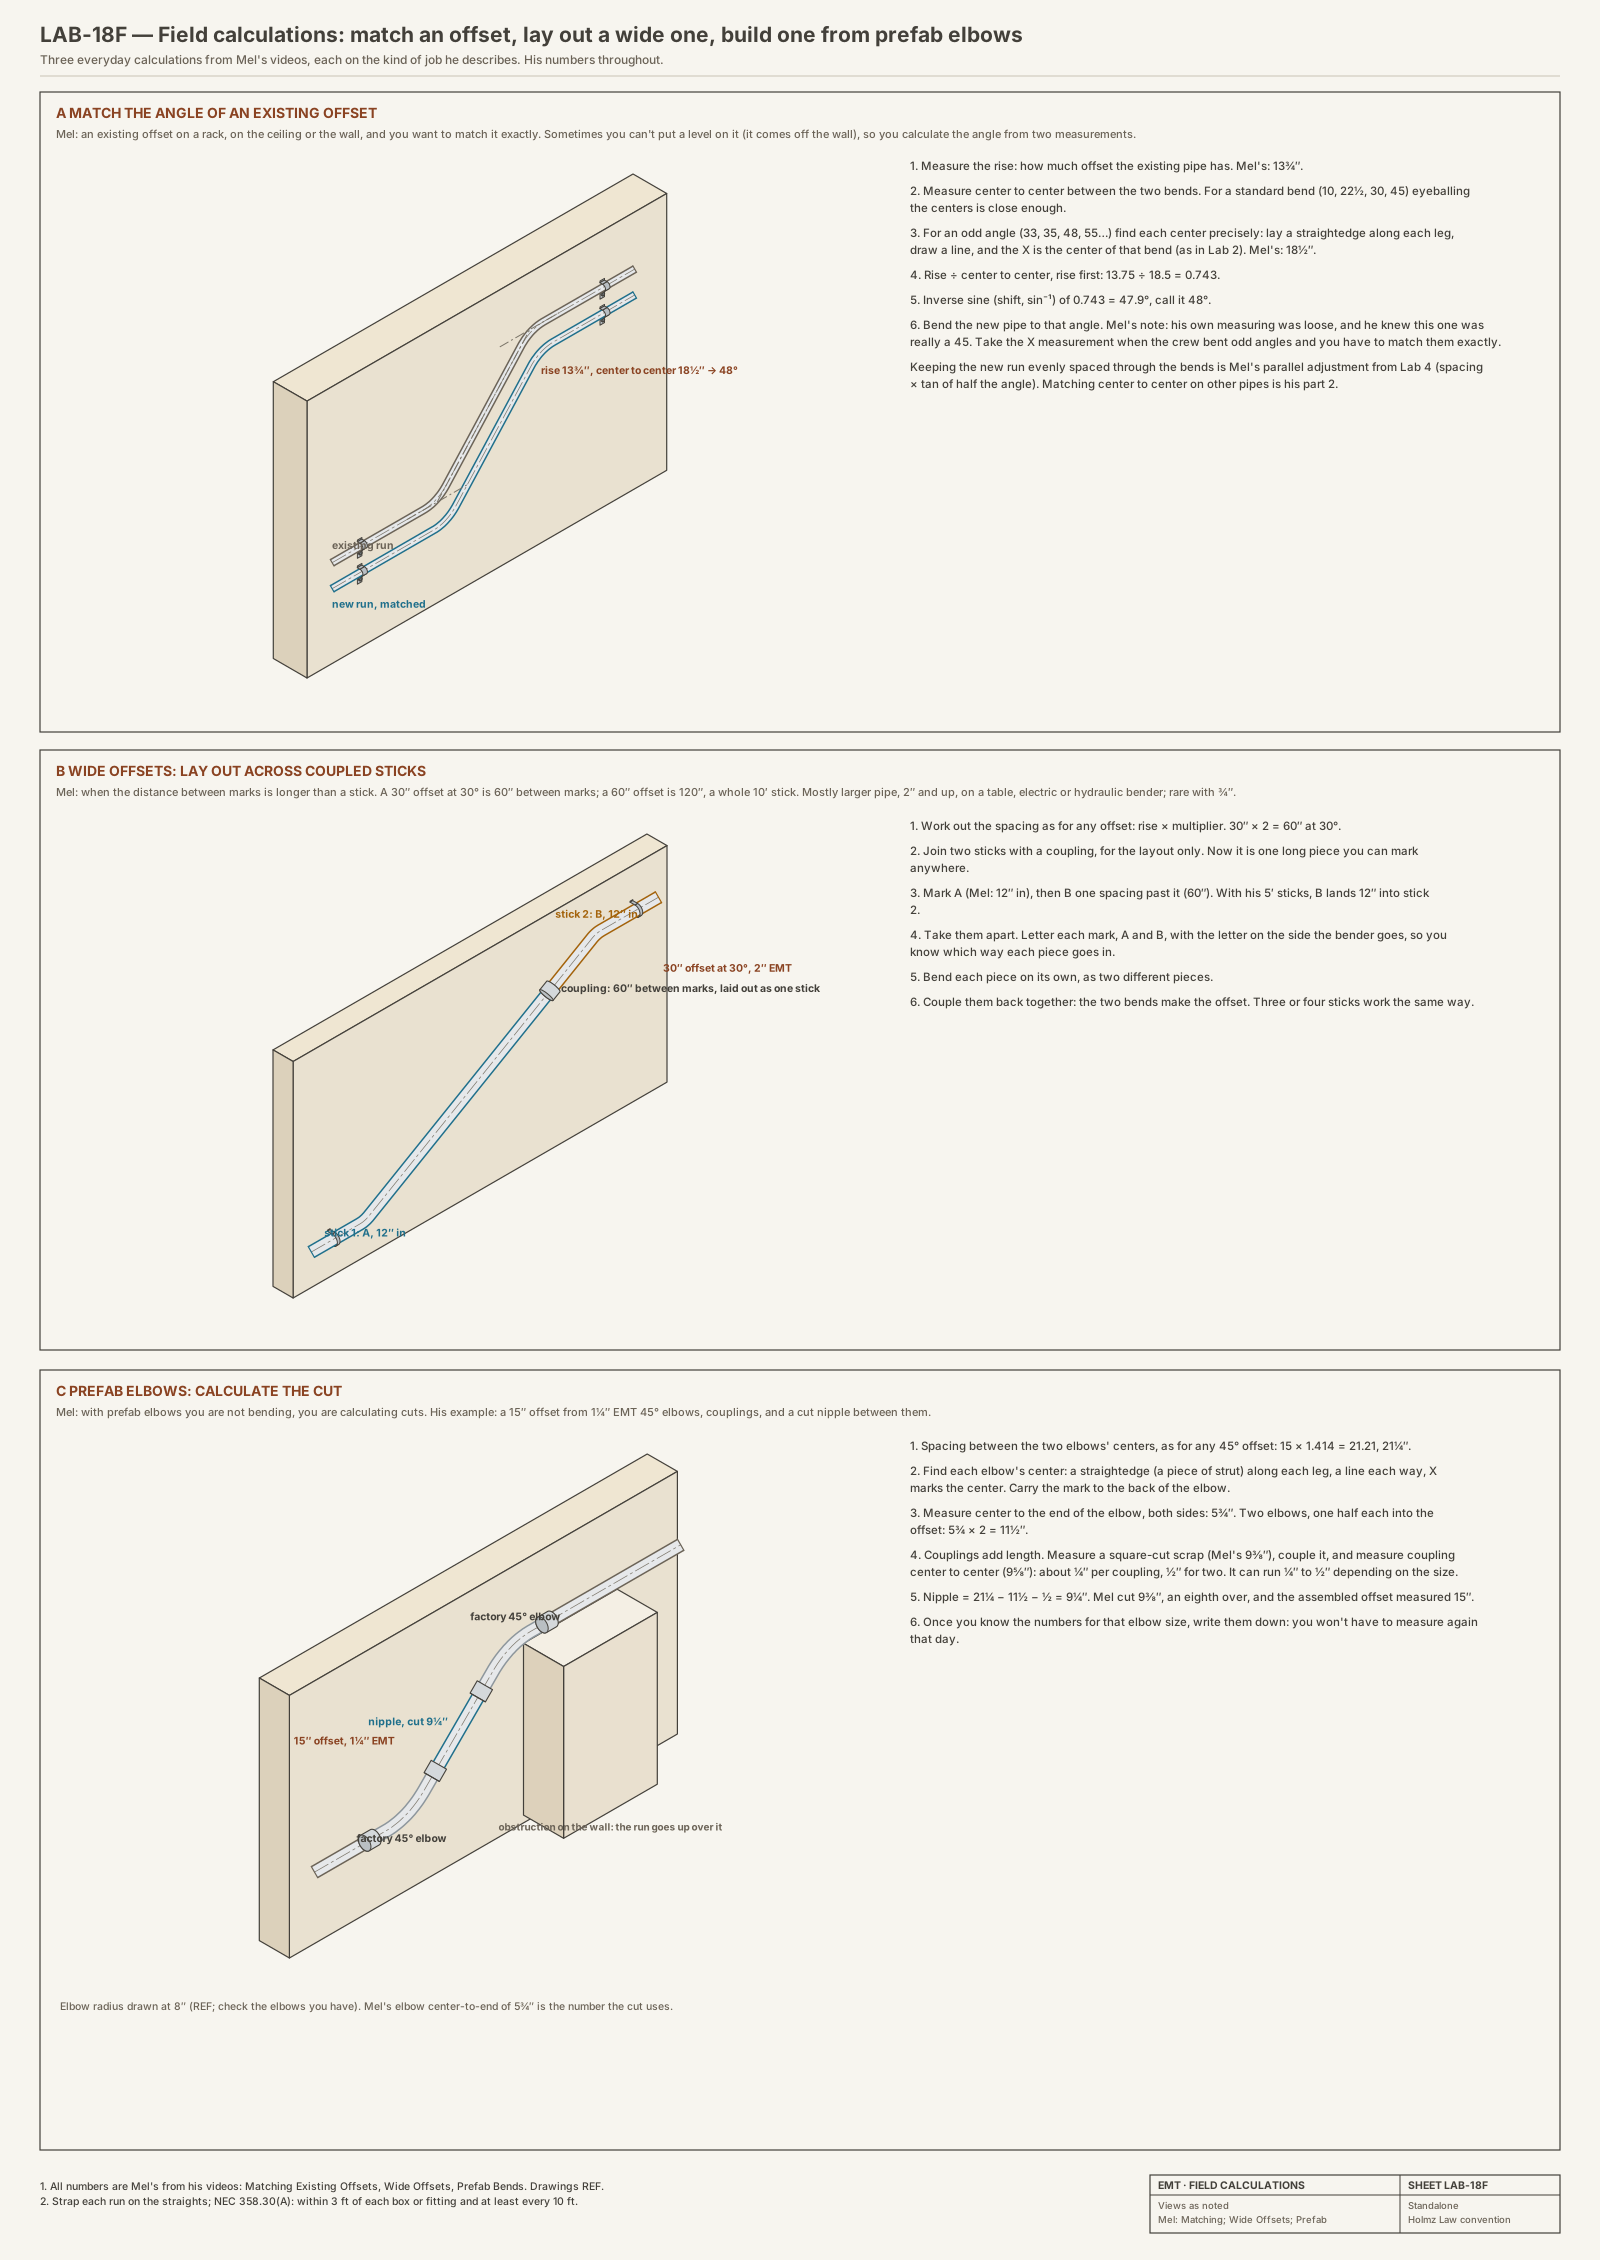
Part B · Wide offsets
- When the distance between marks is longer than a stick (Mel: a 30" rise at 30° = 60"; a 60" rise = 120"), couple sticks together for layout only, letter each mark on the side the bender goes, bend each piece separately, and recouple.
Part C · Prefab elbows (Mel: 15" offset with 1 1/4" 45s)
- Center to center = 15 × 1.414 = 21.21".
- Each elbow's center to its end (measured with straightedges): 5 3/4"; two elbows: 11 1/2".
- Couplings take about 1/4" each; two: 1/2".
- Nipple = 21.21 − 11.5 − 0.5 = 9.21" (9 3/16). Mel rounds 21.21 to 21 1/4 and gets 9 1/4"; he cut 9 3/8" and it measured 15".
It's right when your calculated angle matches the existing pipe, and your prefab offset measures right the first time.
Clips from Mel's videos
Each clip plays only the part of the video that matches the step.
Rev K parts, each on its own
Bench drills
Each sheet is an exact Rev K part, at the Rev K dimensions, laid out on any board from a level line H with only the two boxes (and obstacle) it needs. Build, check and sign off one section without the rest of the wall; the same pieces go into the full wall unchanged. The method for each bend type is in its lab (4 to 9).
Back of the book
Pocket cards
Print these, trim them and keep them on you. Your Lab 2 chart goes on the back of the card.